Showing posts with label Thank you. Show all posts
Wednesday, May 16, 2018
Lavender and Lace
Here's another for the Outlawz, this time Twisted Thursday where the optional "twist" is "Lavender and Lace". Used new layering dies again from Altenew. This one is Peony Dreams. Again I cut in white and colored with Copics because I really didn't have enough lavenders to layer. It was a bit fiddly to glue together, too but all in all, I'm pleased with it. Found lace in my stash I could thread with ribbon. It's actually crinkle ribbon from DL.Art (my fave). DP is K&Co and the sentiment is an old Cuttlebug die. I'm also happy that the purples ended up photographing pretty true. You know how difficult purples can be.
I'm also entering this in the DL.Art May Linky Challenge, Lil Patch of Crafty Friends #81 AG, Crafty Gals Corner #165 Add a Flower, and Let's Craft and Create AG/optional Lace, Ribbon, Twine.
Friday, February 9, 2018
A Quick 3-fer for the Outlawz
Didn't have time for coloring but did want to play with a pretty butterfly die from Memory Box I'd never used. Colors for the Outlawz Tuesday Color, one word sentiment for Twisted Thursday (Cuttlebug die) and Card with Ribbon for Festive Fridays (lavender crinkle from DL.Art). Paper from K&Co.
Monday, January 15, 2018
Anything Goes at Aurora Wings
It's a new year and a new challenge at Aurora Wings and we've returned to our roots as a monthly challenge blog beginning each 3rd Monday, but we'll keep you inspired with a mid challenge post as well. To ease in after our break, our theme this time is the easy peasy
It only took me about 3 tries to finally decide on the images, but I've been in a bit of a kitty mode and was excited to find the fun Ballerina Kitties 3-pack stamp set exclusively at AW.com. I used the Accordion Flip Album 3D die from Sizzix to make a thank you card featuring all 3 of the adorable Ballerina Kitties. Unfortunately the picture of the entire project was done in panorama mode with my camera and this was the largest I could post on my blog without it getting cut off. You can see a better picture of my project in it's entirety, as well as those of my Aurora Teamies on the Challenge Blog HERE, or click on the pic above to enlarge it.
I did, however, takes individual pictures of each kitty before assembling the accordion card. Each is colored with Copics and for once, I kept track of colors because I find the BV (and V ranges for that matter) can be rather difficult to use and photograph.
Although I've been "fluffing up" many of the kitties I've recently colored, these little beauties came out better for me with just some subtle shading. When I tried adding too much texture, it looked a bit more like razor stubble, not the least bit fitting for these girly girls.
Bodies: BV0000,000,01
Cheeks and nose: V000
Inside ear and slippers: RV91,93,95
Tuts and floral wreaths: V0000,000,01,12
Flowers on tutus: same as bodies
As you can see, the palette is somewhat limited, but I've found that the Violets, and Blue Violets especially, are often affected by the colors around them in photographs. That's why I actually colored the die cut "Thank you" (Cuttlebug die) with the BV000 I'd used earlier instead of trying to find a colored card stock to match. In fact, I've found it often helps when choosing design paper to snap a quick pic just to see how the colors (especially purples) photograph together before deciding. Although it really doesn't matter if you're not planning on posting your project online, it saves a lot of time and frustration with photo editing if you know in advance how the colors work together in front of the camera. Haven't we all been there?
The die cuts behind the kitties are cut with the Spellbinders Scalloped Labels One die using DP from a old MAMBI pad. The swirls made me think of the beauty and excitement of the ballet and I've added some texture with my Swiss Dots embossing folder to the solid iridescent pink I've added to the frames.
The corner bouquets include large roses from Kaisercraft as well as small ones I've dyed to match the purples of the kitties using the BV01 reinker and a fair amount of rubbing alcohol to soften the color. They are tied together with tulle to further the ballet reference.
I hope you'll check out the fabulous inspiration from my Aurora teamies and Guest designers and come join our first challenge of 2018.
Here's how to keep up with all that's happening at Aurora Wings.
Aurora Wings Challenge Blog (New challenge through Feb. 17th)
I'm entering this in the SUYP #26 January Furrything Goes/Meuw Year Challenge, the DL.Art Thankful Thursday Winter or Thank you challenge, the DL.Art January Linky Challenge, Lil Patch of Crafty Friends #73, Simon Says Wednesday Use Patterned Paper, the Colour Crazy Challenge Week 1, TTRCD Week of Jan 9th AG, the Outlawz Twisted Thursday AG, 2 Crafty Critter Crazies Jan. AG/w critter (5/5), Colour Crazy Week 1 AG, Crafty Animals #10 AG, the Corrosive Challenge AG, ...
Sunday, August 6, 2017
All Brights CAS for The Outlawz
As a winner of a previous challenge, I'm guesting for Sunday CAS on the Outlawz Forum. Our mission was to use only bright colors. I checked my stash and found some forgotten papers from DCWV that definitely fit the bill. Although I actually planned to use some new dies and a die cut background, I thought I was pushing the CAS theme a bit too far and started subtracting until I came up with this. The die cut sentiment here is from an old Cuttlebug set. Pretty simple and quick, but that's the point.
I'm also adding this to the DL.Art Thankful Thursday (Birthday or Thank you), Lil Patch of Crafty Friends #63 AG, CAS on Friday Exotic, Little C's Aloha Friday Yellow Flowers...
Monday, October 20, 2014
Aurora Wings Heartfelt Thanks
I stepped outside my comfort zone and decided to tackle coloring fur. Normally I either flock it or sort of blend the colors without much texture, but thought this squirrel deserved better. This free tutorial on Deviant Art was quite helpful. Although it focuses on digital coloring, the general techniques still apply, like the under painting and making sure you follow the direction of the fur when filling in the fine individual hair details. I used a combination of Copics and Prismacolor pencils and am pretty pleased for a first attempt.
Acorn Sprite was also colored with Copics, fussy cut and popped atop the frame. I flipped him in my Printmaster program so he'd be facing the squirrel. Aren't they just darling?
The frames were cut with my Spellbinders Grand Labels Four and popped from the card base. The sentiment was computer generated and the gold accents are stickers by Starform and Stampendous. My AW DT sisters have done exquisite work, as always, so please visit the Challenge Blog for amazing inspiration. Our winners for "A Touch of Darkness" are posted below and there's still time to enter our Special "All Gored Up" challenge which runs through October 31st. Be sure to read the rules on this one. We're looking to be terrified! For the more timid, we also have the Colors of Halloween Contest, also running through October 31st on the Stamps by Aurora Wings FB Group.
I'm entering this in Paper Pretties Friendship, Art by Miran ATG, A Gem of a Challenge Create a Scene, Aud Sentiments ATG w/a Sentiment, Great Impressions October Autumnal Elegance, Word Art Wednesdays ATG w/ ODBD, Crafting Musketeers October Autumn Colors, Simon Says Monday ATG and My Sheri Crafts Autumn Abundance.
Monday, June 16, 2014
Aurora Wings No Lines or Color Bingo
Our new Challenge begins today at Aurora Wings and this time you have a choice of No Lines or Color Bingo.
I've used the Sizzix Accordian Flip Album die for my card and each panel holds a different Sprite. Each is colored with Copics and mounted on a DP mat cut with my Spellbinder's Labels One. Here's Strawberry Sprite.
And Blueberry Sprite. I thought the combo of gingham and bandana patternes looked just like a summer picnic. The sentiment was done with Alpha Beads.
And finally the adorable Raspberry Sprite. Aren't they the sweetest EVER?! All 3 are also available in Mitzi's Digital Stamp Shop on her AW website HERE, as well. The Lattice corners and side embellies were also Spellbinders. So let's hear it for the Red, White and Blue! Be sure to stop by Aurora Wings Challenge Blog to see the fabulous creations by my DT sisters. You'll be so totally impressed. And please come play along, with either the No Lines, Color Bingo or BOTH, if you dare.
Also, don't forget our Showcase Blog where we feature new releases as well as gorgeous creations by fans of Aurora Wings. You can have your projects considered for a Showcase by Posting them HERE on the Stamps by Aurora Wings FB Group or read more about it HERE. You'll receive a special Blog Badge and a digi stamp of your choice (up to $4.00 value) if you're chosen. Our current Clean and Simple FB Contest is running through June 30th, as well. Lots of prizes all over the place.
I'm entering this in the Open Minded Crafting Things with Wings Challenge, Dragonfly Dreams Anything with Wings, Crafts and Me Add Wings, Simon Says Monday ATG, Stamp and Create June Thank You Challenge and the Live & Love Crafts Summer Garden Challenge.
Sunday, November 17, 2013
Outlawz CAS Sunday
I'm enjoying my month long Guest DT spot on the Outlawz Challenges CAS Sunday and this week our theme is "Give Thanks". I chose a kraft card stock and autumn hues of my letter jumble card featuring a die cut from the Cuttlebug With Gratitude set. I actually cut "Thanks" out twice in yellow and twice in orange and used my Copics to change the shades. I designed the card in my Printmaster Pro program to print the border and position the word "many". This one I printed in brown, but I can easily change the color and thought it might be fun to do a set using colors of the 4 seasons. What do you think?
I'm also entering this in the Country View Crafts 'Letters' challenge, Mema's Crafts November ATG Challenge with Optional "Thanks" in the Sentiment, Simon Says Wednesday Thanks/Thanksgiving and Creative Moments ATG/CAS.
Friday, November 8, 2013
Dilly Beans Thanks Challenge
Happy Friday! It's time for another Dilly Beans Challenge and what better theme this November than "Thanks"? My card was inspired by my dear DT sister Jenn, truly an angel and fabulous friend. I've used the adorable #512 Bless You Penelope Framed. I colored her with Copics and paper pieced her dress. Penelope has little fairy wings, but I've added die cut, embossed and glittered wings from the Cuttlebug Vintage Collage Emboss Plus folder (big angel wings, like she deserves) and used my craft knife to carefully cut around the image and slide them in place. Of course I added hearts, because hers is huge, and a banner sentiment. Jenn has touched the lives of so many and it's a privilege to call her my friend. I'm so excited that we will finally be meeting in person for the first time this Sunday, before she moves back East. Sniff, sniff!
Stay tuned for pix.
Monday, September 17, 2012
BBTB2 Things that Fly in Nature
Happy Monday! It's time for another challenge at BBTB2. This week my dear friend and fabulous artist, Sandi Kelly has chosen the theme "things that fly in nature". In our garden, my favorite winged things are the gorgeous red dragonflies that flit here and there so I found a beautiful one on the Home Decor cartridge.
It's a shaped card welded in DS using the shadows of the dragonfly with clusters of flowers and the single bloom behind. The flowers and dragonfy body were cut in white and then colored with Copics. The dragonfly wings are red vellum.
In some cases I needed to do a bit of hand trimming to get the layers I wanted for dimension. Then I added punched flower centers and some embossing or doodling for interest. The dragonfly flies above on a spring from an old ballpoint pen that had dried up. (WooHoo! Recycling!)
The inside flower is cut from DP by K&Co. The sentiment was Cut with my Cuttlebug Cardmaking Combo. It's a fairly small card (the cuts are at 3 3/4") but hopefully it conveys a big message. I want to say thank you to my dear DT sisters who are moving on this week. Your friendship and creativity has meant the world to me over the years. Best of luck in everything you do and big hugs! xx
Now please take a look at the fabulous inspiration at BBTB2 and come play along.
Monday, November 7, 2011
BBTB2 Heritage Fancy Corner Challenge
It's Monday and time for another BBTB2 challenge. This week our fabulous fearless leader (and new Grandma!) 
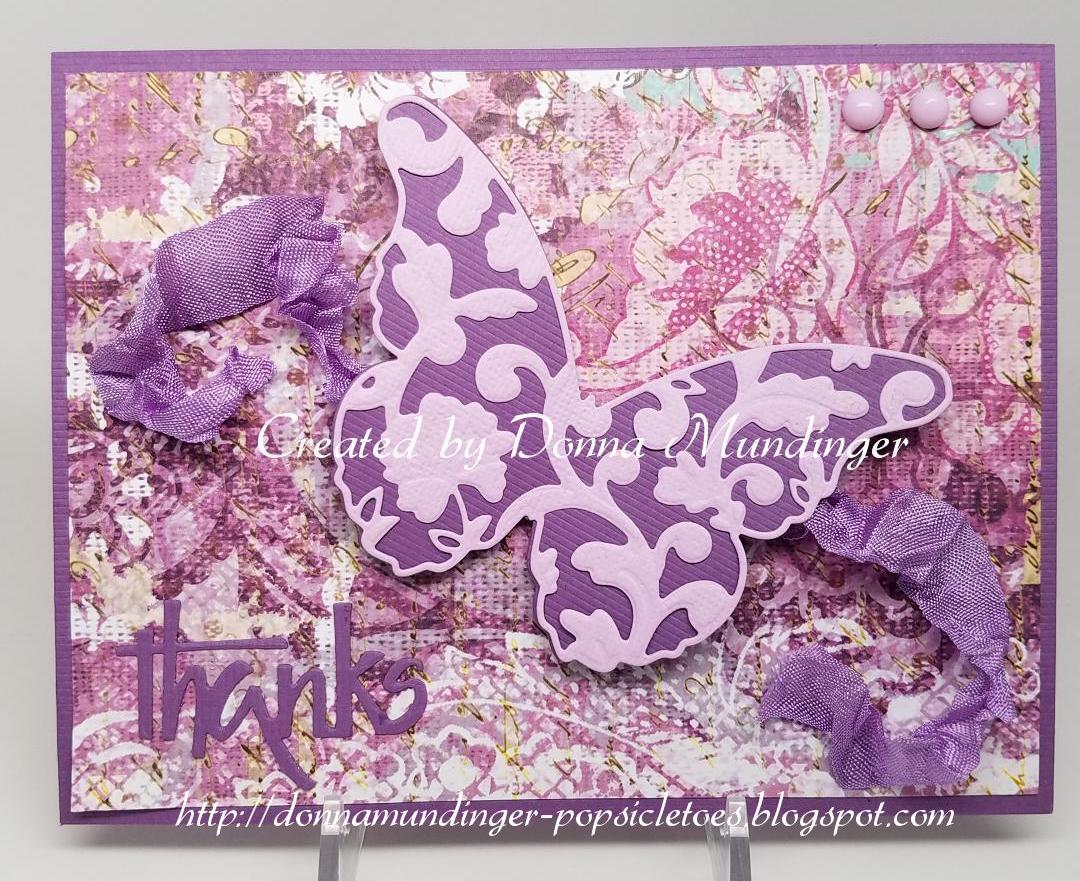
Heather chose the decorative corner (Accent9) from the Heritage cartridge on page 62 of the manual. Because I couldn't come up with anything more creative, I decided to make a little you note card by welding 2 of the corners to the Marquee from Storybook for the front. Speaking of Storybook, it is a fabulous source of other fancy corners if you don't happen to have Heritage. The gorgeous monogram is from the new(ish) Art Nouveau cartridge. The top Marquee is embossed with the Cuttlebug Birds and Swirls folder that I thought looked lovely with the corners.
This is also a shaped front card, but because the corners were delicate (and I chose not to use the shadow on them for an more filigree look) I backed it with acetate. For that reason, when welding, I made the back of my card base 4 1/2" inches rather than the standard 4 1/4" (but I still scored at 4 1/4") so I would have an extra 1/4" to attach my acetate to. It is attached only at the top from the inside. I added a tiny decorative strip and beads on the front to embellish. There was no need to attach the rest of the front because it was heavy enough with the layers and popping to lie flat without and gave me the option of not having to add anything further to the back side of the acetate to hide the adhesive.
However, when I got around to the inside and realized just how limited the writing space actually was, I added another Marquee shape to the acetate with a computer generated sentiment, directly behind the one on the front. The tiny cream strip at the fold hides the adhesive where the acetate is attached but I didn't add the beads so it would lay flat. The dotted paper is from the DCWV La Creme stack and the matte metallic is from Recollections. Now, if you haven't already, please scroll down to see if you're the winner of either the BBTB2 or Dia De Los Muertos Blog Hops. I'd hate to see the prizes go to waste. And check out the creations by the rest of the BBTB2 team and put your thinking caps on. We'd love to see what you come up with for this challenge. Remember, you have 2 weeks to complete it, new creations only, and please link it back to BBTB2 so others have a chance to play along.
Saturday, July 16, 2011
A Day For Daisies CDAC 300 Member Party
Just a quickie this morning because I just couldn't pass up the freebies for the 300 Member Party for A Day For Daisies on CDAC. I adore the ADFD images and subscribe to their newsletter, visit their blog and have purchased a number of their digi stamps. Tammy has such a sweet and unique style and I thank my friend Lisa, who does fabulous work on their DT, for introducing them to me. I can't believe this is the first time I've done a challenge cardfor ADFD. Not enough hours in the day! I've used the Happy Birthday Tower and filled in the tags and added a sentiment with my Printmaster Pro program. At first I printed it with "yummy" on the tags, but then thought it would make a cute thank you card too. (Although I guess with this sentiment it could really be used for anything.) I've colored it with Copics and used a silver gel pen for the cupcake stand. The DP is from the Lemonade 6x6 pad by Basic Grey. Now I better get back to my DT stuff, but I sure hope you have a chance to check out the fun at the ADFD party.
Monday, May 9, 2011
BBTB2 Simply Charmed Strawberry Challenge
Happy Monday! Hope everyone enjoyed their Mother's Day yesterday. Now it's time for another fab challenge at BBTB2. In honor of National Strawberry Month, our sweet and fabulously talented Jeri chose the strawberry from the Simply Charmed cartridge, although those of you who don't have it, may choose a strawberry from any cart. The little strawberry looked mighty lonesome all by itself, so I added a leaf from Cake Basics and a flower from Walk in My Garden. The "berry sweet" sentiment was also from Simply Charmed and I chose Mickey Font to add "so". All of this was welded in DS to a doily, also from Cake Basics. (Might as well use that cart for something since I've never even taken the machine out of the box. LOL) "Of You" was trimmed from a sentiment from a Cuttlebug Card-Making combo and added to fill up the space at the bottom of the doily.
Yeah, it's another shaped front card. I seem to be in a rut. Sorry about that. At least I managed to do the strawberry in pink to spare you another red, black, green and white card.
So there's a little embossing, a little dimension and a few beads and a button to embellish and that's it. But there is LOADS of fabulous inspiration by the rest of the team this week so be sure to check out BBTB2.
Monday, March 7, 2011
BBTB2 Boys Will Be Boys Ladybug Cut
It's time for another BBTB2 challenge and this week it's chosen by our dear leader, Heather. Her choice is the ladybug from the Boys Will Be Boys Cartridge or any ladybug from any cartridge. Good thing, since I don't have BWBB, but it was a tough decision to choose which other ladybug to use. One of my fave project of all time is the card I did from Doodlecharms which you can view HERE on the Custom Crops site and has a free .cut file available. And speaking of .cut files, I so appreciate you all liking my designs enough to ask, but when I design in DS my files are such a mess and changed so frequently that it would take me hours to clean them up for public consumption. They often also require an explanation and unfortunately I haven't the time to do that and therefor don't send them out. I'm really sorry, but thanks for asking. 
So anyway, after checking out CricutSearch.com to check out all of the possibilities, I finally decided on the ladybug on the leaf from Live Simply and realized I didn't have that cartridge either. A short trip to WalMart remedied that and I set about designing. It is a combo of the ladybug and leaf plus the leaves from the flower that is last row, 3rd cut from the left on the keypad welded together and that shaped front welded to the last flower on the cart for the back. (BTW, I had to make a shadow for that flower in DS, no shadows on this cart...grrr) I sized those extra leaves separately so I had to hide contours of the second leaf in each case to get the final design. Make sense? Okay, maybe TMI. Does anybody really read this, or care? I do tend to ramble... In some cases I had to do a bit of hand trimming for the layers which was kind of a PITA but I didn't want to sacrifice dimension if I could help it.
With the card open you can see the shaped front and the Alpha Bead sentiment that was glued to be visible when the card is closed as well. Just a little embossing with Swiss Dots on the ladybug and Polka Dots (in sections, even though it's a 5x7 folder) for the inside flower. Dots and plaids are DCWV Nana's Nursery. Hope you like. My DT sisters knocked it out of the park this week (well, as always) so be sure to stop by BBTB2, and remember, although are challenges are weekly, YOU have 2 weeks to complete them and be eligible for our much sought after blinkie.
Tuesday, January 25, 2011
The Cuttlebug Spot Be Inspired Challenge
If you've been following The Cuttlebug Spot this month, you 've noticed each challenge was to "Be Inspired". This week is no exception, with the inspiration being a magazine ad. With all this crafting going on, I've let most of my mags expire but I did find a copy of Architectural Digest which saved the day. (Not much goin' on in BonApetit, I must say). My interpretation is a bit feeble, but I did manage the colors (sort of) and was able to use another of my Cuttlebug Emboss Plus folders called Perfect Perennials. I cut using kraft card stock and went over the embossing with my Copics. Behind the cut out I used Birds and Swirls. The butterfly is an MS punch and the "Thank you" is from the With Gratitude Card Making Combo. I added a few Prima flowers and some adhesive beads and that was it. Pretty simple. Now go have a look at the creative designs by my teamies. We hope you'll be inspired to play along.
Monday, January 10, 2011
BBTB2 Lyrical Letters Hummingbird Challenge
Yikes, I'm still running WAY behind. We're finally back from break at BBTB2 and this week's Hummingbird Challenge was chosen by our sweet DT Sister Karen. One of the reasons I love BBTB2 challenges is that I often find cuts I never knew existed on the various carts and this was no exception. I looked for flowers for my hummingbird and chose another cartridge I'd never used, the Lite Cart Botanicals.
I chose one of the card cuts and then used Design Studio to elongate the card and weld the hummingbird off the other side so it would fold in to the flower. The light green mat is embossed with the Cuttlebug Bird and Swirls folder, the flower itself, with Swiss Dots. In some ways this looks more like one of my Cuttlebug Spot cards, but the hummingbird had no shadow so it lended itself to a more simple design. However I'm noticing now that the embossing just barely shows up in the pix. What's up with that?
There isn't alot of space for a sentiment with this style of card and I was originally going to do a sympathy card, but I found both the "So Kind" and "Thank You" on the Cuttlebug With Gratitude Cardmaking Combo and they fit so that's what I went with. All that was left were adhesive pearls and a ribbon to complete the embellies. (Big surprise! LOL) Now pop by BBTB2 to see the marvelously creative ways the rest of the team used the hummingbird cut and remember, if you don't have Lyrical Letters, you can use a hummingbird cut from any of the carts.
Tuesday, November 30, 2010
Some Odd Girl Hol-ODD-day Blog Hop
Welcome to the first Some Odd Girl Hol-ODD-day Blog hop. Kristy and the Odd Girls are having this hop this holiday season not only to show their love for all of their Oddies, but also to include us. So hop through the list and be sure to comment at every stop because the Odd Girls have some prizes to give away but you have to complete the list to be entered. If you've come from Jennifer's Blog you're on the right track, but if not, you'll want to start at the Some Odd Girl Blog so you don't miss a thing.

Although I'm sure you'll see many fabulous holiday projects today, I decided to make a thank you card instead. I've used Tobie and Buddie and Tiny Princess Tia on the front. They're both colored with Copics and fussy cut and popped on some fabby paper from Creative Imaginations that I've printed with the sentiment. The background was so perfect that all I used for embellies were a few Prima flowers. The sweet innocence of these images reminds me of a children's book so I've showcased them accordingly.
Inside is Kiss a Prince Tia. I think the 3 of these adorable images tell a little love story and would make a sweet thank you for that special someone who has given you the perfect gift, don't you? BTW, all Tia images are on sale through Dec 3rd so be sure and check them all out HERE. Now hop along to Marcie's Blog but don't forget to comment to be eligible for the prizes. And in case you get lost, here's the complete list.
1) SOG Blog
2) Kimmy
3) Margie
4) Andrea
5) Leah
6) Corry
7) Sally
8) Yvonne
9) Meredith
10) Tanya (not DT)
11) Robin McK
12) Jennifer
13) Donna YOU ARE HERE
14) Marcie
15) Asa
16) Zara
17) Tanya
18) Mary
19) Denise
20) Robin F
21) Diana
22) Jan
23) Cassie
24) Kellie
25) Kristy

And for all you Scrapper's out there, my dear friend and DT sister Susan is having a 2 day sale on her fab DVD It's a Kid's Life so check it out HERE!
Tuesday, November 16, 2010
The Cuttlebug Spot Thank Yous
Well we've been working on Thanksgiving dinner all month at the Cuttlebug Spot and our last offering is a thank you to our dinner host. This whole set of challenges would have been alot easier had I kept the same design scheme, but I'm kinda ADD, so of course nothing matches. It's okay I'm not hosting Thanksgiving anyway, just making butternut squash lasagna and pumpkin and pecan pies.
I always like the idea of Core'dinations card stock and have a bunch so I pulled out some whitewash with an orange core to try it. I used my Cuttlebug Autumn Type folder and sanded away. It never really comes out as dark as I imagine it will. The card itself is the reverse side of that color card stock. Oh well, we've got a sort of pastel Autumn thing going but this was my 3rd attempt for this challenge so I just went with it. The lighter orange is also Core'dinations with a brown top (obviously used in the reverse). The "Thank you" is a Sizzix folder cut with my Nesties rectangle with the window cut with the scalloped version. the leaves were cut with my Nested Maple leaves. One was obviously embossed with Swiss Dots, and the other, scored with my MS score board. I used the Nesties instead of my Cuttlebug maple leaf because it was a tad smaller.
Then it was just a matter of a little popping and voila! DH said the muted color of the Core'dinations make it look Southwest but I kinda like it. Now rush over to The Cuttlebug Spot to check out the fabulous creations from my teamies and be sure to leave a comment because we have a fab new sponsor and you don't even have to make anything to WIN! WooHoo!
Tuesday, November 2, 2010
Color Challenge with Tiddly Inks
Oh my it's a busy Tuesday! Please scroll down for my Cuttlebug Spot card and the festivities continue on our Dia de los Muertos Blog Hop (don't miss it!) below that. We have a fun Color Challenge at the Tiddly Inks Challenge Blog of olive, purple and mustard. I have to admit, it took me awhile to figure this one out, but once I got a handle on it I must say I like it very much indeed. I've used the adorable Poppy, one of Christy's Gothic Cute digi stamps. I adore her long straight hair and thought is would be a good way to get the mustard (Copic Y26) in there right off the bat. I printed her twice so I could pop the flower and leaf. The purple striped mat is from the Graphic 45 Halloween in Wonderland 8x8 pad cut with my Nesties Labels Four. The printed paper behind is from the Basic Grey Eerie 6x6 pad (oops, it's Halloween but don't tell!) The sentiment is from the Cuttlebug With Gratitude card making combo.
Because of the big fat bow I popped the mat, Poppy, and of course, her flower. Then just a few adhesive beads (big surprise!) and it was done! Remember it's Tiddly Tuesday, so hop over to Christy's blog and pick up the latest freebie there or at the PCP group HERE. If you're not a member, request to join. My DT sisters have all come up with gorgeous takes on this challenge so visit them HERE and come play along.
Subscribe to:
Posts (Atom)