Showing posts with label Blog Hop. Show all posts

Monday, January 30, 2012

BBTB2 Baby Buggy Challenge and Blog Hop


Welcome to the first BBTB2 Blog Hop of the 2012. If you've come from Julia's fabulous Blog, you're on the right track, but if you've happened here by accident, you might wish to go back to BBTB2 and start at the beginning so you don't miss a thing. I still can't believe January is almost gone already. My esteemed co-leader and all around great gal, Carole chose the baby carriage from New Arrival this week and although I do have the cart, I decided to play with another one I've only used once so far, which is Car Decals. I came across the "Oh Baby" sentiment while browsing MyCutSearch.com, an invaluable tool when trying to find cut options for your Cricut. The shadows of both cuts were welded in DS and then to a long rectangle from George to make my usual shaped front card (that I failed to get a picture of because I was in such a hurry yesterday to hit the shopping trail...oops!) I sort of squished the "Oh Baby" part and hid the contours of the center of the letters with DS in order to hide the sentiment inside.


Other than the shadow, there are not a lot of layering options on Car Decals so I cut it several times and hand cut portions of the striped body of the buggy out so I could pop it and added little button both on top and behind the wheels. Trimmed her little bow as well and added a pearl and some emerald eyes. (Love her little curl.)


As I said, there wasn't a whole lot of layering options, but I did my best. And I found a cute little "binky" button in my drawer and tied it to the heart. Cute, eh?


Now on to dear Carole's Blog to view her frothy confection (It is really yummy!) but before you go, please leave a comment for a chance to win this Cuttlebug Love Language Card Making Combo, just in time for Valentine's Day. I'll draw the winner on Friday February 3rd so you all come back now, ya hear?


Tuesday, November 1, 2011

Dia de los Muertos Blog Hop


WooHoo! It's Abby's Second Annual Dia De Los Muertos Blog Hop. If you've come from Monica's Blog, you're on the right track, but if you've happened here by chance click HERE because I know you'd just hate to miss a thing. This is a big celebration at my house and my entire dining room becomes a giant ofrenda (altar) honoring those important people who are no longer with me. Remember, it is a celebration of life and a very festive and happy occasion. Traditionally in Mexico fiestas include brightly colored cut paper banners (papel picados)and this year I decided to create my own with the help of my Cricut.

I used the Autumn Celebrations cart for the base and added and subtracted elements using Design Studio. The flowers are from the Paper Lace cartridge. Traditional banners are usually cut from tissue paper, but these are quite delicate enough just using card stock.

Besides the sugar skull motif, skeletons are often depicted doing the things they loved to do in life such as dancing. Again, the design began with Autumn Celebrations with flowers from Paper Lace. The most difficult aspect here was that when flipping the image, the words were also flipped so I had to hide the letters on the flipped image and then hide all of the contours of an unflipped image BUT the lettering and move it into place to cut this banner correctly.

I have many keepsakes from my relatives that I cherish and include in my ofrenda. This shelf is honoring my maternal grandparents who both died before I was born. It includes their wedding picture and portraits. If you'll notice, in both pix my grandma is in profile. I have never seen a picture of her head on. Apparently, when she was a very young child, she had an eye infection and the Dr. put the wrong drops in her eye causing it to shrivel. I still think she's beautiful. The embroidered satin slippers are those Grandma wore on her wedding day. I have her wedding gown as well. The pocket watch is my Grandfather's and is engraved with his initials. I also include my little Novios (wedding couple) sculpture which signifies Amor Eterno (eternal love). My last year's post includes many more stories and pix of my family artifacts, so if you're interested, please click HERE. Many of you asked last year how I could possibly have so many family heirlooms. I am an only child with no living aunts or uncles on either side of my family and only have 3 living first cousins, one on my Mom's side (who is 16 years older than I) and two on my Dad's. My parents seemed to have been the caretakers of many treasures which have been passed down to me. I so enjoy reliving the stories that were told to me by my parents and I'm thrilled to be able to share them with you, because we have no children to pass them down to and Goliath and Jezzie pretty much couldn't care less. LOL

I try to add to my collection each year and would love to show you my recent acquisitons. First, a 12x12 original canvas by Megan Suarez inspired by Frida Kahlo. Megan is not only a fab painter, but she also sells her adorable Dilly Beans digi stamps.


Second, a gorgeous Mexican folk art piece that I had hoped to make a decorated shadow box for but time got away from me. (Maybe next year)


And finally (because you can never have too many skulls) 3 handpainted bottles of TEQUILA! Time to party!


But before you go, please be sure to leave a comment to be eligible for my blog candy. November is also a month to give thanks so I'm offering this Cuttlebug With Gratitude Card Making combo. Just leave a comment and stop back on Saturday, November 5th when I announce the winner. BTW, I'll also be announcing the winner of the BBTB2 Blog Hop that day, so if you haven't entered my giveaway there, please scroll down. Now you're off to Michelle's Blog. Happy hopping!

Monday, October 31, 2011

Happy "Boo-Day" and BBTB2 Blog Hop


Happy Halloween everyone and welcome to our Monthly Blog Hop for BBTB2. If you came from Susan's Blog you're on the right track. Our dear and fabulously talented Shelly chose either ghost cut from PDDU for this challenge, but I took some artistic license and used the one from Happy Hauntings instead. I was browsing my DS files and came across one called "Boo-day" that I'd done eons ago using the ancient Stamped (not to be confused with Stamping)cartridge. The sentiment was all that as there and I'd done it way before there was any "spooky" Halloween font available. I was originally thinking Halloween birthday, I guess, but actually, Halloween is sort of a "Boo-Day" in itself so I decided to go from there. Try as I might, the suggested cuts didn't work as well for my design so I opted for the others (and you can too, remember, we're easy at BBTB2).

It's my usual shaped front style, welded in DS. The "Happy" is also from the Happy Hauntings Cartridge and the entire mess is welded to the rounded rectangle from George. The inside mat is from my Halloween stash and set the tone for the color scheme. I'd planned to do something more colorful, but in the end I enjoyed the neutral theme. The rest of the DP is from the DCWV La Crema Stack and the ghosts were cut from old glitter paper from WalMart. The sweet little flocked ghosty brad is by Making Memories.


I've done my usual dimensional layers and am pretty pleased with how it came out. I've been in a bit of a funk lately and I'm hoping to snap out of it soon. Now hop along to Carri's Blog, but don't forget to leave a comment to be entered in my giveaway, a $40 gift certificate sponsored by Custom Crops. Check out their sale going on NOW with Cricut carts starting at $15.00! I'll be drawing the winner using Random Org on Saturday, November 5th. WooHoo! If you ever get lost along the way, hop back to BBTB2 to get yourself back on track and of course, we'd love to see your take on the challenge. Please link up a new creation using any ghost cut by Nov 13th to win our much coveted POW blinkie. Happy hopping, and have a wonderful, safe, Halloween.
I"m also just squeeking in on the ABC "B" is for Boo Challenge and the Simon Says Stamp Anything Goes Challenge.


Don't forget to come back tomorrow for the 2nd Annual Dia De Los Muertos Blog Hop!

Monday, September 26, 2011

BBTB2 WIMG Wheelbarrow Challenge and Blog Hop


Welcome to the BBTB2 Blog Hop! If you have arrived from Lori's Blog, you're on the right track. If not, you might want to start at BBTB2 so you don't miss a thing. I'm hosting the challenge this week and chose the wheelbarrow from Walk In My Garden. Although it's an oldie, it's still one of my faves. I've welded the shadow of the wheelbarrow to a big full moon from George and pumpkins from Holiday Cakes. The sentiment is from Holiday Cakes as well.


Yes, it's a shaped front card. You know that's my favorite kind to make. I've re sized the rounded rectangle from George for the back. The background DP is from Memory Box. I've embossed the wheelbarrow with the Cuttlebug Distressed Stripes folder and the full moon with Polka Dots.


In some cases, I've cut the image more than once and done some trimming to add more layers, like the middle pumpkin and the green vines. The wheelbarrow was also cut in several colors and hand trimmed to add more detail to the cut.


Isn't this jack-o-lantern a hoot? I stickled the yellow layers of the pumpkins so they looked like they were lit from within, and embossed several with Swiss Dots.


Here's the dimension shot. I couldn't resist adding some non-Cricut embellies, like the leaves and Rain Dot bats. I sprinkled in a few adhesive beads, as well. Now hop on over to sweet Krista's Blog but before you do, please leave a comment for a chance to win a $40.00 gift certificate to Custom Crops. They have a Spooktacular BooTique, chock full of Halloween goodies, as well as new Holiday items and plenty of Tim Holtz, so be sure to start a wish list in case you're the winner! I'll be drawing the name (with any luck, LOL) on Saturday, so be sure to check back because I won't be hunting you down. Now remember, you have two weeks to complete each challenge and we'd like to see a "new" project and please link back to BBTB2 so others can join in the fun. If you don't have the cartridge, you may use a similar cut. In this case, I'm not sure there are any other wheelbarrows, so a wagon would be a fine substitute.

Monday, August 29, 2011

BBTB2 Heritage Tree Challenge and Blog Hop


Welcome to the BBTB2 monthly Blog Hop. If you've come from the mega talented Mona's Blog (I'm asking you, was that eye candy or what!?), you're on the right track. If not, you may want to begin at BBTB2 so you don't miss a thing. I can't believe it's the end of August. Next thing you know, there will be a nip in the air and the leaves will be turning. Ah, glorious Fall! Definitely my favorite season. How fortunate that our sweet and fabulous DT sister Julie chose the curly tree from the Heritage cart for our challenge this week. All I could see when I looked at that tree was the changing seasons so I decided to do a home decor project. It's 10"x10" without the black mat and I hope to frame it. I welded 4 of the trees to represent the 4 seasons. Each is backed by a circle ("and the seasons, they go 'round and 'round" from the song "The Circle Game" kept running through my head) in an appropriate color. I kept them sort of muted to make it neutral and modern looking.


"Seasons" is from DonJuan. The blossoms and leaves I've added to the trees are the off cuts from MS border punches. I'm still in shock that I hand wrote the seasons around each circle, but try as I might, I couldn't manage to figure out a way to do it on the computer and I had no appropriate rub-ons. Unfortunately, it looked too plain without, so...


Not much dimension because I wanted to keep it suitable for framing. I just popped "Seasons" and a few of the flowers and leaves for added interest. Now off you go to Lori's Blog to see what yummy creation she has in store. But before you go, please leave a comment for a chance to win a $40.00 gift certificate from my fabulous sponsor, Custom Crops. They have tons of new products, and a fab Back to School sale going on NOW! Please be sure to stop back on Friday

when the winner will be chosen. Hope to see you join is this week with a new creation, using this gorgeous tree from Heritage, or any similar tree if you haven't that cart, and please don't forget to mention BBTB2 in your post and link it up so others can join in the fun too.

Monday, July 25, 2011

BBTB2 Sweet Treats Ice Cream Cone and Blog Hop


Morning everybody! It's the last Monday of the month, and you know what that means. It's the BBTB2 BLOG HOP and my super sweet and talented friend, Maria, has chosen the ice cream cone from Sweet Treats for our challenge. Hopefully you've arrived from dear Carole's super inspiring blog, but if not, you may like to start at BBTB2, so you don't miss a thing. I was dying to try the ice cream cone box from the new Sweet Tooth Boxes cart. Isn't it fun!? I've embossed the bottom of the come with the Cuttlebug Tiny Mosaics Folder and the top with the 5x7 folder that came with the Give a Hoot companion set. You need to turn the scallop folder sideways and emboss in sections for this, so I had to use my Grand Caliber for it to fit. BTW, you need an extra adaptor plate to use your embossing folders with this machine. If you use the embossing plate that comes with the machine and try to force it, you'll break your machine. Yup, I did! (Note to self, read the instructions)


I'm not the greatest on determining the size of how boxes will turn out (even using DS, as in this case), especially when they are in 3 sections like this one. I didn't want it teeny so I went with the largest size I could fit on a 12x12 mat, which was 11". Let me tell ya, it's one huge honkin' box! I suppose it's meant to fit a cupcake (or is it just a truffle?) Anyway, you could definitely fit a cupcake in the center of this one, for sure. This is what the inside looks like. The usable space is only the top section, and at about 9 1/4 " to top (minus the cherry) I'm not so sure about the stability without weighting the bottom.

The top of the cone looked boring to me, so I've added a chocolate rim by cutting the top of the middle section in brown (by moving it off the page in DS you don't waste another whole sheet)
and punching the bottom with my MS Drippy Goo. I added real sprinkles by running some Terrifically Tacky Tape around it and dipping it in. Gluing sprinkles makes the colors run. I sprayed the ice cream with adhesive and sprinkled MS extra fine glitter to give it a frosty feel. I still thought the top of the cone looked a bit plain, so I added the "Sweet" sentiment, which is also from the Sweet Treat Boxes cart.

I've made the tag using the flat bottomed cone from page 34 to match and embossed it like the box. Remember, you don't have to use the exact cut to play along with us at BBTB2. Just make a new project using an ice cream cone and you're good to go. Now hop along to see what yummy treat Mona has in store for you, but before you do, be sure to leave a comment for a chance to win a $40.00 gift certificate to Custom Crops. They're having a super summer sale right now, so that should go a long long way. Loads of Cricut carts on sale, including Sweet Treats, HERE. I'll be announcing the winner next Friday, so be sure and stop back by.


Edit: I've been reading some of my comments and I wan to to clarify that the Ice Cream cone Box is from the new Sweet Tooth Boxes, not Sweet Treats. Only the Tag is from Sweet Treats.

Monday, June 27, 2011

BBTB2 Watermelon Challenge and Blog Hop!


WooHoo! It's the last Monday of the month and you know what that means, don't you? It's Blog Hop time at BBTB2. I'm kicking off this blog hop, but if you get lost along the way, check back at BBTB2 for the full list of participants. This week our fabulous fearless leader, Heather, as gone "old school" and chosen the watermelon from one of the "oldies but goodies" cartridges, Stretch Your Imagination. Of course, if you don't own that one, any watermelon will do but please make it a "new" creation. My first thought was to have a little kid taking a bite so I welded the shadow of the face from another oldie, Doodlecharms, to the shadow of the watermelon. I was gonna stop there, but then thought of the coming holiday and decided to go all patriotic, adding the fireworks and flag from Stand and Salute. There was method to my madness, because I really wanted to join the Whimsicle Wednesday Let's Get Patriotic Challenge and didn't think I could get to it unless I combined. (Sorry Steph, one of these days...) I glittered the fireworks and added gems and a glittered foam star (from M's) and embossed the flag and added tiny adhesive stars by Recollections. The little dude looked mighty bald so I added a curly paperclip for hair, much better!

Only the watermelon portion of this card opens because of the weird design, but it was fun to do something a bit different for a change. The bite was done with a simple hole punch. The rub-on sentiment is from Melissa Frances. There's not a ton of dimension, but I got a kick out of popping his mouth open so he looks like he's taking a giant bite. Now hop along to my sweet and beautiful DT sis Krista has in store for you. I'm sure it's just yummy! But don't forget to leave a comment for a chance to win a $40.00 gift certificate from Custom Crops. They have some cool new products that I have't seen elsewhere, so be sure to check it out. I'll be drawing the winner using Random Org on Friday, July 1.


Saturday, June 4, 2011

Smeared Ink Skull Appreciation Day Blog Hop


Welcome to the Smeared Ink Skull Appreciation Day Blog Hop! If you've arrived from the uber talented Lady Brayton's Blog, you're on the right track. If not, you may wish to click HERE to find out all about Skull Appreciation Day and the fabulous prizes up for grabs for those who participate in the hop. The Smeared Ink Smeared and Smudged Forum is a fabulously supportive and fun community of artists, specializing in alternative, vintage, and Gothic rubber stamping. Normally for an event like this I'd be using some of my fabulous Smeared Ink stamps, but all types of crafting are welcome in this hop, so I decided to do what I do best and create a shaped card using Cricut Design Studio and my Cricut Expression. I've used the skull border feature from Wall Decor and More welded the shadows along with a flourish from Cindy Loo (to balance the bottom of the card) to create the shaped card base. Then I cut the regular layer 3 separate times in white to create the dimension. The flourishes and skulls are all connected so I colored only the flourishes with Copics and glued that layer to the card base. I added some stickles to the orange flourish and adhesive gems to all for some bling.

The next 2 layers were cut apart manually so I could pop the skulls with foam. The second and fourth skulls have 3 layers while the first and third have two for added depth. To give a bit of shadowing, I outlined the cuts with Copics before running them through my Xyron, right side down and glittering them with fine crystal glitter. They are obviously thrilled as all get out to have a day dedicated all to THEM, don'tcha think?! Now hop on to the amazing Black Dragon's blog to see what skully goodness she has created. I promise you'll be glad you did. And if at any time you get lost along the way, you can click HERE for the full hop list. So hop along, and enjoy!

Monday, May 30, 2011

BBTB2 Celebrations Cake Challenge and Blog Hop


Happy Memorial Day! I hope everyone is enjoying the long weekend and is ready for a fun Blog Hop with BBTB2, but first, please remember to say a little prayer of thanks to those who have sacrificed to keep our county free. This week our super sweet and uber talented DT sister Carole has chosen the cake from the Celebrations cartridge. You should have arrived from Carole's Blog if you're hopping along. This is a pretty simple cake and there's lots you can do to dress it up, but when I found the fabby DP from the DCWV Sweet Stack, I pretty much left it plain and let the paper do the work. This cut comes without an attached candle, so after welding the regular cuts together in DS for the card base, I welded the shadow of the cupcake from Doodlecharms to the first mat. The sentiment is from Sweet Treats. Both the candle and the word "wish" are covered in German Glass Glitter in Sea Shell available at Custom Crops. I love this stuff! It gives a cool texture that you can't get from any of the other glitters around and is particularly gorgeous on vintage projects. Lots more colors available too.


The popped layers aren't that obvious from the front, but they're there. I have to say this is one card that really does look cuter IRL. The only embellies are the gold adhesive beads and a single tiny Prima rose. (I've shown amazing restraint this week, LOL)


Here's a peek at the inside of the card. When you're making a shaped card with a delicate base like this one, it's important to reinforce the card back. Instead of just a single mat of the regular cake cut, I added an additional shadow of the cake plate AND topped it with a regular cut of the cake plate to make sure it was sturdy enough to stand. Now hop along to our beautiful Krista's Blog. Krista's gorgeous, cheery creations never fail to make me smile but don't forget to leave a comment here before you go for a chance to win a $40 gift certificate to Custom Crops. Be sure to check out their Memorial Day sale too. They are giving away a free stamp with every order. Also, if you don't have a blog, please check back next Saturday for the winner and leave a way to get in touch with you or you'll miss your prize.


Friday, April 29, 2011

Tiddly Inks Treasure Hunt Blog Hop


Welcome to the Tiddly Inks Treasure hunt Blog Hop! We're kicking off Tiddly Inks First Birthday Celebration with lots of fun and inspiration. If you've come from our special guest Debra's Blog, you're on the right track. If you've happened upon this post accidentally you might wish to start HERE so you don't miss out on the chance for the fabulous BOOTY (No, not that kind, I WISH! I mean PRIZES) scattered throughout the hop. Christy has been a busy gal with a new release of tons of adorable stamps. You can find them all in the shop HERE. And EVERYTHING will be available at 25% off May 1-3. WooHoo! My first card features Bev and June. Aren't they they sweetest? Obviously they are best friends so I designed a clean and simple card celebrating friendship. They just begged to be paper pieced, don'tcha think?


Next is Come in Cuteness. I totally fell in love with this adorable little guy! He's colored with Copics and the fab DP is from K&Co Daydreams. The sentiment is computer generated. Male cards just got a whole lot easier. WooHoo! Hope you're inspired to see what else the Tiddly Inkers and Special Guests have in store. Also, if at any time you get lost, visit the TI Blog HERE, but be sure to follow in order so as not to miss the treasure clues. Now...

(That would be Jess, in case I screwed up the link. Still recovering from MY birthday! LOL)

Monday, March 28, 2011

BBTB2 Disney Challenge and Blog Hop!


Woohoo! It's Blog Hop time again at BBTB2 and this week we're hosted by my dear and fabulously talented friend, Maria. In honor of Spring Break she's chosen a Disney challenge, hopefully using one of the new carts, but hey, any Disney cart will do. If you've come from dear Carole's blog you're on the right track, but if you'd like to start at the beginning, hop back to BBTB2 so you don't miss a thing. I really find the Disney characters intimidating so this is actually the first one I've actually cut and assembled. This is Figaro from Pinocchio on the new Disney Classic Cart. I love the surprised look on his face so I added the "Oops" sentiment by welding letters from Mickey Font. I added striped twine from the Twinery to the "O's" to make them look like balloons thinking this would make a cute belated birthday card.

It's a shaped front card (again) with a rounded rectangle from George welded in Design Studio. All of Figaro's layers were cut in white card stock and colored with Copics, even the black. Once I'd colored the other parts, the solid black card stock looked too one dimensional and I was able to add a teeny bit on shading coloring it all with my Copics even though it still was essentially black. The inside striped mat was from the DCWV Summer Glitter Stack from awhile back. Yikes! How bright! Definitely a kid's card, eh?


One this I find particularly challenging with the Disney characters is they are not particulary conducive to the type of dimensional layering I like to do. I thought I was gonna be okay with that, but after gluing on all the the features it just looked too flat to me. To remedy that, I actually cut apart the character using the layer placement cuts and popped the head, bow, paws and legs on top of the solid black cut and then popped the entire kitty on the card base. Definitely better, but wished I'd thought of this before I'd glued down the chest fur or that would be popped too. Next stop is Theresa's Blog and wait 'til you see the magical layouts she's created! WOW! but before you go, don't forget to leave a comment for a chance to win a $40.00, yes, you read that right, a $40.00 gift certificate to Custom Crops!!! Thanks so much Custom Crops for being such a generous sponsor. BTW, Custom Crops currently has the Disney Classics cart on SALE for on $27.00! In fact nearly ALL of the Cricut carts are on sale as well as regular Cricut mats for $8.00 and Imagine mats for $9.00 so be sure to check out Custom Crops for all of your Cricut needs.

Monday, February 28, 2011

BBT2 Bird House or Bird Cage Challenge and Blog Hop


Welcome to the first stop on the February Blog Hop and Bird House or Bird Cage Challenge at BBTB2, hosted by my dear friend and very first (and unfailing) inspiration, Carole Beathe. I chose the birdhouses from Stretch Your Imagination and again made a "Welcome to the Neighborhood" card using the sentiment from the Handyman cartridge.
Again it's a shaped front card with all the elements welded in Cricut Design Studio.
Count your blessings that I'm really tired from my fabulously fun girly trip away this weekend so this post is gonna be really short just in case I oversleep and can't fill in more details before this post goes live Monday morning as scheduled. At least I was able to finish the card prior to my departure with a decent amount of layers. Next stop is the fabulously talented Carole's Blog but before you leave, be sure to leave a comment for a chance to win a $30.00 gift certificate to Custom Crops and enjoy the hop.

Monday, January 31, 2011

BBTB2 Love Struck Hearts Challenge and Blog Hop!


I can't believe we're almost through with January, but happy to finally be back to our end of the month Blog Hops at BBTB2. You should have arrived here from the wonderfully talented Shelly's blog, but if not, you may wish to start HERE, at the beginning, so you don't miss a thing. My super sweet and oh so talented friend and DT sister Maria chose two of the hearts from the Love Struck Cartridge and really wished for a layout, but was kind enough to allow us non scrappers (who me?) the option of making a card. I knew immediately what hearts I wanted to use. Scroll down 2 posts and you'll see why. I can't believe I hadn't cut them before.
The card has a shaped front which as usual, doesn't really show in the first pic. All is welded in Design Studio to the welded rectangle from George which I pull and skew until it's the right size. The front sentiment comes from Wild Card. Since "Wild about you" comes all together as a cut, I had to hide the contours of the rest of the phrase to have the "Wild" and "about" be different sizes and placed how I wanted them on the card. Let's just say it took me awhile to design this one, but I'm quite fond of it. I'm hoping a certain someone is too. HeeHee!
This one turned out to be FAT, even for me. the "U" actually ended up having a full 6 popped layers! I make my own adhesive foam using Fun Foam and double stick tape in loads of colors and cut it myself so the dimensionals aren't so distracting when viewed from the side.
And lo and behold, I even finished the inside! the dotty paper is Bo Bunny. I used small clear epoxy letters from J's and backed them with little punched circles (so they'd show up) for the "so let's" and also for the "I'm" on the front (which you can barely see because of the glare.) "Go wild" is from Straight From the Nest. Sometimes it's difficult to do an inside sentiment on a shaped front card without it showing from the front, but I placed the large heart and hugs and kisses (from Wild Card) exactly behind those on the front and the rest of the front elements hid the the slight run over of the sentiment. Of course it wouldn't be complete without some little metal adhesive hearts and the ever present adhesive beads. Now hop along, but not before leaving a comment for a chance to win a $30 gift certificate to Custom Crops. Next up is the gorgeous and super talented Julia so enjoy!

Tuesday, November 30, 2010

Some Odd Girl Hol-ODD-day Blog Hop


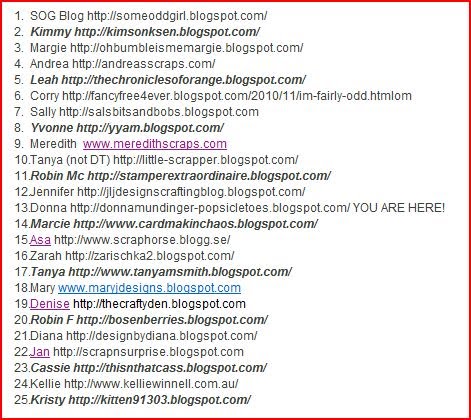
Welcome to the first Some Odd Girl Hol-ODD-day Blog hop. Kristy and the Odd Girls are having this hop this holiday season not only to show their love for all of their Oddies, but also to include us. So hop through the list and be sure to comment at every stop because the Odd Girls have some prizes to give away but you have to complete the list to be entered. If you've come from Jennifer's Blog you're on the right track, but if not, you'll want to start at the Some Odd Girl Blog so you don't miss a thing.

Although I'm sure you'll see many fabulous holiday projects today, I decided to make a thank you card instead. I've used Tobie and Buddie and Tiny Princess Tia on the front. They're both colored with Copics and fussy cut and popped on some fabby paper from Creative Imaginations that I've printed with the sentiment. The background was so perfect that all I used for embellies were a few Prima flowers. The sweet innocence of these images reminds me of a children's book so I've showcased them accordingly.


Inside is Kiss a Prince Tia. I think the 3 of these adorable images tell a little love story and would make a sweet thank you for that special someone who has given you the perfect gift, don't you? BTW, all Tia images are on sale through Dec 3rd so be sure and check them all out HERE. Now hop along to Marcie's Blog but don't forget to comment to be eligible for the prizes. And in case you get lost, here's the complete list.


5) Leah


10) Tanya (not DT)


13) Donna YOU ARE HERE

14) Marcie

15) Asa

16) Zara

17) Tanya

18) Mary

19) Denise


21) Diana

22) Jan

23) Cassie

24) Kellie

25) Kristy


And for all you Scrapper's out there, my dear friend and DT sister Susan is having a 2 day sale on her fab DVD It's a Kid's Life so check it out HERE!