Showing posts with label Bah Humbug Challenge. Show all posts

Wednesday, December 7, 2011

Bah!Humbug!, Scraptastic Monday, and Whimsical Wednesday, WooHoo!


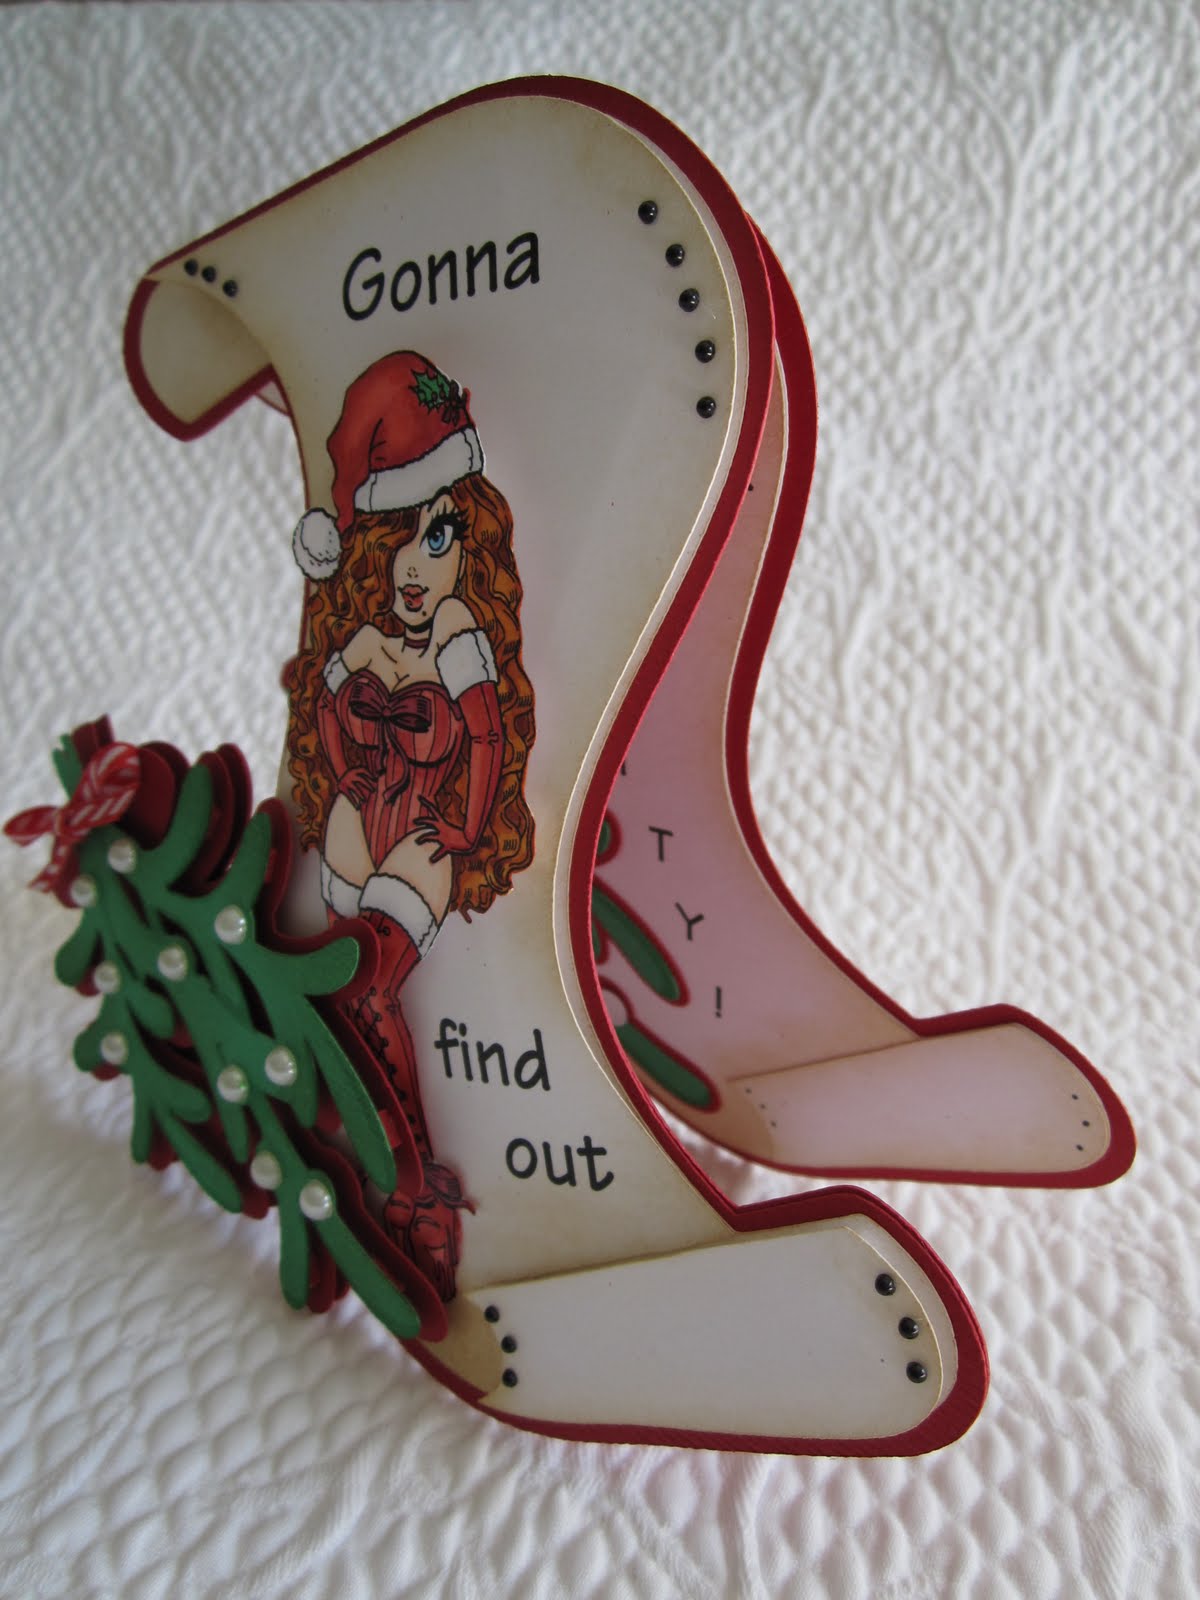
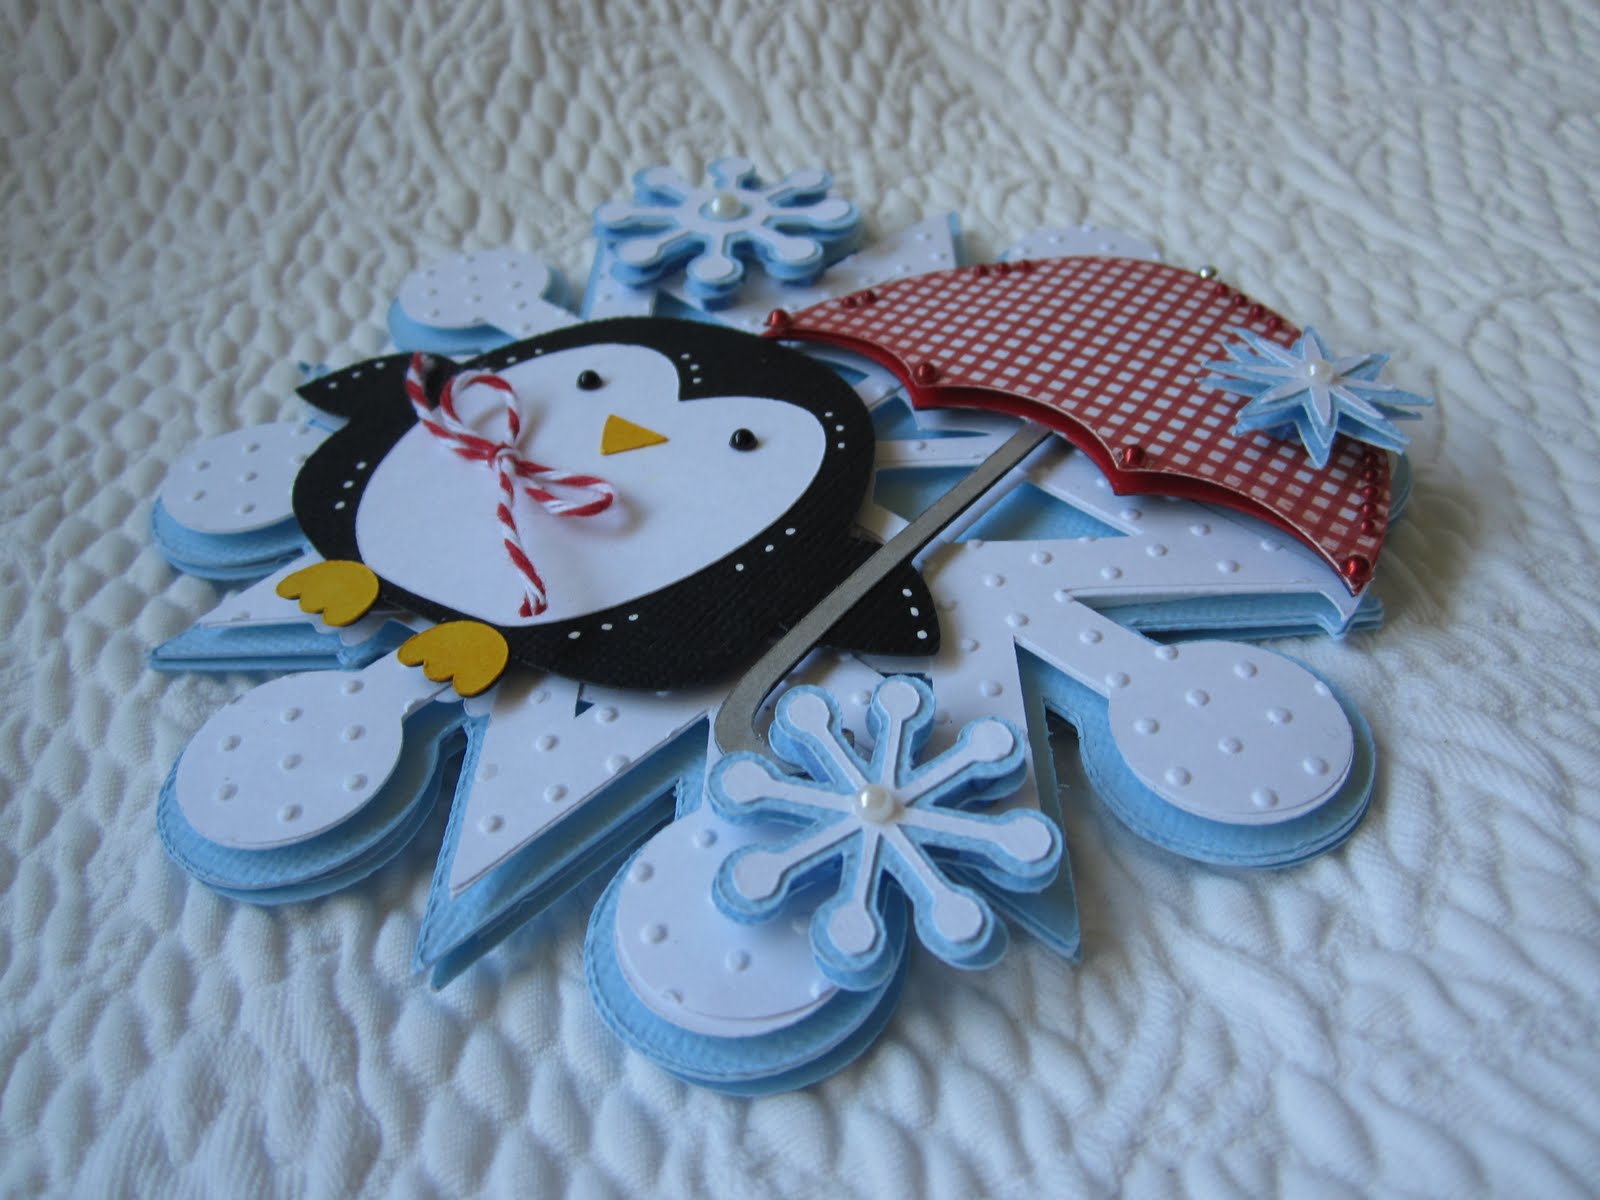
I can't believe it's the very last Bah! Humbug! challenge of the year. I want to thank Ann, Max and the monthly Guest Designers for the fabulous inspiration they've given me these long months. The final challenge is Cute Christmas Critters and I don't think you can get any cuter than this sweet little Christmas Penguin from Cindy's Scraptastic Designs. Better yet, I was able to enter it in the Scraptastic Monday Challenge #4 which calls for no red, green, or gold. In case you're unfamiliar with the Scraptastic Monday challenges, there's a new challenge once a week but you have 2 weeks to complete the challenge. You may use anything you like (your Cricut, rubber stamps, or digi's) as long as you follow the theme, but of course I wanted to use one of Cindy's own. For this challenge, you even get an adorable free digi for entering (showcased by Cindy's talented daughter Tiffany among the DT examples) so I know you all want to check it out and enter.

Seriously, who could resist that face? I printed him twice and colored him with Copics, then fussy cut him out along with his beak, wings (or are they called flippers?) and light strand from the second image and popped him into a Nesties Beaded Circle. The glitter snowflakes are a McGill punch and I've also added some glitter icicles punched with a MS border punch. Oh oh, I see a bit of chartreuse has snuck onto the ribbon. EEK! Quickly avert your eyes, or if I must, I'll gladly rip it off to qualify for that fabulous digi.

Here's the dimension shot. Notice the pretty bling on the light strand and snowflake centers? That's for the current Whimsical Wednesday Winter Fun Challenge that just started today and asks that you use something sparkly. I think I've got it covered with the that and the glitter snowflakes and icicles, don't you? I'm also entering this in the ABC Christmas Challenge (Y is for Yippee! Anything Goes).

Tuesday, November 29, 2011

Bah!Humbug! Fabric Challenge


This week the lovely ladies of Bah! Humbug! have challenged us to use fabric. Normally this would be daunting for me, but I came across some Loralie fabric I'd purchased in 2009 that I had bought from J&O Fabrics. They don't have much of a selection any more, but Loralie Designs in the meantime not only has it's own website, but makes all sorts of stamps and stuff, embroidery designs, you name it, with not only some kitties, but her signature sassy ladies, so if you're interested, check them out HERE. OOps! Off the track a bit here. I'd bought this fabric because of the adorable cards Enfys was making with them but I never got around to trying any myself. 'Bout time, eh? Basically all you do is glue the fabric to card stock using a glue stick, wait for it to dry and fussy cut it out. Make sure you've glued your design completely and it really resists fraying and cuts easily with sharp scissors. The background DP is from an 8x8 pad by Making Memories I got on clearance last year and the little Bingo card is Jennie Bowlin. WooHoo! Couldn't be simpler.


As you can see, I've lots more fabric and Jezzie was eyeing the kitties in the foreground thinkin' they would make fab cards for her to send. I think this would be a great idea for those who sew as well. Make something cute using fabric and save a bit for a matching card. The possibilities are endless. For once I've not waited until the very last minute to complete this challenge, so I suggest you pop by Bah!Humbug! and be inspired by the lovely examples by the DT and join the challenge too. It's almost December. YIKES!

Saturday, November 12, 2011

ADFD for Bah!Humbug! and a Few More Challenges


Okay, don't faint ladies! Yes, it's Saturday and I've done my Bah!Humbug! challenge ALREADY this week. YEEHAW! I knew immediately what image (or at least which group of images) I was gonna use for the Baby's First Christmas challenge. 4 Crafty Chicks is also asking for a baby theme, as is Designed to Delight, WooHoo! I have the whole Santa's Nice List set from ADFD and chose this cutie in the stocking cap. The current ADFD challenge is "Flock Together" so I printed the image (flipped) 3 times so I could cut it apart and flock the pieces individually by running them face down through my Xyron and then reassembling them on the base image. (Does that make sense?)


Tell me this isn't the sweetest baby EVER! Well actually there are 3 other singles, a set of triplets, and a stocking just filled with a teddy and sweets in this set, but the stocking cap really did it for me because I could add a mini pompom. What little coloring there is is done with my Copics. The red part of the stocking is colored as well, before running through the Xyron and flocking, so the coverage is deep and even. The little dots on the toe and heel are mini adhesive beads I applied AFTER running through the Xyron but before adding the flock. The flock would have obscured the dots had I just colored them, and I was afraid of bleeding if I tried to touch them up after. The adhesive on the beads doesn't stick well to the flock, either, but applying glue after the fact is pretty messy so this solution worked well for me.


Besides the flocking, I wanted to add some additional texture for the Cardmadfairy's Texture Challenge and the Frosted Designs Fabulous Friday Challenge which is Embossing. I chose a Sizzix folder because the scallops echoed the Nestie scalloped mat but look what happened when I ran it through my Cuttlebug. I've had this happen with quite a few of the Sizzix folders, including those by Tim Holtz, and I was really bummed at how it actually cracked and ripped my cardstock because of the deep embossing.


Lucy McGoo's Wonder Goo to the rescue! Honestly, this stuff has been on my crafting table for MONTHS! I bought it at a Scrap Expo (I think) because it's supposed to help get a better impression when using those old embossing plates (rather than the folders) so I thought I'd give it a go and WOOHOO! A little spritz on the card stock, in the folder, and through the Cuttlebug and VOILA! No more cracking! I do, however suggest you leave it in the folder until the thing dries because it does have a tendency to curl more, but hey, small price to pay. I'd been getting kind of discouraged with these folders lately so I'm happy as a clam to find a solution. That link is the only place I found this stuff online, but I hate to mention a product with no link to where you can get it sooo... I also apologize for such a long post for such a simple card, but I finally seem to be coming out of my funk so I'm back to my old wordy self. LOL Anyway, I'm off to get boofy for the first holiday party of the season at my BFF's. Have a great rest of the weekend and go check out all of these fab challenges, if for no other reason than to oooohh and aaaahh at the DT inspiration.

Wednesday, November 9, 2011

Dilly Beans for the Bah! Humbug! Snowman Challenge


This week at Bah! Humbug! the challenge is snowmen. I LOVE snowmen! The problem was choosing which snowman to use. I really love the framed snowmen in the Dilly Beans shop. They're as cute as can be, easy to color and the framing pretty much finishes the card for you so I decided to use Framed Snowman #2 because of his sweet stocking cap. He's colored with Copics to match the Peppermint Forest DP from J's last year and I added some Star Dust Stickles for a little bling. I think pastel Christmas cards are just YUMMY, don't you?

To add a little dimension, I printed my snowman 3 times and fussy cut his nose, the end of his cap and the little heart (twice) and popped them. All I needed were a few mats, a sheer ribbon and some adhesive pears and Voila! Really simple, but cute enough that I may just make a whole set with the rest of the framed snowmen from Dilly Beans. BTW, the Dilly Beans Designer and Challenge Blog is coming in December! WooHoo! And remember, there are only a few more challenges left at Bah!Humbug! before the Humbuggers take their holiday break so be sure to stop by and thank them for helping you get your holiday cards under control. I'm also adding this to the Whimsical Wednesdays Anything Goes Challenge because I seem to be running a bit behind there. There's still some time left for that challenge, and the new one from this past Wednesday is Thanksgiving. See ya there!

Wednesday, November 2, 2011

Bah!Humbug! Die Cut Challenge and the Return of The Cuttlebug Spot


Well, I'm afraid to say I've missed the last two Bah!Humbug! challenges but I couldn't let another go by. I've been trying the last few weeks to balance my life a bit which has been tough on me and my crafting. This week the ladies of Humbug Hall chose Die Cuts as the challenge. Now normally I'd do a Cricut project, but in honor of the return of The Cuttlebug Spot I opted to use my new Tim Holtz Festive Greenery die and make a tag. These dies to work in the Cuttlebug, but you need to have the Sizzix extended platform and cutting plates to use them (in the Big Shot as well, BTW). Although I have decided to retire from the Cuttlebug Spot DT, I hope to participate in challenges whenever possible. I want to thank Nilda for all of her hard work and the fabulous opportunity to be on such a wonderful team and say "Hey!" to the talented teamies who chose to stay on. The challenge this time is Anything Goes. They will be bi-weekly now and will not necessarily require embossing, but I have so many folders (many that I've acquired since we went on hiatus in April and have yet to use) that I'm pretty sure I'll be embossing anyway. I've used the Tim Holtz Sheet Music folder on my project today. All of my die cuts were actually cut in a medium green card stock and I've used Copics and Distress Inks to color and shade them. The pine cone is also embossed with the Cuttlebug Tiny Mosaic folder. The adesive metal letters are from M's and I've added a few beads for holly berries and a ribbon tie for my stash. As I'm just squeeking in for Bah!Humbug! again (sorry ladies) you'll probably have to wait for Friday's new challenge, but you have nearly two full weeks to join in at The Cuttlebug Spot so I hope to see you there.

Wednesday, October 5, 2011

Bah! Humbug! Nativity Challenge


This week at Bah! Humbug! they're celebrating the true meaning of Christmas with a Nativity challenge. This became slightly more difficult for me than expected when I realized I have NO Nativity stamps and would have to rely on my Cricut. The Nativity I chose came from the Christmas Village cartridge and the figures are designed to be free standing. I welded the figures in DS, hid the contours of the bases and also welded a small rectangle from George at the base of each figure to hide the slit at the bottom where the base fits in. Of course, no shadows again, so I hid the interior contours of the images, cut it in brushed gold card stock and glued them slightly offset. The Star is from Joys of the Season.

I decided to keep it pretty CAS. I thought just the white and gold looked elegant, but a plain white mat look unfinished and it was too large to emboss with a regular A2 Cuttlebug folder. I decided to use the smallest of my Spellbinders Grand Circles to emboss only (tape your die in place and run it through your machine with the embossing pad and plate so it won't cut through) and then added some holographic peelie stars. I popped the cuts and added an adhesive star to the star cut and a few adhesive rhinestones to the manger. I'm actually quite pleased with how it came out. Look ladies, no camels. LOL Really though, the B!H! DT examples are lovely, as always and welcome back, Ann! Oh, and today is my dear friend Barb's Birthday (and it's her final week as a B!H! Guest Designer) so pop by and sing her the b-day song. I'm also entering this in the Christmas Stampin' All Year Long Resist the Temptation challenge, The Crazy Challenge Monthly Christmas No Red or Green Challenge, The Jingle Belles Peace on Earth challenge, the Sparkles Forum Christmas Songs challenge (Joy to the World), Fab's big Christmas Something Shiny (and/or Snowflakes)Challenge for Oct, CHNC Suitable for a Male Challenge.

Wednesday, September 28, 2011

Bah! Humbug! Rudolph/Reindeer Challenge


This week at Bah!Humbug! it's all about reindeer, Rudolph or otherwise. I was poking around in my printed but not colored digi images and a came across Deer Mae from SOG. Oh, I just ADORE her and she was printed on kraft so I decided to give her a go. She's colored with Copics with some white pencil accents. After that, the card practically made itself. The mat was cut from the DCWV Homespun Christmas stack with the lovely space for the computer generated sentiment right there. WooHoo! (It was about all I could handle 'cause I'm having a rough week.) I added a few tiny buttons that I threaded with jute (the hardest part of the whole card. LOL) punched a few corners out of kraft and colored them with Copics to match Mae and added a few small adhesive beads. Done! I'm also entering it in the Christmas Stampin' All Year Long Clean and Simple challenge, The Paper Shelter For the Girls challenge and the Simon Says Stamp Anything Goes challenge.

Tuesday, September 20, 2011

Bah! Humbug! Flourishes/Swirls Challenge


This week the Bah! Humbug! challenge is Flourishes and Swirls and because I skipped out on BBTB2 this week, I thought I'd better do a Cricut card. Happier now? My very first thought was the Trim a Tree cartridge with the intricate swirling images. I chose the ice skate this time because I was a figure skater as a kid and also because it was a natural to add a flourish to. Ever go to MyCutSearch.com and type in flourish? HA! There are so many carts with flourishes these days that I got an error message. Left to my own devices I decided to use another of those carts I just "had to have" and have hardly used, Picturesque. (Phonetic spelling pik-che-'resk, according to Merriam-Webster, except the "e" in che is upside down in their phonetic spelling and I can't figure out how to do that. LOL But honestly, I've heard this cart called some very hilarious things, even in a VIDEO!)


Fortunately, I didn't have to look very far to find a suitable flourish, so I welded the skate and shadow of the flourish to a rounded rectangle from George to make a shaped front card. I'm hoping this counts as a shaped card for the ABC Christmas Challenge this week which also requires Swirls, Spots or Stripes. I chose the gray glitter DP from M&MBI to join in on the CHNC Glitter Challenge and added glitter snowflakes from JoLee's as well.


The swirly top skate is done in matte metallic with the regular flourish in mirri which is why the pix are so bad, sorry. It really is prettier IRL. There's a bit of dimension and a few silver adhesive beads and a peelie sentiment and there ya go. The Shopping Our Stash challenge this week is No Coloring Allowed so I'm popping it in there as well. For once I'm a bit ahead for all of these challenges so go have a look. There's still time to play long and the DT examples are lovely.

Wednesday, September 14, 2011

Bah! Humbug! Paper Weaving Challenge


Those gals at Humbug Hall almost scared the bejeezes out of me with that giant spider they had introducing this week's challenge. Boy, I sure couldn't wait 'til it was off my sidebar. LOL Thank heavens it's gone! Thought I'd stumbled into Haunted Design House for a minute. And I dare say I wouldn't be using any spider catcher no matter HOW long the handle. How are ya hanging in Humbug Hall this month, Barb? HeeHee However, the challenge this week was not the easiest either, especially since I took a few days off from crafting the beginning of the week and thought I could sort of skate by. Paper weaving? Eiyiyi! Yes, I've done it, but it's not something that is easily slapped together. I'm proud that I did manage, however. The mats were cut on my Cricut with a cut out from Storybook which I stretched to fit the sweet silhouette from A Child's Year.


After weaving my background, I ran it through my Cuttlebug using the Sizzix Tim Holtz Swirls folder so I could enter it in the CHNC Swirls challenge and also because it made me think of swirling snow. The top mat and silhouette are embossed with the Cuttlebug Limited Edition Snowflake Folder.


Both mats and top image are popped on a prefolded 5 x 6 1/2" card base. The gorgeous snowflake is cut and embossed with the Spellbinders Create A Flake 1 and topped with an adhesive pearl. Be sure to stop by B!H! and CHNC to see the lovely examples. No much timeleft for B!H!, but you still can sneak in a card at CHNC.

Thursday, September 8, 2011

A Super Quickie for Bah! Humbug!


Yikes! My little anniversary trip threw me all out of whack for my fave weekly challenges so here I'm am scrambling to sneak this week's Bah!Humbug! Xmas Sentiments/Text Challenge. I actually had a much more elaborate card in mind, but at this late hour, there is no way I'd be able to finish it so I pulled out my trusty Cuttlebug, embossed with the Joy and Cheer folder (that I've had FOREVER, but never used), stamped a Hero Arts sentiment with Blazing Red StazOn, cut a scalloped rectangle in the mat with my Nesties, popped them both and there ya go! Don't even know if I'm technically under the wire, VERY CAS, but it's done! I apologize for the pic. Hard to photograph when it's still dark out. LOL

Friday, August 26, 2011

Bah! Humbug! Here Come the Girls Challenge


I can't believe how time flies! I'm so sad to be leaving Humbug Hall as this is my final post as Guest Designer. I want to thank Ann and Max for inviting me and Tracy for being a Guest teamie with me this month. I'm very excited, to see what the next ladies have in store and to continue to play along with the weekly challenges because, after all, I am a Proud Loyalty Member. This week our challenge is Here Come the Girls. We want to see you girly-est ideas, whatever they my be. No problem there. Can't get much girlier than shopping. And it's even MORE fun at CHRISTMAS! I made the easel card with the next to smallest Labels One Grand Nestisties and my Grand Caliber, then cut the the mat and striped piece with the smallest in the set. This is as easy as doing a regular shaped card with your Nesties. You just place one of the sides of the die just above the fold and run it through. Then score at the center of one of the sides. Cut additional mate to adhere to the folded piece, thad there you go. You don't even have to measure because of the shape of the Labels One die. Easy peasy! The yummy pastel papers are by My Mind's Eye.


I've used the adorable Xmas Shopping from Kenny K. She's colored with Copic and I've added Stickles her fur trim. She's cut out with Nesties Beaded Ovals which I inked with Distress and popped.


The sentiment is computer generated and cut embossed and matted with my Nesties Labels Seventeen. I've used adhesive pearls to hold up the easel, coloring some of them with Copics to match the dots on the paper. Now go have a look at Bah! Humbug! for more fabulous inspiration, and I'm sure you'll love playing along with this challenge. I'm also entering this is the Christmas Cards All Year 'Round August Challenge using ribbon, inking, stripes and a metal embellishment, Christmas Stampin' All Year Long Non-Traditional Colors, Crafty Hazel's Anything Goes (or actually, it could be a Christmas Birthday card), Divas by Design Christmas in August, The Crazy Challenge Christmas Anything Goes for August, and the Charisma Cardz Glitter it Challenge.

Thursday, August 18, 2011

Bah! Humbug! Something New Challenge


As we settle back down from the summer holidays at Humbug Hall, we are doing a bit of work with our new found crafty items and exploring new techniques. Yes, this week's challenge at Bah!Humbug! is Something New. Those that know me well know, that rubber stamping is not my forte, especially when the medium is not regular ink. Although I've had this lovely Christmas stamp by Stampin' Up for awhile, this is the first time I've used it, and the medium was especially exciting (and challenging). I've used my new Judikins Mica Gloss Metallics Effects ink in green, rose gold and gold, spread it on glossy card stock, mushed it together and stamped it on another piece of black glossy card stock for this effect. There are a number of different techniques using this fabulous ink HERE.

Unfortunately, I did not refresh my memory as to technique before I began experimenting and did get a bit more ink on the delicate stamp than intended. It therefor took much longer to dry than anticipated, and I accidentally smeared it a bit while finishing my card. To hide a particularly messed up area, I use my Heartfelt Creations Limited Edition Regal Poinsettia 2 Precut Stamp and Coordinating Spellbinders Blossom Two Nesties and popped it over the offensive mistake. A metallic gold mat, a few adhesive beads, and a peelie sentiment was all that was needed to complete the card front. As I'm quite timid in diving into new stuff, I thank Ann and Max for this challenge. Undoubtedly, these supplies would have languished for years in my drawers had it not been for them. LOL Please take a look at their new found treasures and techniques HERE and we invite you to join along.

Friday, August 12, 2011

Bah! Humbug! Kiss-mas Challenge


It's my second week as Guest Designer on Bah! Humbug! and this week our challenge is Kiss-mas. We want you to 'pucker up' and send some Christmas kisses to a loved one in your life. I went back and forth on whether to do something romantic, or cheeky, and guess which won out. Bet I don't have to tell you who it's for, either. This sexy Santa is X-mas Hottie from Kenny K. (Guess she does look rather X rated, LOL). She was so much fun to color with my Copics!

I created the shaped card in Cricut Design Studio. The list (which I stretched a bit) is from the Christmas Cheer cartridge, with some added mistletoe from Christmas Solutions.

I cut the list 3 times and cut it apart to give it dimension. It was then inked with Distress ink in Antique Linen. the shading on the mistletoes was done with my Copics. They are a lot easier to use on intricate cuts. The berries are adhesive pearls from M's.

The sentiment, on both the front and inside, were computer generated. It took a bit of trial and error to get it arranged just right. I typed it within a text box and printed it, then used my light table to see if it would line up correctly. Once satisfied, I used temporary tape to tape it to the page and then ran it through my printer again. Although the inside looks quite like the outside, I didn't use any dimensional elements so it would close properly. I did, however, cut the list another 3 times and cut it apart and layered it (flat) to give the back of the card the structure to make it sturdy enough to stand. This is especially important for shaped cards, such as this. Then, instead of adhesive beads and pearls, I just doodled on the list, used a basic hole punch for the berries and added some Glossy Accents for shine. Instead of a real ribbon, I cut the mistletoe in white and cut and colored the bow and glued it on. I was so happy to see the fabulous response last week to the WOW challenge. the cards were just breathtaking and I hope to see my friends join in again this week. Please pop by to see what the Humbuggers have in store for you this week. You'll not be disappointed.

Friday, August 5, 2011

Bah! Humbug! White on White Challenge


TGIF, everyone! An this is not just any Friday. Today I'm joining the Humbuggers for the month of August as Guest Designer! WooHoo! If you follow my blog, you know I've been a proud Loyalty Member of the Bah! Humbug! fabulous Christmas Challenge Blog since last year and I'm more than excited and honored to join Ann and Max and my fellow Guest Designer, Tracy for a month of Christmas fun. This week the challenge is White on White, a particular favorite of mine. I've had the idea for this card for a long while. I designed it in Cricut Design Studio and cut it on my Cricut Expression. The snowflakes are from Accent Essentials and Very Merry Tags, the gorgeous butterfly from Hannah Montana, the sentiment banner from Wedding Solutions and the back from George and Basic Shapes.


No surprise it's a shaped front card, my favorite type to make, and I've used a matte silver for the shadows, from Recollections, to set off the all white design. Then I added plenty of adhesive gems to make it sparkle.


Here's a close up of the sentiment, done on my computer with my Printmaster Pro program.


There are plenty of layers for dimension and the butterfly is adhered in the center only, so the wings are free to fly.


Inside, I've embossed the mat with one of the 5x7" Cuttlebug folders. The sentiment was placed so that it is not visible from the front. I have to say that this may be one of my favorite Christmas cards EVER! I do so hope you come visit Bah!Humbug! to see the lovely creations by the rest of the crew and would be ever so pleased if you decided to play along. On the first Friday of each month there is a prize to be won, and this month's is ever so exciting. I'm also entering it in the Simon Says Stamp Christmas in August Challenge, the Jingle Belles Shape-Up for the Holidays Challenge, the Fussy and Fancy Fridays Challenge and the Winter Wonderland White on White Challenge (I'm hoping since they're allowing a colored image, and I don't have one, that they'll let the little silver shadow slide. LOL)

Wednesday, August 3, 2011

Bah! Humbug! Lace Challenge


This week the challenge as Bah! Humbug! is to use lace. I was excited because I've been hoarding this gorgeous vintage lace I'd received from my dear friend, Joy and this seemed the perfect opportunity. I thought it paired well with the beautiful laser cut sticker I'd also been hoarding from another dear friend, Leah. Thanks you guys, love ya both! The sticker was on a piece of craft color backing, and I liked the combination so much that I cut Kraft paper to use on my card.


For some reason, the K&Co chipboard sentiment really didn't show up in the first pic, so here's a close up. It's layered on a scrap tag I'd cut with my Cricut, that was laying on my desk and the kraft piece behind it is the back side of a tag that came with my vintage seam binding from Prairie Bird Boutique. Way to recycle, go me! This is the last of my really late B!H! cards for awhile. Check back Friday for a surprise, and if you're quick about it, you can still join in on this week's lace challenge too. WooHoo! I'm also entering this in the Simon Says Stamp Christmas in August Challenge.

Tuesday, July 26, 2011

Bah! Humbug! Beads and Whimsicle Wednesdays Use Your Scraps Challenge


Wow, my DH has been gone backpacking for 4 days and I really thought I'd be crafting up a storm but I sort of got lost in other things. I went to the Farmer's Market, I gardened, I chatted with friends, I cleaned house, I did laundry. What got into me? But I finally managed to do a really CAS card for the Bah!Humbug! Beads challenge. The only difficult part of this card was stringing the beads because the eye of the tapestry needle I used didn't want to go through the Alpha Beads. I ended up using pliers to pull, which finally did it. I planned to play along with the current Whimsicle Wednesday Use Your Scraps Challenge, as well. I always have white card stock of various sizes all over my table from digis and computer generated sentiments, border punches, etc, so that was a cinch! The red piece had been knocking around for weeks and had all sorts of junk cut out of it, but thankfully, there was space left over for a 4 3/4 " square. The embossed wreath is a Cuttlebug folder and the doves, a Martha Stewart punch. P.S. the red ribbon the beads are strung on is a scrap too.


I popped the wreath and the doves (which I punched once in white and once in red to create a bit of a shadow) and that was it. Im also entering this in the Christmas Cards All Year 'Round July Challenge which is to do a card that is mostly white and the Winter Wonderland Holly and Ivy Challenge because if you look closely at the embossing, you'll see that there are holly leaves in the wreath. Be sure to stop by all of these fab challenge blogs to see the wonderful inspiration by the DT's.

Monday, July 18, 2011

BBTB2 Jolly Holidays Penguin Cut and Bah! Humbug! Shaped Card Challenge


Happy Monday everyone! Time for another fun challenge at BBTB2, this time chosen by our oh so talented sister, Melissa. Our challenge this week is the cute penguin with the umbrella from the Jolly Holidays cartridge but any penguin with any umbrella will do. Now you don't have to do a Christmas card, (wait 'til you see some of the uber creative things my teamies have come up with!) but I did, because I wanted to also enter it in this week's Bah!Humbug! challenge which is Shaped Cards. I designed my card in DS using the snowflake from Accent Essentials as the base. Seems like I always come back to that one. The penguin base is welded to the shadow of the snowflake at sort of an angle so he's look like he's flying through the air with his umbrella. He's a pretty simple little guy so I decided to add a few more snowflakes (also from Accent Essentials) to jazz up the card a bit.

Not quite as many layers as usual, because the cuts on Jolly Holidays has no shadows, but I did glue the umbrella around the top and side edges and pop the center so it sort of looks like it's open (which doesn't seem to show in the pic). There's a little embossing, doodling, adhesive pearls and a twine bow, and that's pretty much it. All in all, I still think it turned out pretty cute. Now go have a look-see at the fab creations by the rest of the BBTB2 DT and remember you have two weeks to complete the challenge with a "new" card, please. And why not check out the fabulous Bah!Humbug! challenges as well? Always super inspiration and fun there and for once, there's still time to enter because I'm not getting my project in just under the wire. LOL

Wednesday, July 13, 2011

Bah! Humbug! Mice Challenge


EEEk! Humbug Hall is filled with MICE (or meeces as the humbuggers like to call them)! That's the challenge this week at Bah!Humbug! Bet you know where this one's going, eh? Goliath insisted on being the star of this simple card. Anybody tired of him gifting us with these? Yeah, me too! Anyway, the Santa hat is from a Kenny K Xmas Accessories digi. The mice are MS punches and the "Night Before Christmas" DP is by My Mind's Eye. Could it be more perfect? The frame was cut with my Nesties and there ya go, easy peasy. Be sure to check out the sweet mice cards by the B!H! team. Bet they weren't expecting one like this. LOL

Wednesday, July 6, 2011

Bah! Humbug! Acetate Challenge


This week at Bah! Humbug! it is the dreaded Acetate Challenge. Eiyiyi! Because of preparations for our July 4th party, (yes, we had a blast, ate and drank WAY too much, stayed up late and we're still recovering) I had no time to really think about this and the magnitude of the challenge until today. Secretly, I think those Humbuggers were exacting revenge on us Yanks for the whole Independence thing, but that could just be me. Worse yet, I decided to try something new and take on a "Magic" card from SplitcoastStampers , which just about did me in. Even when I'm feeling 100%, measuring is not my forte, so this proved to be more than a little daunting. Since I stink at stamping, and stamping on acetate is a particular bite, I decided to use a digi stamp and let the computer do that work for me. I used the quirky little Prezzie Elf, part of Santa's Grotto from The Octopode Factory.


I chose non traditional colors from the Happy Holidays collection by Fancy Pants because of the whimsical image. As you pull on the bow, the magic starts to happen.


I used the method shown on the video for this type of card because I used my Nesties to cut the window.


As you can see, once fully extended, a fully colored image appears just like magic! WooHoo! He's colored with Copics with some Distress inking in the background. The sentiment is also computer generated. I think it turned out pretty darn cute, despite my troubles in creating it. Hopefully next time will go better (if there ever IS a next time). Is it "Happy Hour" yet? Oh yeah!

Wednesday, June 29, 2011

Bah! Humbug! Penguin Challenge


This may be a really lean week of crafting for me so I'm gonna apologize in advance. Besides several appointments (just got back from the dentist, YUCK!) I've got tons to do for our annual 4th of July party and houseguests, so I'm scramblin' to complete NEXT week's DT cards. Or Tiddly Inks challenge has been postponed for a week (which is why you didn't see a Tiddly Tuesday card yesterday) but don't forget to comment on my BBTB2 Blog Hop card HERE for a chance to win a $40 gift certificate to Custom Crops. I have, however, managed to do my Bah!Humbug! card for the week and the challenge is penguins. Since I've done a few penguin cards in my time, I was looking for something new. This cutie from Winter Frolic fit the bill. (I'm actually starting to like that cart now, who knew?) Anyway, I made a shaped card in DS and flocked his little bod. I embossed the hat and added a pompom and Flower Soft to the rim. Initially I just used Glossy Accents on the lolly pop, but it just wasn't enough so I cut off the stick used more Glossy Accents to adhere it to the back of a Tim Holtz Fragment. Then I added a colored toothpick and bow.


The Snowflake is from a Cuttlebug cut and emboss combo that was lying on my work table from??? The little guy looked a little plain (and actually there was a smudge of black flock at the bottom of his tummy from my grubby fingerprint to hide) so I stuck it on there and added a Jolee sticker to the center. Kinda weird but not so totally out there, do ya think? Anyway, not much dimension but I needed this to be quick so there he is. I'm also adding this as my 5th card to the June Anything Goes challenge at Christmas Cards All Year 'Round.