Tuesday, March 31, 2009

The Cuttlebug Spot Double Embossing Challenge and Last Day to Get Blog Candy


This week at The Cuttlebug Spot we were asked to use double embossing on our project which is simply running your cardstock through the Cuttlebug using one folder and then a second time using a different folder for a multi patterned effect. The first pattern flattens slightly but is still visible, but you can also ink the first embossing and it will stand out much more. I used Swiss Dots and Birds and Swirls. The adorable die cut is another Cottage Cutz which is available exclusively from The Scrapping Cottage. I must say I've fallen in love with these dies. I cut the shape out in both white and gold foil cardstock for a bit of a shadow effect and popped them for dimension.
The sentiment is a fabric label I got in the clearance bin at J's. I thought it would be appropriate for either a wedding or anniversary. The border is a peel off and of course I added gold adhesive beads. The border punch is a new one from EK Success. This technique is so much fun that I hope you come and play along at The Cuttlebug Spot and be sure to stop by and see all of the lovely examples created by my Design Team sisters.


I can't believe today is March 31 which means it's the LAST DAY to enter my BLOG CANDY giveaway in honor of my 100+ followers. I'm thrilled to see that that number has reached 161 since announcing the candy. Signing up to follow was not a requirement to enter so I'm honored that so many of you found my blog inspiring enough to do so. Thank you, thank you, thank, you! Click HERE to leave a comment if you haven't already done so. See you tomorrow! (I may be a little late in posting the winner because I have an early a.m. hair appointment and it takes HOURS to keep my hair this red. LOL

Sunday, March 29, 2009

BBTB Doodlecharms Bunny


I can't believe it's Monday already but I bet you all know what that means. Yea! A new Bitten by the Bug challenge! Regina chose the bunny from Doodlecharm this week and instead of making a card I chose to do a freestanding Easter decoration. I got to thinking about those panoramic eggs and decided to make my bunny with a panoramic tummy. LOL I welded the shadow bunny head to an oval from George with a circle cut out the size of the packaging from some tape rolls. I cut her out of chipboard twice (for sturdiness) then covered her with card stock and cut it again on regular using the Bazzill Swiss dots paper. Layers were popped to add more dimension. The feet are made from the hearts from Accent Essentials and notched so the body could fit in and stand.


For the tummy scene I used the Doodlecharms basket and Zooballoo grass sized to fit in the opening. Brads from Queen & Co. and some punched "grass" and a butterfly completed the look.


I finished her both front and back since the tummy was see through so a pom pom tail was in order. I had intended to doodle around her but that Bazzill Swiss dots paper is used is quite textured and a bit waxy so I was afraid I'd screw it up after all of that work so I pulled out my trusty adhesive pearls to finish her off. all in all she's nearly a foot tall. this week the BBTB Design Team really outdid themselves with loads of FUN Easter projects so be sure to click HERE to see them all. Also don't forget you only have 2 more days to enter for my BLOG CANDY. Good luck!

Friday, March 27, 2009

Paper Blooms, Vintage and a Bit of Recycling


I was so lucky to win the gorgeous Blog Candy Leah offered over at Paper Blooms to launch her new challenge site and introduce her design team. Her beautiful hand crocheted blossoms and stick pins scream for something lovely and vintage and though I'm not very good at this style, I truly love it. I can't wait for the challenges to start April 1st. Her beautifull blooms are available on Etsy and are sooo reasonably priced. She even does custom orders if there's a particular color or style you'd like to have. Be SURE to check it out HERE. She better be getting her little fingers busy because I just bought 3 sets to add to the ones I won so I'll be ready for the challenge. LOL


The doll image is a postcard I received from a fabulous store in Pleasanton CA called American Harvest that features many artists who craft with a distinctly vintage style. This doll is by the very talented Nicole Sayer who just so happens to live in Pleasanton. I cut her out and matted her in chocolate and popped her on top of a crocheted doily I had recently uncovered in the attic. The pretty paper is Basic Grey. I used some ecru lace from J's across her bodice and the glitter heart and vintage keyhole are from Melissa Frances. After taking these pix I realized I had neglected to ink the edge of the chipboard heart. I popped it off and it's all fixed now (okay Shelly? LOL)

Thursday, March 26, 2009

I've been Tagged


I've been tagged by my dear friend (and BBTB DT sister) Jen so here's my 6th picture in my 6th file. I can't believe it's not a cat picture. LOL This bouquet is from my garden and sat in the niche at the end of our entryway last May. Nothing makes me happier than fresh flowers in the house and if they're from my garden so much the better. We have more than 70 roses in our yard and I've been wondering how I ever kept up with them all until I remembered that I didn't get my Cricut until the beginning of May last year. LOL I'm afraid I'm a bit behind this Spring but we're already getting buds. WooHoo!


I think it will be fun to tag some of my newest blogging friends to get to know them better so that will be


Thanks ladies for following my blog and be sure to comment HERE to be entered in my Blog Candy draw. Can't wait to see your pix. xxD
Also if you'd like to play along with this tagging business (I really think it's FUN!) my dear friend DeeDee is offering up some BLOG CANDY so check it out HERE.

Tuesday, March 24, 2009

The Cuttlebug Spot Spring Challenge


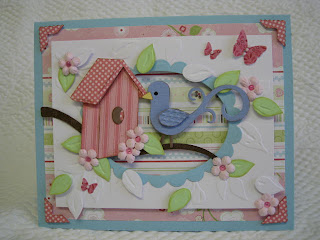
Spring is definitely in the air and this week at The Cuttlebug Spot it is no exception. My Spring themed card starts with my Cuttlebug Leafy Branches folder. I cut an oval in the center with my Nesties to allow the pretty Spring paper to show through and rimmed it with a scalloped frame also cut with my Nesties. The birdhouse, branch, leaves, and bird were all cut using my new Cottage Cutz die from The Scrapping Cottage. These fabulous dies are designed by and made exclusively for The Scrapping Cottage by Go Kreate. I used Tim Holtz distress embossing power on the branch and cut many leaves in both white and green and cuttled them individually with the Leafy Branches folder for texture. Some of the leaves were popped directly over the base embossing and some were just thrown in for interest. I also used a leaf shape for the bird's wing and cuttled it with one of the textures from the Cuttlebug Snow Fun emboss/die combo set. the butterfllies are a Martha Stewart punch, the corners are a punch from EK Success and the flowers are by Prima. Be sure to stop by The Cuttlebug Spot to see all of the fabulous creations the other Design Team members have done and we invite you to play along.

Monday, March 23, 2009

Spring has Sprung BBTB Challenge


Happy Monday! Is everybody out there feeling Springy? This week at Bitten by the Bug Regina chose the "Spring" cut from the Stretch Your Imagination cartridge. I made a shaped card by welding my sentiment in Design Studio using my choice of the required cut and letters from All Mixed Up to some tulips and daffodils from Walk in my Garden and grass from Zooballoo. This shaped front was then welded to a rounded rectangle from George. I highlighted the letters with my fave adhesive pearls and cuttled the grass for texture with the forest branches folder. Of course there were several layers to pop for dimension and the darling Queen & Co. garden brads finished it off. the little butterfly and bee are on springs I made by winding 26 guage wire around a wooden skewer. Be sure to stop by Bitten by the Bug to see how my Design Team sisters rocked this challenge and I hope you'll be inspired to play along.
Hey, and don't forget my BLOG CANDY. Click HERE if you haven't already entered. the drawin will be held on April 1st.

Friday, March 20, 2009

A Day at Scrapbook Expo and Some Lovely Blog Awards


I'm sorry no card to post today but I've been busy shopping 'til I dropped at the Scrapbook Expo in Pleasanton, CA. I'd take a picture of all the goodies I bought but I'm afraid that would incriminate me terribly. Fortunately DH wasn't home so I could sneak my bags upstairs unnoticed. LOL It should suffice to say that I made several trips to the car before I was through.

I'm also way behind at posting some lovely blog awards. The first is from Caryn at Glitter Me Silly. She is an amazing crafter and fabulous mother to 5 (yes, count'em 5 adorable children) yet looks like a sweet child herself. If you love bling be sure to visit her wonderful blog. Thank you Caryn for this honor. P.S. She's also has some yummy candy available on her blog so click HERE to comment to win.

The second is from Rosy and Nicci. Rosy at Box Clever Papercrafts has some of the most fabulous sentiments I've ever read in her gorgous cards. Some are beautiful and touching and some make you LOL. Be sure to stop by her blog by clicking HERE. You can visit Nicci at Procraftination (isn't that just the most adorable name for a blog?) Nicci is also from across the pond and has some amazing things on her blog including a fabulous tutorial on making beautiful ribbon roses. Click HERE to check it out.
That makes 24 people I should be passing these awards along to. As far as I'm concerned, all of you who visit me and comment and have blogs of your own truly deserve these honors as well so please accept them with my heartfelt gratitude and admiration. Hugs! D

Also please don't forget my own BLOG CANDY. You have until April 1 to comment HERE.

Wednesday, March 18, 2009

A Springy Card Set


Heres a fun Springy card set and and folder I made using a template and downloadable stamps from The Cutting Cafe. They are so easy to use and there are so many designs I had a hard time choosing what to make first.

I printed the Greeting Card Folder on my computer and cut it by hand (with the help of my paper cutter...sooo easy), but the downloads are also available in a format to use with SCAL or your Pazzles machine.
I used Martha Stewart punches and fun dotted paper to decorate the folder both inside and out. The pretty tulips are printed half size from The Huge Flower download (stamp 2). I made 2 cards per pocket but there was room for more.

I printed the tulips on patterned paper, glued them to card stock and cut them out. The flower heads and All Occasion Sentiment Circles were popped dotted for dimension. My Cuttlebug Swiss Dots folder added some texture. A coordinating strip of paper was added to the inside edge to enhance the scalloped front.

I used 4 of of the 6 sentiments offered in the All Occasion Circle Scallop set. They are conveniently sized in 1", 1 1/2" and 2" versions to punch out with your circle punch, or cut with your Nesties. This was really a fun set to make and I think it would make a super gift. Be sure to stop by The Cutting Cafe to see all of Regina's fabulous designs. They are only a download away.

Tuesday, March 17, 2009

The Cuttlebug Spot Sketch Challenge


This week on The Cuttlebug Spot our Design Team sister Aymee provided us with a terrific sketch. Aymee is an AMAZING scrapper and has recently started a second blog A Sketchin' Southernbelle where you can find her fabulous sketches for both layouts and cards. So if you want a fun and creative sketch for a project Aymee is your gal. I'll be the first to admit, sketches are a REAL challenge for me. I love the idea of them but when it gets right down to it I have a terrible time with them. I think maybe my mind is much to scattered to follow a "recipe" and even though I know you can take "creative license" with the design somehow I feel like I'm "cheating" when I do. I did overcome this somewhat by turning the sketch vertically. (This was a VERY big deal for me. LOL)

I had the idea for this card way back when the challenge was to use buttons but I was too sick to participate. I wanted to use my fave paper from Memory Makers (Chloe's Closet) because of the tape measure. This paper also had lots of other striped sections which was perfect for the sketch. The pretty patterns of this paper reminds me of a mix of fabrics you might use for a quilt and provided lots of Cuttlebug opportunities. The back ground and "embroidery piece" are textured with Swiss Dots, the buttons and zigzag stitching are border folders, and I used the folder from the With Gratitude set for the larger floral strip. "Thanks" is cut from the die from that set. The rectangle and ovals are cut with Nesties and it's supposed to look like a piece of fabric in an embroidery hoop. I lightly drew the "Sew" on the oval and pierced it at regular intervals. (I cuttled it after sewing so that's why it looks kinda smooshed but I was afraid it might tear the paper otherwise.) "Much" is cut on my Cricut using Opposites Attract, and the pincushion is the Cuttlebug pumpkin cut/emboss die with the leaves cut off. Please go visit The Cuttlebug Spot to see the other Designer's amazing takes on this fun sketch and have a go at it yourself. And don't forget to check out my BLOG CANDY.

Monday, March 16, 2009

BBTB Wedding Solutions Pillow Box (and Hallmark Scrapbook Shoe Challenge)


Good Morning all! It's Monday and you know what that means. This week on Bitten by the Bug Regina asked the designers to use the pillow box cut from the Cricut Wedding Solutions cartridge. I had conveniently received my Stampin'Up order with the fun "Humor in High Heels" set. WooHoo! Perfect theme for this challenge, don't you think? I chose the stamp "Cinderella is proof that a new pair of shoes can change you life!" and set out to make the glass slipper atop the pillow that Prince Charming carried in search of Cinderella.

First of all I cut the pillow box in shadow on the largest size I could get on a 12"x12" mat which was 10"from pearlescent card stock from WalMart. The regular cut was also done at 10" using the beautiful card stock from the DCWV Luxury Stack. The layers were adhered with wide double stick tape so this is quite a substantial box that measured about 9"x5" when assembled. It is embellished with pleated organdy ribbon and rhinestones (from M's) as well as double corner bows and little jewel crowns (from J's).

To make the "glass" slipper I used the packaging from a Cricut cartridge (how about that for recycling?). This required the use of the "multi cut" feature to make it all the way through. The shoe is from the Graphically Speaking cartridge which I chose to complete a challenge for Hallmark Scrapbook (that I was VERY late on but wanted to play catch up.) In order for the shoe to stand up I had to cut it twice (on blackout). Normally I would have welded 2 shoes together to do this but my acrylic wasn't big enough so I glued them together at the top and used small rectangular spacer pieces for the bottom so it would stand and could be glue dotted to the pillow box. I added pattern by running the shoes through the Cuttlebug with the Textile Texture folder and outlined them with the same pearlescent card stock I used to line the box.

The tag was cut from Plantin Schoolbook and I used my Nesties to cut out the stamped sentiment. Be sure to bop over to Bitten by the Bug and see all of the fabulously creative ways my design team mates interpreted this challenge. It was a fun one so we invite you to play along. And P.S., don't forget to comment one post down for a chance to win my BLOG CANDY.

Friday, March 13, 2009

I've Got CANDY!


WooHoo! I finally got my shopping done and am thrilled to offer this YUMMY BLOG CANDY in honor of my 100 (+now 14!) Blog Followers. I'm thrilled that so many of you find my blog inspiring and I hope you visit often. You don't need to jump through any hoops here. Just leave my a comment by March 31 and your name will go into a hat for the drawing. If you'd like to put a link on your blog that would be great, but it's not a requirement. I'll announce on April 1 (no fooling! LOL) This candy is open to EVERYONE (meaning International friends as well) so if you've got a sweet tooth be sure to drop me a line.

Monday, March 9, 2009

The Cuttlebug Spot Challenge...Serendipity


This week's challenge at The Cuttlebug Spot is to use a technique called Serendipity which involves glueing torn pieces of cardstock to a background sheet and running it through the Cuttlebug to emboss. There is a terrific tutorial by Brigitta on The Cuttlebug Spot, or you can view it HERE. At first I wasn't so sure about this because it sort of looks like a mess with the random bits all over the paper but it truly is magically transformed when embossed. "Serendipity" means "a happy accident", but I have to admit I cheated a bit and looked at the Cuttlebug Birthday folder I planned to use for my paper placement. I chose primary colors and rather large bits because I wanted to make a child's birthday card using my new Boo for You die from Go Kreate. When I saw Nilda's adorable card on The Cuttlebug Spot the week before last I rushed right over to The Scrapping Cottage and snapped him right up! Just tell me he's not the CUTEST! The 4x4 die comes with the balloons and works right in the Cuttlebug with nothing extra needed. You just substitute a C plate for one of your B plates. The balloons and Boo's nose are glazed with Glossy Accents. I cut the window with my Nesties and thought I'd messed up because I cut it after embossing but it didn't seem to flatten out a bit. I also used a scalloped oval Nestie embossed with Swiss Dots to add some texture behind Boo. The vertical sentiment is part of the Cuttlebug cut/emboss Birthday set which I cut twice to give it some depth and of course I popped the serendipity piece, Boo's head, and the balloons for dimension. Be sure to stop over to The Cuttlebug Spot to see what the other talented designers have come up with. It's amazing the different effects you can get with this technique so have some fun and play along, there's a prize to be won!

Get Your Kicks on Route 66


Morning all! Have to say I had a ball with this week's BBTB challenge. Regina chose the highway sign from Going Places (thank you Leah) and that old song "Get Your Kicks on Route 66" popped immediately into my head. On summer Sunday afternoons DH and I love to drive down to The Wharf restaurant at the end of the Capitola pier and have lunch (and drinkies) on the rooftop. All summer long a band called "Warmth" plays oldies (and boy some of them ARE oldies and have been playing together for over 40 years). "Get Your Kicks" (complete with physical ones) is one of their favorites to play. We really get "a kick" out of it.

This shape card was welded in Cricut Design Studio using the highway sign, both Illinois (where I'm originally from) and California (where we live now) from 50 States, and several rounded rectangles from George for strength and stability. "Get Your Kicks" was welded separately using Mickey font and cut 4 times for extra pop. The winding highway is also a cut from Going Places and was stretched using Design Studio to reach from Chicago to LA. (Are the words coming back to you? You know you'll be singin' this all day. LOL) I printed maps of both states out on the computer and punched out the cities and attached them in the appropriate places. The musical notes are a Cuttlebug die and a terrific suggestion from DH. The little VW convertable is a cut on Paper Dolls and the surfboard in the back was trimmed from last year's DCWV Glitter Mat Stack. It looked silly going down the highway with no driver so I printed out the tiny pic of DH and I, cut us out and there we are cruisin'. (I thought he'd die when he saw this but he really got a "kick" out of it. Isn't he a great sport? LOL) Please be sure to cruise on over to Bitten by the Bug to see what fabulously creative ideas the other Designers came up with and we invite you to play along. Oh and breaking news, Regina just announced a new contest so check it out!

Friday, March 6, 2009

Pinch Proof and I've Been Tagged!


I remember when I worked on St. Pat's Day I had a struggle getting dressed because without something green on some people really couldn't resist the opportunity to pinch. One of my BFF's is a teacher so I decided to make her something that would assure she would be "pinch proof" for the day. I used the St. Patrick's Day printable stamp set from The Cutting Cafe for the center of the little pin I fashioned by making a rosette from ribbon and glued it atop a Nestie scalloped circle. It was the perfect size to punch using my 1 1/2" circle punch and I colored in the little shamrock with a Bic marker and added some Crystal Effects and an adhesive bead. I glued a pin to the back of the rosette so no matter what she wore she'd still have a little green.


The accompanying card has a base cut with my Cricut using the Wildcard cartridge and DCWV's Green Stack. The March Calendar is from the 2009 Calendar set from The Cutting Cafe. I know I'll be using this set alot because each month is offered in several sizes in both a circle and square design. The shamrock and "pinch proof" also came from the St. Patrick's Day set and I was really proud that I managed to resize the shamrock all by myself using the instructions Regina has on The Cutting Cafe site. I have to say I'm really pleased that these downloadable stamps are so easy to use because the my computer skills leave alot to be desired. LOL


Are you wondering about the 5th pic? Well DeeDee, my sweet friend and DT sister for both BBTB and The Cutting Cafe has tagged me. I was to find the 4th pic in one of my files and explain it. This is my adorable Jezebel asleep on the dining room chair. I couldn't resist snapping her snoozing because that's about the only time I can capture her on film she's such a wild girl. since this is my first post as a DT member of The Cutting Cafe I'm going to tag Teri, Tracy, Enfys, and Nikki, a few or my fellow designers. Please click on the names of each of these ladies to view their fabulous blogs. And be sure not to forget DeeDee!

Wednesday, March 4, 2009

Fun with a new Go Kreate die


As a Design Team member for The Cuttlebug Spot I've had the opportunity to work with a new die from Go Kreate, a UK company that has just begun marketing in the U.S. This little Scotti dog is a 4x4 die I got from The Scrapping Cottage. You don't need any extra mat to use them in the Cuttlebug. Just use the sandwich A plate, B plate, die foam side up (that they send you and you just adhere to the cut side so it looks like a CB die), cardstock, and C plate. I thought it would be fun to use a different card size for a change so this one fits in a legal size envie. I cut each Scotti twice to shadow him a bit and popped them on a black background cuttled with the houndstooth folder. The tiny collar is also part of the die and I embellished them with tiny adhesive beads. The red border is a MS punch. The white center strip behind the ribbon is cuttled with the CB ZigZag border folder. The round tag is a circle Nestie attached with a jump ring to a bone paper clip from WalMart. The sentiment is cut with the CB Friends Forever set. Fast and fun! Please check out The Cuttlebug Spot and play along with this week's bow challenge. The prize this week will be a cute VW van die from Go Kreate from The Scrapping Cottage and if you feel all thumbs when trying to tie a decent bow, Nilda has added a cool bow tying tutorial.

Monday, March 2, 2009

The Cuttlebug Spot Bows Challenge


I'm so excited about my first challenge as a Design Team member at The Cuttlebug Spot. This week Nilda chose bows. I tried to stretch myself and make the entire card using the Cuttlebug since I've been investing in lots of new folders and dies so I'm proud to say that with the exception of cutting the mat layers that's what I did. The style is a tent topper that I learned from my friend and BBTB DT sister DeeDee (be sure to check out her BLOG, she's awesome) and both the scalloped and regular ovals for that were done with my Nesties, the top one cuttled with my Swiss dots folder. The green background is cuttled with flower folder from the With Gratitude Cuttlebug set and the Thanks and small pink flowers are cuts from that set as well. The larger flowers and leaves are from the Shapeabilities Sunflower 2 set. Besides cutting and embossing you can use these dies as stencils. Before embossing I used my metallic gel pens to give them some detail and bling. I added small button centers to the pink flowers (because I missed last week's challenge and I thought they were cute) and popped the entire bouquet for dimension. Finally, the DMC floss stems are tied up with a big bow that inspired my entire color scheme. I hope you'll visit The Cuttlebug Spot to view the fabulous creations the other designers came up with and invite you to play along.

Laugh Often BBTB DT Challenge


WooHoo! It's Monday, I feel about 85% better and I finally have something to post! For this week's challenge at Bitten by the Bug Regina chose the "Laugh Often" cut from Beyond Birthdays. The inspiration for the design actually came when I was leafing through my Stampin'Up catalogue and saw a cute little duck stamp with the sentiment "You Quack me up". It really got the wheels turning so I designed a shaped card using the duck from New Arrival as a base. First I welded some waves from Zooballoo because the card needed something flat to stand on. The top layer was cuttled using D'Vine Swirls. I originally was gonna use the sentiment inside, but there wasn't enough of an attachment at the top of the duck's head (without giving him a flattop LOL) so I added a word bubble from Paper Pups to increase the area for the top fold. "Quack is cut from Animal Kingdom and the tiny clear bubble letters are from J's attached to punched circles to give them color. I decided the NA ducky wasn't whimsical enough so I cut off that bill and added Daisy's laughing one from Mickey font. The wings were trimmed from the winged heart from Hello Kitty Greetings and her little curl is the swirl cut from the second wing. with some lidded google eyes (also from J's) and a little bow I think she turned out pretty cute. Be sure to stop over to Bitten by the Bug and see what my fabulous Design Team sisters have done with this fun challenge and please come and play along.
P.S. I was shocked and delighted to wake up this morning and see that I have reached 100 blogs followers! I want to thank each and every one of you and will be celebrating soon with some yummy BLOG CANDY so stay tuned. HUGS! D