Showing posts with label Digi Stamps 4 Joy. Show all posts
Monday, March 10, 2014
The East Wind Challenge 2
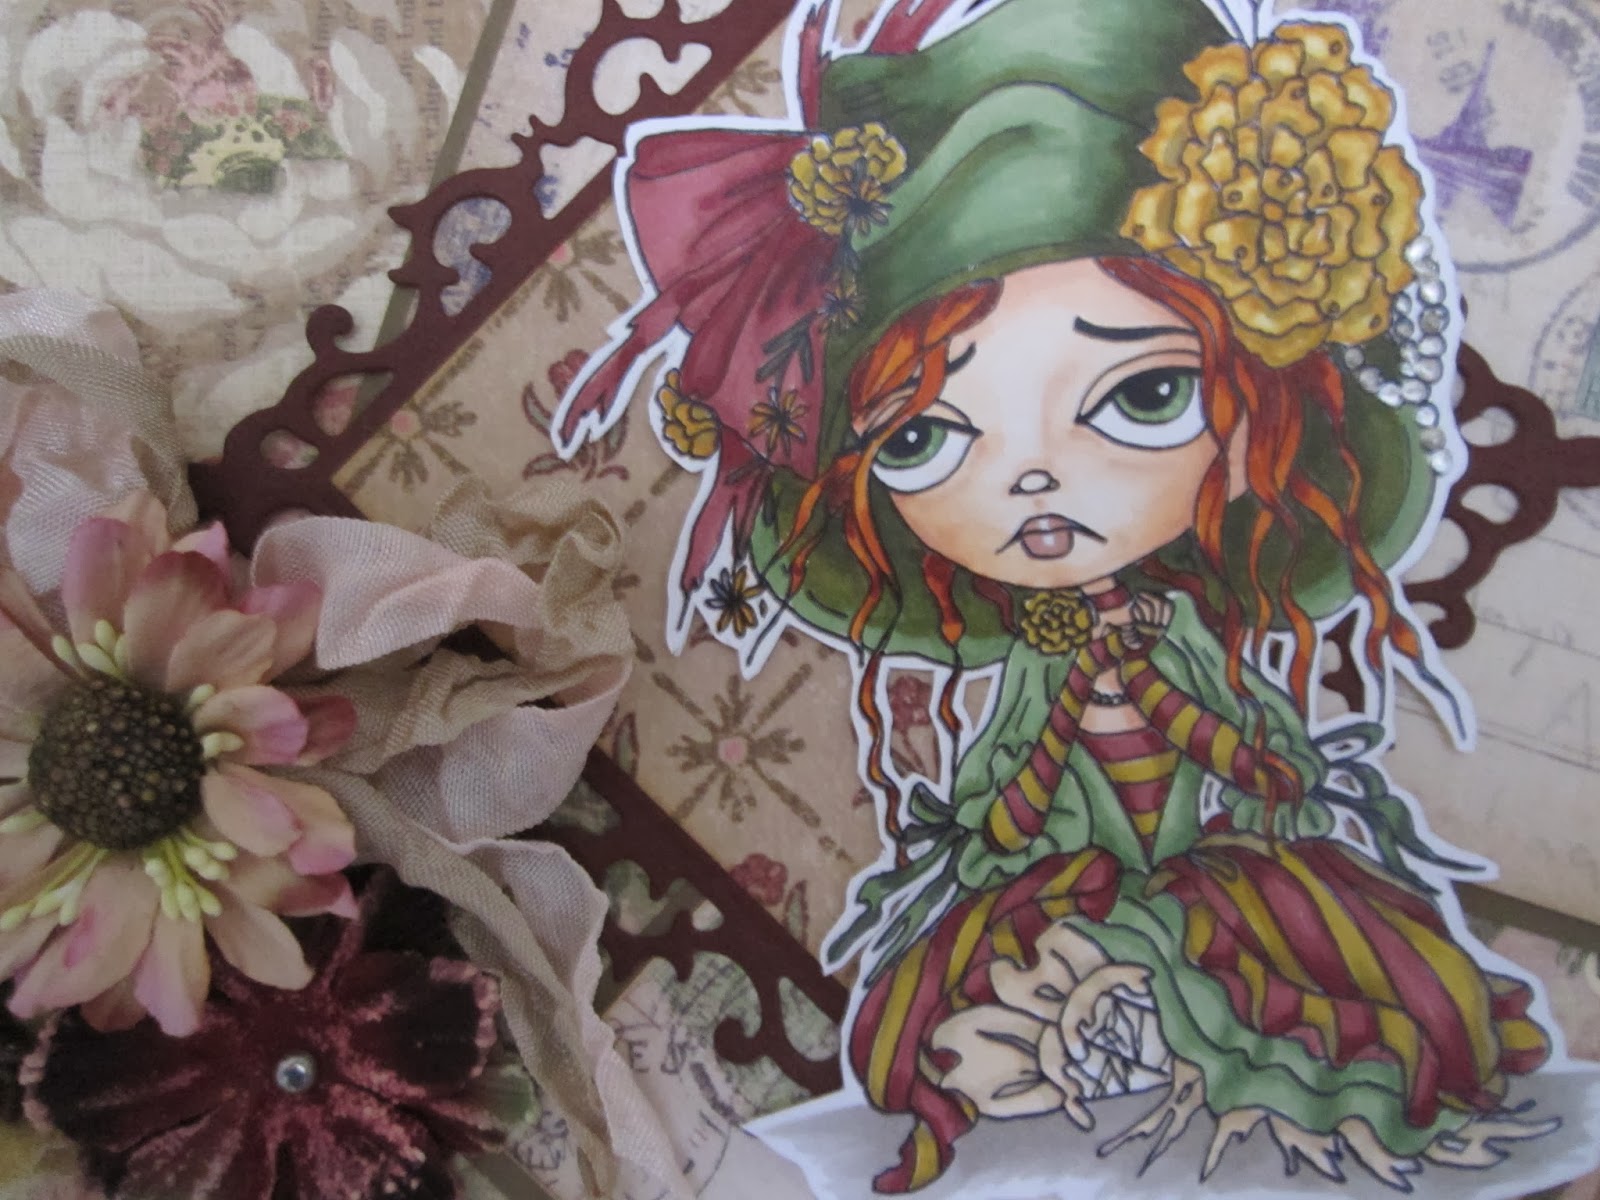
WOW! Been working all day on the current Use a Digi challenge for The East Wind and am just making it in with a couple hours to spare. I had the hardest time choosing which of her fabulous digi's to start with and had both the adorable Freebie image I received with the newsletter, and Aurora Poppy colored, thinking I could do both, but of course that was not to be. Aurora Poppy won out because I was dying to use this DP by BoBunny and a never used Poppy Die by Spellbinders. I created a window straight through the card with Aurora peeking out. The butterfly is a Martha Stewart punch and the sentiment is computer generated.
And don't faint, I actually finished the inside. Go ME! She's colored with Copics and I used the scraps from the DP mat on front to help finish it off. Another MS butterfly and an ancient photo corner die as well.
I'm also entering this in the Quirky Crafts Secret Garden Challenge, the Left of Center Die Cuts Challenge, Through the Purple Haze Anything Digital, Naughty or Nice Birthday Challenge (I can't believe I went with "Nice". Still thinkin' on "Naughty"), the ABC Challenge "G" is for Girls, and the Fussy and Fancy Birthday Challenge, Digi Stamps4Joy Add a Birthday Sentiment and the LOC 1st Anniversary ATG challenge.
Saturday, March 1, 2014
Cute Little Leprechan for Aurora Wings and a Mini Tut
Found a fun and fabulous tutorial on Splitcoast Stampers by Bibiana Martinez-Zeigler to make this 4 leaf clover (shamrock) card and thought it would be the perfect backdrop for Mitzi's Whimsical Little Leprechan from Aurora Wings. The catch was, the card folds flat for mailing so I needed a way to attach the image without interfering with that.
I followed the tut using my Spellbinders heart dies. Then I cut a 1" x 4 3/4" strip and scored it at 3/4" 1 1/2", 3 1/4" and 4". and folded it as shown.
I slipped the two end flaps through the bottom of the top two hearts and folded the top two hearts down over the bottom two, applied adhesive to the flaps and made sure they were straight before pressing them down. It's ok for them to be glued right over the diagonal ribbon that laces the card, just make sure you've got it tied in a way that both allows you to stand the card up, as well as fold it flat. If there is a teeny bit of excess along the bottom, just trim that flush with your hearts so they will stand straight.
Now, open your card again, place it in the standing position, and put adhesive on the front of your strip. This is where the image will go.
Here's this cutie's close up. He's colored with Copics and I've added some glitter foam shamrocks and adhesive gems to gussy him up. Carefull apply him to the pop out so he will be straight when the card is in the standing position.
I used a Cuttlebug Emboss Plus Fancy Label with a computer sentiment. Tip here if you're using this particular type of folder, cut the label first, print your sentiment on copy paper and then use removeable tape for placement. Then run it through your printer again. Had I used Spellbinders, I would have printed first, but it's nearly impossible with this Cuttlebug folder because the only part that's open is the embossed portion. OOPs, that was a little side track. The point of this pic was to say that to adhere your sentiment, again leave the card in the open postion and only adhere the right portion to the bottom right leaf, making sure it's centered as you wish when the card is open.
When the card is flattened completely, the sentiment will be a bit sideways, but that's ok. You want it to stand anyway, don't you? The flap that the image is attached to will flatten to the left as well.
So, to fold it flat for mailing, take the two left hearts and fold them behind.
Then fold the bottom two up and there ya go. there's plenty of room in an envie made for a 5x61/2" card. Oh look, you can see my little "Good Luck" peelie in this pic.
I'm entering this in the Creative Corner Green challenge, Creative Fingers ATG(sponsored by Aurora Wings), QKR Stampede Anything But a Square Card, Savvy Handmade Cards Going Green challenge, Digi Stamps4Joy Use Dies or Punches, Sassy Studios Flip it or Fold it,the Outlawz Monday Greeting Cards ATG, Just Inspirational Hearts and Ribbon, Party Time Tuesdays ATG, and 613 Avenue Create ATG.
Wednesday, February 26, 2014
My Melancholy Moppet for Lacy Sunshine
There's a contest going on (through Friday) in the Lacy Sunshine Facebook Group and I had to play along. You were to use any of the Melancholy Moppets and they are some of my FAVES. I've chosen Anastasia (scroll down to get yours). What started out to be a card expanded into a wall hanging. I'd printed Anastasia a little more than 5.5 " tall and wanted to add Lots of Layers to enter her in the current Lacy Sunshine Blog challenge as well, soo... I've used my Spellbinders Grand Caliber Creative Book pages for several of the layers and K&Co DP which had the shabby look I was going for. The gorgeous lace die is from Heartfelt Creations and the lacy frame behind Anastasia is Spellbinders Fleur Di Lis Squares.
Anastasia was so much fun to color with my Copics. Not exactly Springy colors, but I thought they suited her. Delved into my stash for the perfect flowers and seam binding to finish it off. Kinda love how this turned out.
I'm also entering this in the TTRCD ATG Challenge Feb 25-Mar 3, Digi Stamps4Joy Use Dies or Punches, Outlawz Twisted Thursday ATG with the Triple Play Twist (Use 3 of something-3 flowers).
Thursday, February 13, 2014
A Valentine for my Man
As soon as I saw Veronica Vamp by Kenny K, I knew she was gonna be on this year's Valentine for my man. Had to say I kept it kinda simple ('cause he likes it that way), using two different doilies, a touch of embossing and a sentiment from Ginger's House. Couldn't forget the lips though. His kiss? MMMMmm...!!! (Oh oh, TMI?)
Now tell me you're surprised she's a redhead. LOL Really fun to color, too.
And inside...well... Wishing you all the love of your dreams. Happy Valentine's Day.
I'm entering this in the KennyK's Krafty Krew's Love Challenge, Digi Stamps 4Joy Hearts, the Outlawz Paper a la Mode Valentine's Challenge, TTRCD ATG Feb 11th -17th, Sassy Studios DTBST It's Valentine's Day Challenge, the Fan-Tastic Tuesday Romance challenge, the Corrosive Feel the Love Challenge, the Crafter's Cafe Must Have Hearts and the very first Naughty or Nice Love challenge (the image is a bit naughty but the sentiment is nice).
Thursday, February 6, 2014
Aurora Wings Anti-Valentine for Left of Center
Just couldn't resist this cutie from Aurora Wings and thought she'd be perfect for the current Left of Center Cute/and or Creepy challenge. This adorable little Anti-Valentine Girl looks like she's through with love, at least for now. Can't imagine anyone wanting to break her heart though, can you? Wanted to do something a bit different so I made a "Spring" card, modifying it somewhat to suit my needs.
I took my colors from an old DCWV stack. Had a ball coloring her edgy hair, well actually all of her, with my Copics. EEEK! Love her little kitty ears. The fab sentiment is from Ginger's House and the adorable little Glo Skull is from Creepy Glowbugg's Etsy Shop.
I've used Nesties dies for the hearts and cut one jaggedly for either side of the base. It helps stablize the pop up center because as usual, I've fussy cut and popped the image which made it a bit wonky.
I'm also entering this in the Corrosive Blog Feel the Love Challenge, Simon Says Monday Love Notes, Digi Stamps 4 Joy Hearts, the Outlawz Twisted Thursday ATG w/optional twist Valentines/hearts, and the Crafty Little Fairies Love challenge .
And now for some exciting news (in case you missed the new badges on my sidebar). Mitzi Sato-Wiuff of Aurora Wings has opened a new monthly Challenge Blog and has asked me to join the Design Team. Although the challenges do not start until March 17th, there will be weekly interviews of us gals until then. Be sure to stop by and follow the blog, because Mitzi has generously offered up a Freebie and coupon code (under the "Offers" tab at the top). Also, if you just can't wait, there is a contest, more freebies and all sorts of good stuff going on on the Facebook Group. Hope to see you there.
Friday, January 17, 2014
Dilly Beans Mardi Gras Colors
There's a new Challenge at Dilly Beans, use Mardi Gras Colors. That means we want to see Green, Purple and Gold. You may use any theme, but I love the festive spirit of Mardi Gras so I went quite literally with the adorable #484 Adriana's Mask Framed. I colored Adriana with Copics and a metallic gold Sharpie for her mask. I found some green specialty paper from M's that I've had FOREVER and thought it look a bit like fireworks but couldn't manage to make the frame work with it, so I fussy cut her and mounted her on a metallic doily. I jazzed up her mask with some feathers and glittery metallic bow and cut the sentiment with my Cuttlebug. Looks like she's ready to celebrate BIG TIME. My teamies have come up with loads of inspiration so stop by the Challenge Blog and take a peek. And did you know that you now have 2 weeks to join our challenge as we've gone bi-weekly for the new year? Hope to see you there.
I'm also entering this in the Addicted to Stamps and More Holidays Challenge, 613 Avenue Create ATG/Party/ Celebrate, the Crafter's Cafe Bling it On, Simon Says Monday ATG, the STAMPlorations Stamps and Feathers Challenge and Digi Stamps4Joy Glitter and Sparkle.
Tuesday, December 10, 2013
Wicked Wednesday ATC A Charmed Christmas Challenge
Here's a little cutie for the WW ATC A Charmed Christmas Challenge. This Sweet Angel is from digi Stamps 4 Joy. She's colored with Copics, her wings glittered with Stickles. The snowflake charm has been in my stash for years. Managed to make this before breakfast 'cause I've got decorating to do!
Saturday, October 19, 2013
I Miss You!
Ok, it's gorgeous out, I procrastinated all morning, have DT stuff to do, but this card just BEGGED to be made. As you know, CAS is pretty difficult for me, but I enjoy playing along with the Outlawz Sunday CAS challenge. It's been awhile and when I saw the challenge as I Miss You, I really wanted to join in. Combine that with the Digi Stamps 4 Joy Embossing Challenge and it became a must. Just got the Tim Holtz Embossing Diffuser which allows you to block out a portion of your embossing folder for use with a stamp by placing an acrylic frame with a cut out on your folder and running it through your machine. I chose the oval one for a test and it worked pretty well, but the oval definition wasn't as pronounced as I would have liked, so I used an oval Nesties in about the same size and ran it through my Grand Caliber with the embossing mat and plate, instead of the cutting one, to make a more crisp impression. Much better. Finally, I edged it with a black peel off border.
The adorable image is I'm Sorry Fairy ( a super bargain at only $1.50!) from Digi Stamps 4 Joy. Her expression says "Miss you" to me, for sure. Her hair made me think of the Pierette mime so I colored her minimally with just a touch of Stickles to her wings and chose the Harlequin Cuttlebug folder. Originally I planned to do the sentiment with a Cuttlebug Die cut but it overwhelmed the delicate image. I rarely do aything hand written on my projects, but it seemed fittting and so much more personal here. Have to say I love how it turned out.
Friday, June 7, 2013
Simply Steampunk Clocks and Timepieces
Woohoo, it's time for another challenge at Simply Steampunk and that's exactly it: TIME. We want to see clocks or timepices on your projects. I call my piece, Cherish Every Moment Because Time Flies, using the adorable Jude from the Robert's Family Portraits Release. Wanted to do a little staging here, with antique toys, a memory of how quickly children grow up.
I've assembled a faux watch using pieces from Tim Holtz. Thought it would be fun to do something a bit different, for a change. Jude is colored with Copics and captured in the pocketwatch. The watch fob incorporates additional Steampunk embellishments. The team has done an outstanding job so be sure to visit them HERE, at Simply Steampunk. Remember, you must use an SBS Steampunk image to be considered for a prize but hopefully you snagged either a Freebie from our release hop or took advantage of the fabulous sale over the Memorial Day weekend. We can't wait to see what you come up with.
I'm also entering this in the C.R.A.F.T. Anything but a Card Challenge, The Happy Campers Use Metal Challenge, Digi Stamps 4 Joy "Oh to be Young Again" Challenge, Pink by Design Anything but a Card Boys, boys, Boys Challenge, Simon Says Stamp Masculine, Simon Says Stamp and Show Brought to You by the Letter "S" (Steampunk) and Digi Darla's Make it Masculine Challenge.
Friday, September 21, 2012
Dilly Beans Autumn Colors
Oh how I love the Fall! the nip in the air, the leaves turning colors, it's my favorite season. This week our Dilly Beans challenge is to use Fall colors. The inspiration for my project came from a tag included in my Anthropologie catalog (yea! recycling!) and the sentiment got me thinking. I cut a slot in the tag, mounted it on corrugated card stock, popped it so there would be room for the dime (a penny was too big, this is an EXPENSIVE tag, LOL) and foam sandwich to fit and added the sweet little Dilly Beans Heart Owl. I know I just used him, but he's a FAVE!
So it's a spinner tag! (Directions are on SplitcoastStampers.) WooHoo! (That's what HE said) there he goes. He's colored with Copics and has lidded google eyes (Darice in the child's crafts section of J's). I've tied it up with a little twine.
Wish I could have done a video so you could see how he spins. The pretty leafy corners were a freebie from Dilly Beans but are unfortunately no longer available.
Still going... "woohoo" was cut on my Cuttlebug using the discontinued Typewriter Alphabet dies.
My DT sisters have outdone themselves this week with fabulously beautiful creations so be sure and stop the by Challenge Blog to ooooh and ahhhhh. We're excited to see your projects as well. Just be sure to include a stamp, be it rubber, clear, or digi.
I'm also entering this in the 4 Crafty Chicks Beauty of Leaves Challenge, Kraft Outlet Lavish Layers, Charisma Cardz Things with Wings, DLArt Thankful Thursday, Halloween, Fall Colors,and/or Owls, Digi Stamps 4 Joy Leaves, the Recycle, Re-purpose and Reinvent Sept Challenge, the Smudger Reduce, Re-Use RecycleChallenge, and the Anything But a Card Texture Challenge.
Friday, August 3, 2012
Dilly Beans Sewing
EIYIYI! The day got away from me and I've neglected to post this week's Dilly Beans challenge card. Megan still has limited computer access so we're not up to speed on the Challenge Blog but if you'd like to get started, the theme this week is sewing. This is open to interpretation, stitching real or faux, sewing notions or patterns, anything related to sewing, so be creative with it. I'd recently purchased the Sizzix button folders so I immediately thought of Megan's Ragdoll Ruby with her cute button eyes. I wasn't quite sure how I was going to use her, so I printed not only the whole Ruby, but also Ragdoll Ruby Face because I wan't sure which to use for my design. I colored just the Face stamp first and added cute flower buttons to her eyes but after compiling my card, the face alone didn't balance the design so I colored the smaller body and fussy cut it without the proportional head et voila! I kinda like her with the big head, don't you? LOL
The pretty papers are from Making Memories Chloe's Closet which is old as the hills but still a fave of mine. I sanded the embossing to bring out the buttons and added a scattering of real ones. The sentiment button was printed on the computer and glued to the back of a Stampin'Up clear button and I sewed them all to the mat and left the needle right on the card. The fab spool is from the new Close to My Heart Artiste Cricut cartridge which is now available to order HERE from my good friend Susan. It arrived just in time, (fab shipping Woohoo!) I popped Ruby's Face a bit higher than her body to give a little more dimension. I hope you have as much fun with this challenge as I did. Click on the individual designer's name on the sidebar of The Dilly Beans Challenge Blog to get more inspiration until Megan is back online.
I'm also entering this in the Simply Create Too Anything Goes Challenge, DYSU Polka Dots challenge, My Heart Pieces Use Designer Paper Challenge, Paper Play Layer it Up Challenge and Digi Stamps 4 Joy Polka Dots and Stripes challenge.
Subscribe to:
Posts (Atom)