Tuesday, February 15, 2011

The Cuttlebug Spot Opens the Gates


Our challenges all month at The Cuttlebug Spot are highlighting unique card folds and this week we're opening the gates with gate fold cards. I wanted to try something a bit different by making my gate fold card look like a gate so I used my Spellbinders lattice border (the one that cuts on only one side) to cut and emboss the top of the gate as well as the front pieces that open. I started with a piece of white card stock that was 6x11" and scored it to make a gatefold. Then I cut down the scores to where I wanted the top of the front of the card to end and then cut it across. Then I used the border along the top back and turned the card over and aligned the die at the fold of each side and ran it through the Cuttlebug again. (Again, hope this makes sense. I haven't really had time to do a tutorial, sorry) Then I cut blue mats and white mats which I embossed. The front panels are embossed with Swiss Dots, and the inner panels with Formal Squares.
The top of the inside mat is embossed with the Cuttlebug border folder from the Organic Flourish set. I scored a line and then embossed the remainder with Swiss Dots. The ribbon which is woven through the lattice on the front and holds the card closed is captured by the inside mats. Of course I added a few adhesive pearls and some butterflies punched with MS punches for embellishement. I haven't finished the inside because I'm not sure of the occasion. Wedding or anniversary, perhaps? Well, there are lots more fabulous gate fold cards at The Cuttlebug Spot so why not check them out and have a go yourself?

Tiddly Inks Monochromatic Challenge


It's another Tiddly Tuesday and this week our challenge is Monochromatic at the Tiddly Inks Challenge Blog. I'm obviously still in the mood for love, using As You Wish behind my Nestie Heart window. This is one of Christy's most romantic images which always brings to mind the quote, from a poem by Anne (Dudley) Bradstreet. It says, (in case you can't read it through the yummy paper) "If ever two were one, then surely we". I'm pretty sure I first heard this in the early 70's when I was learning about life and true love and it has stayed with me all these years. MMMMmmm....perfect love. It truly warms my heart.
The couple and roses on the front are colored with Copics and the lovely corner flourish is a Spellbinder's die from Heartfelt Creations. There are gorgeous example of monochromatic designs by the Tiddly Inkers so be sure to check out their lovely work HERE and pop by Christy's blog for a peek at what's new and a fab freebie sentiment. Remember, we welcome all images in our challenges, but you are only eligible to win a prize if you use a Tiddly Inks image. You can find some each Tuesday on Christy's blog, The Tiddly Inks PCP Group (just ask to join if you're not already a member), and some permanent ones in the Shop. Hope to see you soon!

Monday, February 14, 2011

BBTB2 Heart Border Challenge


Happy Valentine's Day! Busy day and I'm running a bit behind. This week my dear friend and DT sister Susan chose the heart border and decorative heart from the Martha Stewart Seasonal Cake cartridge for our BBTB2 challenge. Wow, 2 week's in a row I didn't have the cart (better get shopping, LOL) so I chose one from Stamping and welded it to "Love U" from All Mixed Up. (Love that whimsical font!)
Again, it's a shaped front card (one of my faves to make) using the rounded rectangle from George for the back. The inside mat is actually adhesive backed Dear Lizzy fabric paper from American Crafts and I did manage to cut it with my Cricutl I used my deep cut blade because I figured it was sharper than my regular one and probably multicut is at least 5 times. It did snag a bit and next time I won't try it unless I have a brand new blade, but it was okay (but not perfect...grrrr).
Lots of layers and a bit of embossing and the cute adhesive conversation hearts were in my stash from M's several years ago. I'm hoping Susan will count them as decorative hearts. LOL Go have a look see at the lovely projects from the rest of the BBTB2 team and we'd love it if you'd play along.


I'd also like to enter this in the Fabulous Friday Challenge at Frosted Designs where the sweet and multitalented Chloe is Guest Designer. She has challenged us to us the word "Love" on our project and you've got to go see the amazing things she has done with the word "Love"! Now I'm off to clean up for a romantic dinner in the city, WooHoo! Hope your day has been super special, or if not, my Macabre Monday post (scroll down) for today may be more to your liking. LOL

Macabre Monday Love Bites (Romance is Dead) Challenge


This week the Macabre Monday Challenge at Haunted Design House is Love Bites; the End of Romance. Certainly love can hurt and for those who have been wronged, Valentine's Day is a painful reminder. I hope that's not the case for you. I used the Cricut Love Struck Cartridge to design a shaped card using Design Studio. I've done a bit of trimming to accomodate the fabulous Corset Heart Stamp from Strange Skin, this week's sponsor.
Inside is a computer generated sentiment cut with my Nesties Labels Seventeen. A crime of passion or self inflicted? Stop by Haunted Design House to see how the rest of the Minions celebrate VD. YIKES!

Sunday, February 13, 2011

SOG Digi Day Early Bird Challenge


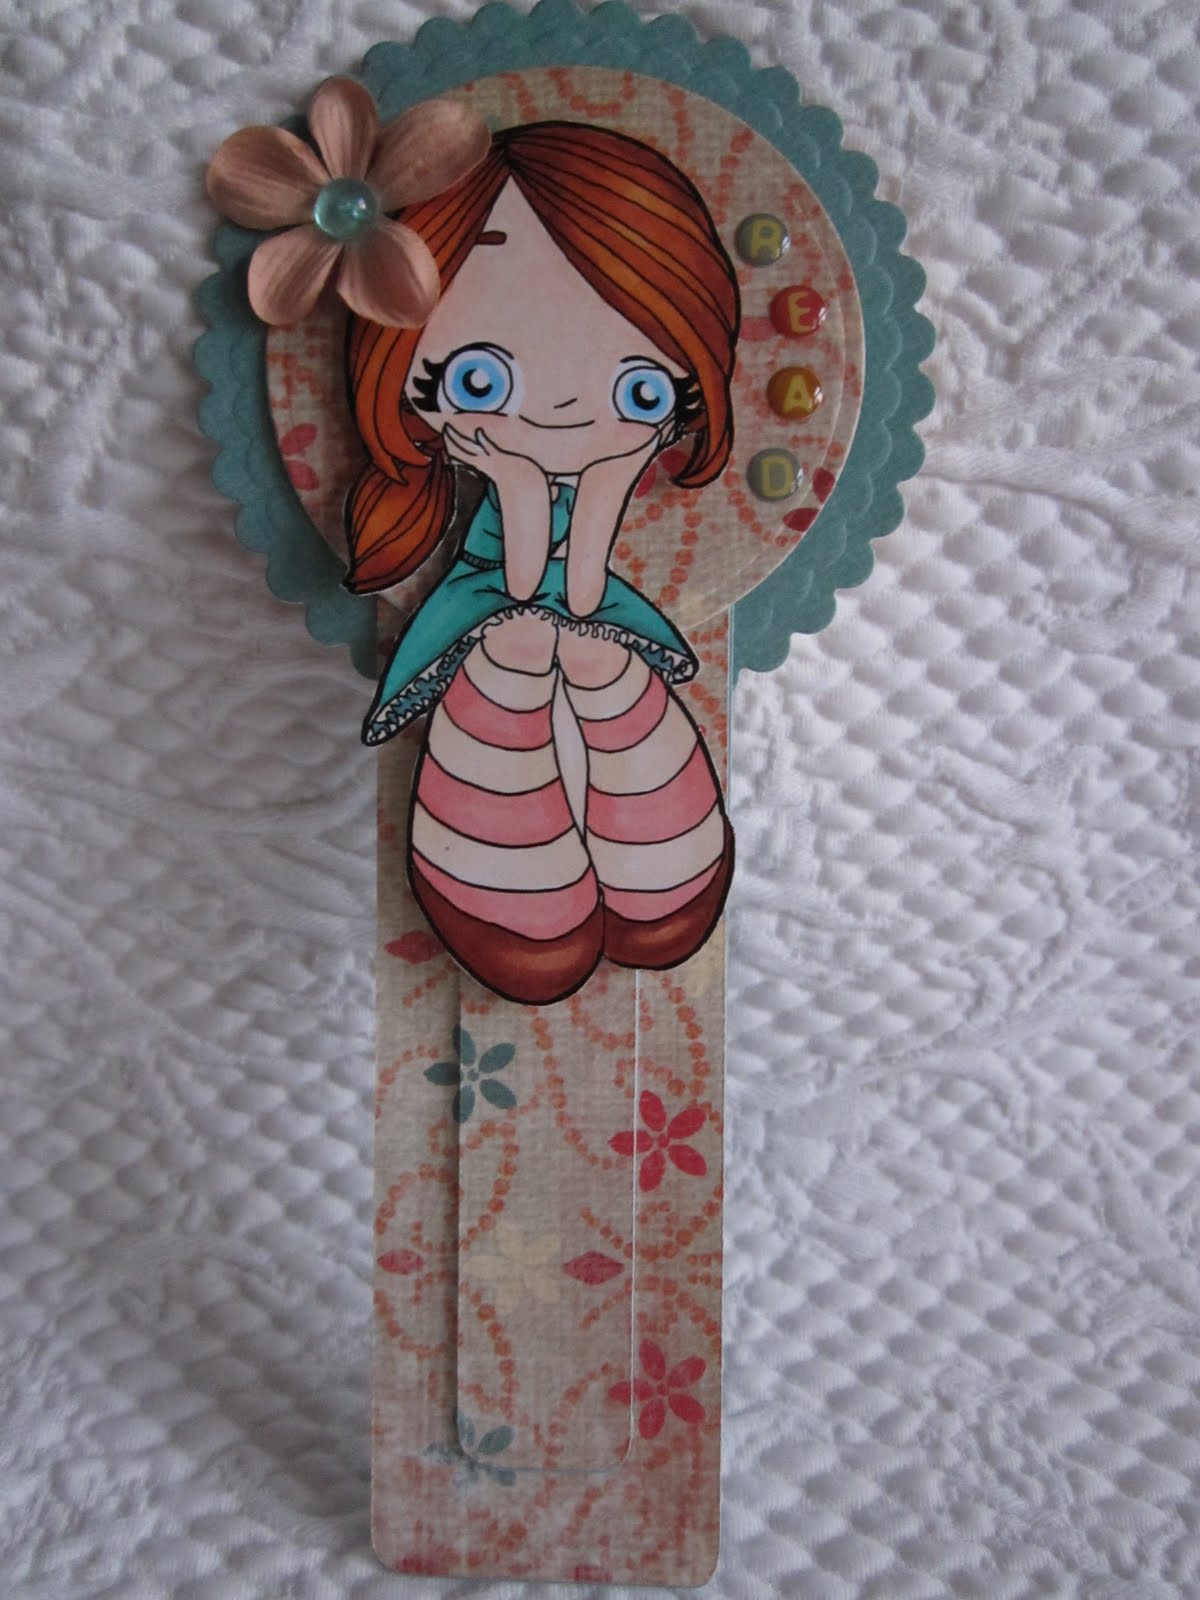
Well, now for sure there's no question how I spent my Saturday. LOL Besides the fun Some Odd Girl Digi Day event (which happens the 2nd Saturday of very month, now at the NEW SNR site) I managed to do BOTH of the challenges. WooHoo! Scroll down for the coloring on kraft challenge. WAY cool! And this is the Early Bird (announced the day before digi day) Challenge from the fabulously talented DT member Zarah, which is make a bookmark. The base of my book mark was cut on my Cricut from the Animal Kingdom cartridge. I just used the plain one and cut it twice and glued it together for strength. Then I cut a scalloped and regular circle with my Nesties and attached on either side. I colored up Sigh Mae, one of the New Releases at the Some Odd Girl Shop, fussy cut her out and popped her on the bookmark.

Here's how she looks in a book. The tiny epoxy letters (spelling "read") are from K&Co and the flower is Prima. This was so much fun to do, I'll be making more for sure. But not today, gotta get my rear in gear on DT stuff. Sure was fun to do some "just 'cause I want to" projects, though.

Saturday, February 12, 2011

Some Odd Girl Digi Day AND Weekly Challenge


Well, I've had a ball all morning over at the new SNR site celebrating Some Odd Girl Digi Day. There were games, challenges, discounts and all around FUN! This time I even managed to participate in the Saturday Challenge by DT member Caz to print and color your image on kraft card stock. WooHoo! That's a new one on me so I just HAD to try it. I chose Valentine Tobie and I really love how soft the Copics look when coloring on kraft. Who knew? The DP is Chelsea's Place by Making Memories. I added 2 MS punched hearts (to total 3) so I could also enter it in the Weekly challenge at the SOG Challenge Blog as well. Thought the sentiment was fitting for a shy little guy like Tobie, don't you? Now let's see if I can manage the Early Bird bookmark challenge too.

Thursday, February 10, 2011

Goliath's Valentine to Daddy


This year Goliath decided he wanted his Valentine to Daddy to be like the kind kids used to give out in school (do they still do that?) you know, the flat kind that don't open. Well, Mommy thought that was a fine idea, BUT flat? of course not. I love the little Tiddly Inks Kitty Christy has done a number of ways and decided on Sealed With because of the envelope he was holding. I printed him BIG and colored him with Copics trying hard to make him look like Goliath (although he looks a little bit like a racoon to me but Goliath said he was okay). He's fussy cut and popped on a manila tag on top of Nestie Hearts that were cut from the DCWV Pet Mat Stack.

I replaced the envie with a real envie so Goliath could enclose a special something for Daddy. (More on that later.) The little paw print seal was fussy cut from the stamped envie. the sentiment was spelled out with epoxy letters from J's. Paw print border punch down the side (as close to lace as Goliath would let me get) is EK Success. The mouse border and rat punch are by MS.

Here's a close up of Goliath's special gift (that fits in the envie). Please notice Heather, that this rat is dead, see the x'ed out eye? Not to be confused with the LIVE one Goliath brought in through the cat door of the run on the back porch yesterday. Daddy had a heck of a time corraling that one. This, BTW, is the same cat door that David insisted on putting in the run so he could go in and out at will. Does he? Of course not. Goliath still insists on waking me up every morning at about 2:30 am by pawing at my face to let him out and cries at the back door to come in. When we're around he acts like he hasn't a clue what that door is for, or that it's beneath him to actually open a door for himself. Jezzie however, thinks it's the cat's meow!

BUT today he was caught in the act! In case you can't tell, Goliath has another surprise for Daddy. See the LONG tail hanging from his mouth?

In he comes, the little stinker! Fortunately we closed the window and blocked off the other door before he could bring this little gifty into the house.


Okay, so let's play!


OH, you're no fun. I'll leave you for Daddy. (The bad news is Daddy keeps telling him "Good Boy"). Wonder what he'll bring in tomorrow.
Be sure to check out the Tiddly Inks Challenge Blog for Fabulous Friday tomorrow and there's still time to participate in the current Love is in the Air Challenge.

Wednesday, February 9, 2011

Bah!Humbug! Buttons and Bows Challenge


Okay, so they can't all be winners. This embarrassingly simple card is for this week's Bah! Humbug! Buttons and Bows Challenge. My first thought was "Country Christmas" so I dragged out the DCWV Homemade Christmas Stack. The green and kraft gingham made me think of a wreath and I was too lazy to cut one with my Cricut. I pulled out my Scalloped Circle and Inverted Scalloped Circle Nesties, taped them to the cardstock and cut the wreath in one fell swoop. Chose one larger and one smaller and repeated for the shadow. So simple I will definitely be doing that again! Took an hour to decide on the background DP (not really, but it felt like it) and ran it through my Distrezz-it-All to chew up the edges a bit. Cut the sentiment from ribbon from M's, glued on the buttons and bow and called it DONE! Not awful, but coulda done better. Sorry ladies, I've got stuff to do today but didn't want to miss a challenge.

Tuesday, February 8, 2011

The Cuttlebug Spot Step Card Challenge


It's our second week of unique card folds at The Cuttlebug Spot, and today we're steppin' it up with Step Cards. Again, there are loads of possibilites for this type of card and I decided on a Center Step card that I found (Oh, oh, I can't seem to find it). I'll keep looking, but basically it's the same as a side step, but there are tall pieces at both sides. I started with a piece of card stock that's 7 x 8 1/2 inches and the cuts are 1 3/4" in from each side. When it folds it'll fit in a 5 x7" envie, considering the Nesties Beaded Oval I used for the back panel.
The stamped image is from Heartfelt Creations Hydrangea/Posy Branch PreCut Stamp set that I colored with Copics and fussy cut it out. These images coordinate with Nesties, in this case the Posy Patch Flowers PreCut Stamp Set for the 5 popped blooms on the branch that matches the Spellbinders Posy Patch Die. The tiny flowers are a bit challenging to line up with the Nesties but there is a video to help with that HERE on the Heartfelt Creations blog.
The green panels are embossed with the Cuttlebug With Love Border set and Swiss dots behind the Nestie, and the pink side panels with the Crafts Too Daisy folder. the sentiment is a peelie mounted on a Fancy Label from the Cuttlebug Emboss Plus set mounted on a Petite Scalloped Nestie. The butterfly is a MS punch. Now be sure to take a look at the fabulous variety of Step Cards by my super creative DT mates and play along for a chance to win a gift certificate from The Craft Barn.

Monday, February 7, 2011

BBTB2 Bloom Cartridge-Fence Challenge


This week's BBTB2 challenge was chosen by our Scrapper Extraordinaire, Theresa who chose the fence/gate cut from the Cricut Lite Bloom cartridge. Believe it or not, I don't own the Bloom cart (imagine that!) but there are loads of other fences/gates on other carts so I finally decided on one from Picturesque. Since I wasn't quite with the crafting program after our little getaway, I thought maybe a tag would be simpler, however I got pretty involved with making it really 3D so... I loved the look of the tag feature of the cut but there was no fence attached so I added some by using the coordinating corner feature and welded them in Design Studio. I also welded the shadow of the "Spring" cut from Stretch Your Imagination to the top and hid the contour of the hole at the top to make the fence. I cut the individual fence pieces many times and cut them apart, in some cases by hand. to make the fence 3D. The pieces were embossed with the Cuttlebug Distressed Stripes folder for texture and inked bit with Pumice Stone Distress Ink. I cut "spring" and the flowers in white card stock and colored them with my Copics because it was easier, then used some Stardust Stickles on them to match the glitter on the background DP which is from the DCWV Flower Shower Spring Stack.
I did a bit of resizing of the blank tags to fit how I imagined the fence would attach. My first attempt left the fence too far out and sort of flimsy, so I added the outer posts directly to a middle tag piece (welded in DS) behind the DP background layer so they would have something to attach to and I could then also attached the first fence slat to the tag front for more stability. (Okay, I just read what I wrote and I'm pretty sure I've lost 99% of you, but I'm leaving it in, just in case it makes sense to somebody. LOL) I orginally planned to use my Cricut for flowers, but this DP had cute glittery flowers and grass mounds at the bottom so I fussy cut them out and glued them to better match the background. The flower centers are Rain Dots and the butterfly is an MS punch attached to fine wire for flight. Finally, I attached a larger tag pieceto the back with strips of adhesive foam to frame it better and give the entire tag more stuctural strength. So much for a simplified project. LOL My DT sisters found fabulous fence cuts on all sorts of cartridges so pop over to BBTB2 and be inspired. with so many possibilites there's no reason not to play along.

Macabre Monday Flesh-eating Frenzy


It's time for another Macabre Monday at Haunted Design House and this week's challenge is Flesh-eating Frenzy. You know, create a fabulously dark and creepy piece with zombies, carniverous plants, flesh eating bacteria...(you get my drift). Let me tell you, try Googling"flesh eating" and I guarantee it'll put you off your feed so I chose the lesser of a whole bunch of disgusting evils with this free coloring book image from Zombies Stained Glass Coloring Book by Dover Publications. (You get them in the monthly newsletter.) I KNEW this one would come in handy! Kinda fitting considering it was Super Bowl weekend so I colored the lovely cheerleaders in GREEN BAY PACKERS, WOO HOO! colors (seemed to go well with their lovely mottled green complexions) and used the Tiny Bubbles Cuttlebug folder for pigskin (sort of) texture. The border punch is EK success Swiss Cheese (hee hee, couldn't fit a cheese head on the little darlings)
The cheer is computer generated and I've printed the image twice so I could pop the hand. The fleshy bone is a portion of the Twip puppet by Phee McFaddell (not sure she had this in mind)that I fussy cut and added for effect. I'm quite pleased with my coloring of the zombie complexions, using W0 over G21 and then dabbing on some colorless blender to get the lovely mottled effect. Wanna see more? (Of course you do!) Pop on over to Haunted Design House to see the rest of the Minions fabulously creepy concoctions. We dare you to play along.

Saturday, February 5, 2011

BBTB2 Blog Hop Winner and Getaway Pix


Happy Saturday everyone! Thought I'd share a few trip pix from Post Ranch Inn at Big Sur, CA before I reveal what you really came here to see. Although David booked the trip hoping for a storm, I was more than thrilled with the gorgeous weather, especially when we saw the spectacular sunset from the balcony of our room. We stayed in an Upper Coast House with ocean view the entire length of the room (and bathroom). Total privacy so the curtains stayed open.


The property is large and all structures were designed to blend harmoniously with the natural beauty. This is the reception area.


and here is the lower meadow from where I took the pic.


Scattered throughout the property are fabulous sculptures.


Making a wish...a BIG one!


And amazing fountains. This is the entrance to the restaurant.

But here you can see it juts out over the ocean for unobstructed views.


There are hidden places at every turn


I wish I'd thought to bring my suit.


There's an amazing spa and even a yoga yurt. Truly a place to restore both body and soul.


It was hard to say goodbye to such beauty.


and wind our way back along the coast to home. But I appreciate your patience so without further ado, the WINNER of the $30 gift certificate to Custom Crops is...


Number 22 BunnyFreak! who wrote...


WooHoo! Congrats BunnyFreak! Please email me at dlmundinger(at) yahoo(dot) com so I can arrange for your prize. Thanks to everyone who participated in the hop (and put up with my travelogue). Also, it is not lost on me that I have recently reached 1000+ followers. I'm a bit overwhelmed and was afraid to mention it until I was pretty sure the number would stick (LOL) so stay tuned for more blog candy (as soon as I figure out what it will be) xx D