Friday, March 12, 2010

Oh Alice and Sunday Stampers Challenges


WooHoo! I'm lovin' the Alice challenges! This week at Oh Alice! Chapter 3 is "Painting the Roses Red": a color challenge of red, purple and blue, inspired by the new O.P.I. Alice nail polish collection. Also, through my blog hopping I came across Sunday Stampers where the theme is either Rabbits, or Alice, or BOTH! I gotcha covered! the sweet image is a digi from Sassy Studios Designs, colored with my Copics. the cool frame is done with my new Labels 13 Nesties. The blue mat is embossed with the Cuttlebug Fleur de Lys folder and the vine border punch is EK Success. The white and red roses are from Cottage Cutz Topiary die from The Scrapping Cottage. (I had originally planned on using the entire rose tree but opted for just the roses instead.) My story here is that the White Rabbit is looking at his watch because the roses aren't all painted yet and he's worried the Queen will be furious.

Jezzie in the cards


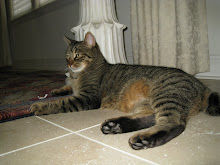
Okay, no card yet to show, but I just HAD to get that poor little Christmas card off of your sidebars. LOL I did craft yesterday but it was DT stuff that I can't show 'til next week. Couldn't resist posting these pix of Jezzie. I'd been sorting my mountain of cards and they were all over the floor. Here's what she thought of that. (So rare I can get pix of her.)Margie says I should scrap this. WHAT, a LAYOUT!? Maybe some day.


Wednesday, March 10, 2010

Bah Humbug Challenge #8 Stitching Real or Faux


I'm gonna apologize right up front for this card. I had great intentions this week because the Bah! Humbug! challenge was stitching real or faux and I was going to attempt, for the first time EVER, to stitch on a card using my sewing machine. And then the weather turned lovely. And then I walked this morning. And then DH suggested going out to lunch and after 2 glasses of wine it lead to an (ahem) nap. Oh crap! The challenge. Needless to say, I almost blew it off BUT as the good Loyalty Member that I am, I persevered, looking for an image that lent itself to stitching in some way shape or form (and was so tiny that it didn't take much to color. LOL) Yea, Fluffie! However it did take 2 attempts, because the darn thing was too small to get any nuance with Copics so I brought out the Prismas (not that it helped much, but a little.) So what about the stitiching? I was WAY too impared to fire up the machine so I pierced and intended to use my gel pen for faux. But it looked BAD! Out came the needle and floss and I stitched by hand... quite shakily I'm afraid. Thank heaven I cut the mat with my new deckle oval Nestie so it sort of looked like it was planned. (Well, maybe.) Anyway, that's the card, devoid of further embellishemnt because it's probably going in the bin. A total embarrassment, but I'm sure Max, Ann, and Irene will at least appreciate the effort.

Tuesday, March 9, 2010

Stampotique Color Challenge - "Made for Each Other"


Well I missed the first Stampotique Designer's challenge and was determined NOT to miss this one. It's a color challenge using rose, yellow and mossy green and you MUST use a Stampotique stamp this time. I've been dying to use these 2 stamps by Daniel Torente together. Don't Moth Fab and Bowtie make a cute couple? IMOO they're MFEO! I added a rub on flower in his hand and a couple of hearts and there you go. True love! WooHoo! Wouldn't this make a cute anniversary card?

Monday, March 8, 2010

The Cuttlebug Spot Vintage Challenge


I was so excited that our challenge at The Cuttlebug Spot was vintage this week because I'd been browsing the adorable images on my Peggy Loves Vintage New Baby Volume 1 CD and came across this precious bundle. I have no idea why, but I've had baby fever (no chance, I'm WWWAAAYYY too old for that, LOL). The CD is chock full of fabulous vintage images and this sweet little guy all wrapped up in his blanket just called out to me and I HAD to use him. I resized him to fit a 2 1/2 inch square and cut him out with my Nesties along with a scalloped mat. Then, to echo the blanket, I cut a 5 inch square and used my MS punches (these are obviously my current faves since I used them 2 weeks in a row, LOL), scored each side twice diagonally and ran it through my Cuttlebug using Swiss Dots. Then I folded each corner in, then out on the score marks to make the sweet dimensional frame.


I decided that some weaving might be in order (thought it looked like an old fashioned baby blanket) and once I'd woven the strip I embossed it with Swiss Dots as well. I cut a channel in the top mat and embossed it with one of the 5X7 folders from the Romance bundle. I ran my ribbon over the mat but under the weaving and added a bow.

The image is popped and I added pearls and little Alpha Beads to finish it off. Be sure to stop by The Cuttlebug Spot to check out the lovely efforts by my DT sisters and if you leave a comment you not only may win a gift certficate to the Craft Barn, but our sweet DT sister Lillie has donated a fabulous set of her handmade "hip huggin' jammies" for your Cuttlebug and Cricut. Of course if you can't wait, click to shop Lillie's store. Also, we'd love it if you'd play along, and if you're in search of vintage images for ALL occasions be sure to visit Peggy Loves Vintage. Not only does she have CD's, but also downloadable cut out sheets with 8 images in a variety of designs available for immediate gratification. Also, check out the Peggy Loves Vintage BLOG for freebies, contests and MORE!

BBTB2 ACY Garden2 Girl (or Boy) Challenge


Happy Monday! This week at BBTB2 our fabulously talented DT sister Shelly is hosting the challenge and chose either the girl or boy Garden2 cut from A Child's Year. I fully intended to do a card and even designed one, but I kept wanting to add and add and add until I figured I need to go BIGGER so out came this door hanger instead. I used the watering can from WIMG mainly because it had a shadow and layers and cut it at 7 1/2" with cut outs in the top 2 layers (done in DS) to frame the little girl. I used a combination of Springy prints from K&Co. Portobello Road, DCWV Nana's Nursery Mat Stack and Making Memories Chloe's Closet.

Here's a close up which shows the script embossing on the top layer of the watering can as well as the MS Spring border punch I used along the edge. the rim and portion of the spout are embossed with Swiss Dots but it still doesn't show up. I cut the girl twice so I could add color to the tulips and also added a tiny butterfly from an MS punch. Yes Leah, of course there are adhesive pearls. LOL
I sort of thought I was done, but it looked like it was missing something so I cut the gardening tools from Walk in my Garden to hang from the side. "Spring Wishes" are peel offs from Stampendous and I think look kind of cool being shiny against the mat silver metallic of the tools. Forgot to mention that at the top of the hanger is a Prima flower with a K&Co covered button brad.
Here you can see the dimension. I used large enough pieces of foam to pop the pieces and enough layers that I didn't even have to use a chipboard backing. It was sturdy enough as is. Now if you're in the mood for Spring be sure to visit BBTB2 so see the gorgeous projects from the rest of the Design Team. They're sure to put a smile on your face even if you're still covered in snow. Gosh is anybody STILL covered in snow? Hope not!


Sunday, March 7, 2010

Spring has Sprung!


Happy Sunday everyone! I looked out the window this morning and the trees were all an explosion of blooms. It inspired me to make this fresh clean Springtime card using digi stamps from The Cutting Cafe. Trees seem to be all the rage on the cardmaking front so I chose this especially stylish one from the Trees in a Row Printable Stamp set. This set comes with 6 different rows of trees and 12 different sentiments so it's extremely versatile and oh so afforable. I used my Printmaster program to clip out the trees and the sentiment (also included in the set) and resized and colored them individually to fit an A2 size card. Regina has instructions on how to do this on the Cafe site. Then I printed the dotty background using the Colored Mini Polka Dot Background set which comes with 12 different colors already done for you. WooHoo! Aren't you ALWAYS looking for something dotty? Anyway, this card came together so quickly and easily. That's what I LOVE about Regina's stamps. To finish I embossed the front of an A2 card with my Swiss Dots Cuttlebug folder, added a green mat, gingham ribbon, and mini buttons and Voila! So if you'd love to do a quick and easy but oh so beautiful card in MINUTES, check out all of the goodies available for download at The Cutting Cafe.

Saturday, March 6, 2010

Dare to be Sassy Color Challenge and Blog Hop Winner


Had a great time at Alice in Wonderland yesterday. I have to say though, that I would have liked more of the Wonderland characters and less of the Red Queen's Army. Definitely not enough Depp and I think my faves (besides the Red Queen) were the Cheshire Cat and Absolom the Caterpillar. Anybody else see it? Would love to hear your thoughts. I definitely will be seeking out Alice challenges wherever I can find them, so let me know if you come across any. I did this one for Sassy Studios Designs Dare to be Sassy Thursday using their Sassy Studios Little Mad Hatter and Sassyland Sentiment digi stamps. You can buy them HERE. It's a color challenge using green, black, hot pink and orange so of course, with that pic for inspiration, I just HAD to! He's colored with Copics and cut out with Nesties. The paper is K&Co. Portobello Road. I purposely made the mats all wonky, popped them up and added some adhesive beads.

And now the moment you've been waiting for. The winner of the $30.00 gift certificate from Custom Crops is #31. CONGRATULATIONS HELEN!

Helen said...
Great card-Thanks for sharing!


Please email me at dlmundinger (at) yahoo (dot) com to arrange for your prize.


Thank you all so much for participating in the hop and thank you Custom Crops for your generous donation. P.S. GREAT sale going on there 'til tonight with UNBELIEVABLE prices on Cricut carts (and not just old ones, would you believe Forever Young at $27.00!?!)

Friday, March 5, 2010

Oh Alice- Running in a Sketchy Circle


Today is THE DAY! We already have our tickies to the IMAX for the opening of Alice in Wonderland! WooHoo! I'm excited to have finished my Oh Alice! Chapter 2 which is Running In a Sketchy Circle. Now you know me and sketches, but I think I managed this one okay. It all came together when I decided to make my circle a teapot, cut on my Cricut from the When Dreams Come True cartridge. That's about as much poetic license as I took, but I'm quite pleased. Papers are Graphic 45, sentiment is digi from Sassy Studio Designs, digi image from the net colored with Copics, MS embossing border punch, buttons from Stampin'Up. don't forget that I'll be drawing the name for the $30.00 gift certificate to Custom Crops TOMORROW! so if you haven't commented on my BBTB2 blog hop card be sure to do so HERE.

Thursday, March 4, 2010

"Wooden" it be nice?


I'm sorry for the pun, but I just couldn't help myself. I got some of the coolest wood veneer from Creative Imaginations at my LSS and I couldn't wait to use my adorable Cottage Cutz beaver die from the Camping release at the Scrapping Cottage. Tell me he's not the cutest. He's cut in my Cuttlebug using the A, C and B plates and I shaded him a bit with my Copics. I used 3 different woods on my card; one for the mat, the light punched border (how cool is that?!) and I little thicker one for the stick in his hand. The circles are done with my Nesties. The trees are from the DCWV Green Stack. "Hello Friend" is from the Cuttlebug Everyday Greetings card making combo.
Inside, the computer generated sentiment is truly hokey but I couldn't resist. The little punched corners (EK Success) are also wood. Gotta get more of that stuff! Be sure to stop by The Cuttlebug Spot to see more adorable cards made with Cottage Cutz dies. We have fun examples every other Thursday. Also visit The Cottage Blog where ideas and inspiration abounds.

Wednesday, March 3, 2010

Bah Humbug - Tree Challenge


After a week's vacation (to meet in person, how fun!) the gals at Bah! Humbug! came up with a tree theme for challenge #7. I must say I missed the challenge terribly the week they were gone. Can't wait to hear about their trip. Anyway, I'd been toying with this design using my Cricut Design Studio for some time and finally decided to use it in a very simple and straightforward way. I used Winter Woodland and Storybook to build my tree and cut it in mirror card stock. The white mat is embossed with the Holly Ribbons 5 x 7 Cuttlebug folder with the corners embellished with a MS Deco Fan corner punch. One more gold mat on a premade card and all I had to do was add some gold adhesive beads. This I just might make multiples of. Don't forget, if you love Christmas, Bah! Humbug! is the place to be. There's a new challenge every Friday (UK time so if you're up, we US gals can sometimes sneak a peek Thursday night. WooHoo!

Tuesday, March 2, 2010

Think GREEN at The Cuttlebug Spot


This week at The Cuttlebug Spot we're going green. We're honoring the Irish, and although our cards didn't need to be for St. Patty's Day, I thought it would be great to finally break out my Celtic Knot folder. I cut a square out of the center with my Nesties and made a scalloped frame for the adorable little image I found at Living Locurto.com. I'm still practicing with my MS punch around the page punches (this one only took me 2 tries, WOOHOO!) and I embossed this pretty mat with none other than Swiss Dots. Pretty simple, I just added a fluffy bow and a glitter foam shamrock from M's that I got when shopping with my dear friend Lillie. BTW, Lillie now has her Cricut and Cuttlebug covers available for sale on her fabulous STORE (along with her gorgeous cards) so go check it out! Also be sure to stop by The Cuttlebug Spot to see the FABULOUS cards by my DT sisters. They pulled out all the stops this week! AND, if you leave a comment you may win a gift certificate from Custom Crops.