Saturday, November 12, 2011

ADFD for Bah!Humbug! and a Few More Challenges


Okay, don't faint ladies! Yes, it's Saturday and I've done my Bah!Humbug! challenge ALREADY this week. YEEHAW! I knew immediately what image (or at least which group of images) I was gonna use for the Baby's First Christmas challenge. 4 Crafty Chicks is also asking for a baby theme, as is Designed to Delight, WooHoo! I have the whole Santa's Nice List set from ADFD and chose this cutie in the stocking cap. The current ADFD challenge is "Flock Together" so I printed the image (flipped) 3 times so I could cut it apart and flock the pieces individually by running them face down through my Xyron and then reassembling them on the base image. (Does that make sense?)


Tell me this isn't the sweetest baby EVER! Well actually there are 3 other singles, a set of triplets, and a stocking just filled with a teddy and sweets in this set, but the stocking cap really did it for me because I could add a mini pompom. What little coloring there is is done with my Copics. The red part of the stocking is colored as well, before running through the Xyron and flocking, so the coverage is deep and even. The little dots on the toe and heel are mini adhesive beads I applied AFTER running through the Xyron but before adding the flock. The flock would have obscured the dots had I just colored them, and I was afraid of bleeding if I tried to touch them up after. The adhesive on the beads doesn't stick well to the flock, either, but applying glue after the fact is pretty messy so this solution worked well for me.


Besides the flocking, I wanted to add some additional texture for the Cardmadfairy's Texture Challenge and the Frosted Designs Fabulous Friday Challenge which is Embossing. I chose a Sizzix folder because the scallops echoed the Nestie scalloped mat but look what happened when I ran it through my Cuttlebug. I've had this happen with quite a few of the Sizzix folders, including those by Tim Holtz, and I was really bummed at how it actually cracked and ripped my cardstock because of the deep embossing.


Lucy McGoo's Wonder Goo to the rescue! Honestly, this stuff has been on my crafting table for MONTHS! I bought it at a Scrap Expo (I think) because it's supposed to help get a better impression when using those old embossing plates (rather than the folders) so I thought I'd give it a go and WOOHOO! A little spritz on the card stock, in the folder, and through the Cuttlebug and VOILA! No more cracking! I do, however suggest you leave it in the folder until the thing dries because it does have a tendency to curl more, but hey, small price to pay. I'd been getting kind of discouraged with these folders lately so I'm happy as a clam to find a solution. That link is the only place I found this stuff online, but I hate to mention a product with no link to where you can get it sooo... I also apologize for such a long post for such a simple card, but I finally seem to be coming out of my funk so I'm back to my old wordy self. LOL Anyway, I'm off to get boofy for the first holiday party of the season at my BFF's. Have a great rest of the weekend and go check out all of these fab challenges, if for no other reason than to oooohh and aaaahh at the DT inspiration.

Wednesday, November 9, 2011

Dilly Beans for the Bah! Humbug! Snowman Challenge


This week at Bah! Humbug! the challenge is snowmen. I LOVE snowmen! The problem was choosing which snowman to use. I really love the framed snowmen in the Dilly Beans shop. They're as cute as can be, easy to color and the framing pretty much finishes the card for you so I decided to use Framed Snowman #2 because of his sweet stocking cap. He's colored with Copics to match the Peppermint Forest DP from J's last year and I added some Star Dust Stickles for a little bling. I think pastel Christmas cards are just YUMMY, don't you?

To add a little dimension, I printed my snowman 3 times and fussy cut his nose, the end of his cap and the little heart (twice) and popped them. All I needed were a few mats, a sheer ribbon and some adhesive pears and Voila! Really simple, but cute enough that I may just make a whole set with the rest of the framed snowmen from Dilly Beans. BTW, the Dilly Beans Designer and Challenge Blog is coming in December! WooHoo! And remember, there are only a few more challenges left at Bah!Humbug! before the Humbuggers take their holiday break so be sure to stop by and thank them for helping you get your holiday cards under control. I'm also adding this to the Whimsical Wednesdays Anything Goes Challenge because I seem to be running a bit behind there. There's still some time left for that challenge, and the new one from this past Wednesday is Thanksgiving. See ya there!

Monday, November 7, 2011

BBTB2 Heritage Fancy Corner Challenge


It's Monday and time for another BBTB2 challenge. This week our fabulous fearless leader (and new Grandma!) Heather chose the decorative corner (Accent9) from the Heritage cartridge on page 62 of the manual. Because I couldn't come up with anything more creative, I decided to make a little you note card by welding 2 of the corners to the Marquee from Storybook for the front. Speaking of Storybook, it is a fabulous source of other fancy corners if you don't happen to have Heritage. The gorgeous monogram is from the new(ish) Art Nouveau cartridge. The top Marquee is embossed with the Cuttlebug Birds and Swirls folder that I thought looked lovely with the corners.

This is also a shaped front card, but because the corners were delicate (and I chose not to use the shadow on them for an more filigree look) I backed it with acetate. For that reason, when welding, I made the back of my card base 4 1/2" inches rather than the standard 4 1/4" (but I still scored at 4 1/4") so I would have an extra 1/4" to attach my acetate to. It is attached only at the top from the inside. I added a tiny decorative strip and beads on the front to embellish. There was no need to attach the rest of the front because it was heavy enough with the layers and popping to lie flat without and gave me the option of not having to add anything further to the back side of the acetate to hide the adhesive.

However, when I got around to the inside and realized just how limited the writing space actually was, I added another Marquee shape to the acetate with a computer generated sentiment, directly behind the one on the front. The tiny cream strip at the fold hides the adhesive where the acetate is attached but I didn't add the beads so it would lay flat. The dotted paper is from the DCWV La Creme stack and the matte metallic is from Recollections. Now, if you haven't already, please scroll down to see if you're the winner of either the BBTB2 or Dia De Los Muertos Blog Hops. I'd hate to see the prizes go to waste. And check out the creations by the rest of the BBTB2 team and put your thinking caps on. We'd love to see what you come up with for this challenge. Remember, you have 2 weeks to complete it, new creations only, and please link it back to BBTB2 so others have a chance to play along.

Sunday, November 6, 2011

The Altered Alice Fall Colors


"`Off with her head!' the Queen shouted at the top of her voice.
Nobody moved. `Who cares for you?' said Alice, (she had grown to her full size by this time.) `You're nothing but a pack of cards!'
At this the whole pack rose up into the air, and came flying down upon her: she gave a little scream, half of fright and half of anger, and tried to beat them off, and found herself lying on the bank, with her head in the lap of her sister, who was gently brushing away some dead leaves that had fluttered down from the trees upon her face."

-- Chapter 12, Alice's Adventures in Wonderland


Perhaps the Wonderland story took place in the Fall. It's the time of year when the days grow shorter, there's a nip in the air and the trees are giving up their green for the vibrant hues of burgundy, scarlet, orange, chartruese and gold. This month your challenge at The Altered Alice is to create a project drenched in the colors of Autumn.


My teapot is hand cut from a template from Gem's cottage using DP from K&Co over a card stock base. The window in the front was cut with my Nesties to reveal the tea party scene.


Our prize again this month is an A5 sized unmounted stamp set from IndigoBlu (a £13 value), or an equivalent amount of A6 stamps. IndigoBlu is a fantastic new British stamp company that makes "Quintessential English Rubber Stamps" right there in England.


In fact IndigoBlu is sponsoring The Altered Alice for October AND November, and the design team will be working with these two fantastic Alice stamp sets, titled appropriately "Alice I" and "Alice II". Most Americans don't know what A5 and A6 mean so I'll just tell you, these sets are huge!


I encourage you to go visit IndigoBlu.com. All stamps are on sale right now with their introductory pricing, but that won't last forever, and the designs are all wonderful! In addition, the Head Honcho Alfie says The Altered Alice readers can take 10% OFF during the challenge; just use coupon code Altered Alice in the voucher code box at checkout! Thanks Alfie!


This stamp is from the "Alice II" set and is colored with Copic and inked with Distress. It's recessed from the frame, but there is still plenty of room to fill the pot with tea or other goodies.


I've cut a tea tray using my Nesties Grand Labels One and added autumn leaves to both the tray and the teapot lid. The leaves were either punched or cut with the Cuttlebug Maple leaf and stamped with the crackle stamp from the "Alice I "set before embossing. Please visit The Altered Alice to see our first week's inspiration pieces and we invite you to play along. Our challenges begin the first Sunday of the month, with new inspiration each week and run through the Friday before the last Sunday when the winner and honorable mentions are announced. Hope to see you down the rabbit hole.

Saturday, November 5, 2011

Smeared and Smudged Guest Designer Challenge and BOTH Blog Hop Winners


I'm thrilled to be Guest Designer this month Smeared and Smudged Forum. Not famliar with Smeared and Smudged? Well, it's a fun, supportive group of "alternative" stampers, hosted by the fab owners of Smeared Ink Stamps. Each month there are a number of different challenges and I was lucky enough to be asked to host the November GDT Challenge. I've used an image from the Smeared Ink Smitten digi set, also available as a single HERE. I chose the image because I'm trying to convince myself that a butt the size of Cleveland can be a GOOD thing since my diet and exercise regimen is not yielding the rapid results I'd hoped for and I'm about ready to eat the furniture. LOL I've added dimension using the pyramage technique with my Nesties. Have you guessed the challenge yet? Well, check it out HERE. I'd love to have you join the forum (just ask) and my challenge this month. And BTW, you get a free digi just for entering. WooHoo!


Now on to the Blog Hop Winners! First, the winner of the BBTB2 Blog Hop and the $40 Gift Certificate from Custom Crops is LUCKY NUMBER 13! Thank you so much Custom Crops for your generous sponsorship!


WOOHOO! Congratulations RO, who wrote:


Now on to the Dia De Los Muertos Blog Hop and the winner of the Cuttlebug With Gratitude Card Making Combo is #15


Congratulations to Ruthie Lopez who wrote:


I want to thank all of you for partcipating in both hops. There are an awful lot of blog hops these days and I really appreciate that you took the time to visit and comment. Winners, please email me at dlmundinger(at)yahoo(dot)com to arrange for your prizes

Wednesday, November 2, 2011

Bah!Humbug! Die Cut Challenge and the Return of The Cuttlebug Spot


Well, I'm afraid to say I've missed the last two Bah!Humbug! challenges but I couldn't let another go by. I've been trying the last few weeks to balance my life a bit which has been tough on me and my crafting. This week the ladies of Humbug Hall chose Die Cuts as the challenge. Now normally I'd do a Cricut project, but in honor of the return of The Cuttlebug Spot I opted to use my new Tim Holtz Festive Greenery die and make a tag. These dies to work in the Cuttlebug, but you need to have the Sizzix extended platform and cutting plates to use them (in the Big Shot as well, BTW). Although I have decided to retire from the Cuttlebug Spot DT, I hope to participate in challenges whenever possible. I want to thank Nilda for all of her hard work and the fabulous opportunity to be on such a wonderful team and say "Hey!" to the talented teamies who chose to stay on. The challenge this time is Anything Goes. They will be bi-weekly now and will not necessarily require embossing, but I have so many folders (many that I've acquired since we went on hiatus in April and have yet to use) that I'm pretty sure I'll be embossing anyway. I've used the Tim Holtz Sheet Music folder on my project today. All of my die cuts were actually cut in a medium green card stock and I've used Copics and Distress Inks to color and shade them. The pine cone is also embossed with the Cuttlebug Tiny Mosaic folder. The adesive metal letters are from M's and I've added a few beads for holly berries and a ribbon tie for my stash. As I'm just squeeking in for Bah!Humbug! again (sorry ladies) you'll probably have to wait for Friday's new challenge, but you have nearly two full weeks to join in at The Cuttlebug Spot so I hope to see you there.

Tuesday, November 1, 2011

Dia de los Muertos Blog Hop


WooHoo! It's Abby's Second Annual Dia De Los Muertos Blog Hop. If you've come from Monica's Blog, you're on the right track, but if you've happened here by chance click HERE because I know you'd just hate to miss a thing. This is a big celebration at my house and my entire dining room becomes a giant ofrenda (altar) honoring those important people who are no longer with me. Remember, it is a celebration of life and a very festive and happy occasion. Traditionally in Mexico fiestas include brightly colored cut paper banners (papel picados)and this year I decided to create my own with the help of my Cricut.

I used the Autumn Celebrations cart for the base and added and subtracted elements using Design Studio. The flowers are from the Paper Lace cartridge. Traditional banners are usually cut from tissue paper, but these are quite delicate enough just using card stock.

Besides the sugar skull motif, skeletons are often depicted doing the things they loved to do in life such as dancing. Again, the design began with Autumn Celebrations with flowers from Paper Lace. The most difficult aspect here was that when flipping the image, the words were also flipped so I had to hide the letters on the flipped image and then hide all of the contours of an unflipped image BUT the lettering and move it into place to cut this banner correctly.

I have many keepsakes from my relatives that I cherish and include in my ofrenda. This shelf is honoring my maternal grandparents who both died before I was born. It includes their wedding picture and portraits. If you'll notice, in both pix my grandma is in profile. I have never seen a picture of her head on. Apparently, when she was a very young child, she had an eye infection and the Dr. put the wrong drops in her eye causing it to shrivel. I still think she's beautiful. The embroidered satin slippers are those Grandma wore on her wedding day. I have her wedding gown as well. The pocket watch is my Grandfather's and is engraved with his initials. I also include my little Novios (wedding couple) sculpture which signifies Amor Eterno (eternal love). My last year's post includes many more stories and pix of my family artifacts, so if you're interested, please click HERE. Many of you asked last year how I could possibly have so many family heirlooms. I am an only child with no living aunts or uncles on either side of my family and only have 3 living first cousins, one on my Mom's side (who is 16 years older than I) and two on my Dad's. My parents seemed to have been the caretakers of many treasures which have been passed down to me. I so enjoy reliving the stories that were told to me by my parents and I'm thrilled to be able to share them with you, because we have no children to pass them down to and Goliath and Jezzie pretty much couldn't care less. LOL

I try to add to my collection each year and would love to show you my recent acquisitons. First, a 12x12 original canvas by Megan Suarez inspired by Frida Kahlo. Megan is not only a fab painter, but she also sells her adorable Dilly Beans digi stamps.


Second, a gorgeous Mexican folk art piece that I had hoped to make a decorated shadow box for but time got away from me. (Maybe next year)


And finally (because you can never have too many skulls) 3 handpainted bottles of TEQUILA! Time to party!


But before you go, please be sure to leave a comment to be eligible for my blog candy. November is also a month to give thanks so I'm offering this Cuttlebug With Gratitude Card Making combo. Just leave a comment and stop back on Saturday, November 5th when I announce the winner. BTW, I'll also be announcing the winner of the BBTB2 Blog Hop that day, so if you haven't entered my giveaway there, please scroll down. Now you're off to Michelle's Blog. Happy hopping!

Monday, October 31, 2011

Happy "Boo-Day" and BBTB2 Blog Hop


Happy Halloween everyone and welcome to our Monthly Blog Hop for BBTB2. If you came from Susan's Blog you're on the right track. Our dear and fabulously talented Shelly chose either ghost cut from PDDU for this challenge, but I took some artistic license and used the one from Happy Hauntings instead. I was browsing my DS files and came across one called "Boo-day" that I'd done eons ago using the ancient Stamped (not to be confused with Stamping)cartridge. The sentiment was all that as there and I'd done it way before there was any "spooky" Halloween font available. I was originally thinking Halloween birthday, I guess, but actually, Halloween is sort of a "Boo-Day" in itself so I decided to go from there. Try as I might, the suggested cuts didn't work as well for my design so I opted for the others (and you can too, remember, we're easy at BBTB2).

It's my usual shaped front style, welded in DS. The "Happy" is also from the Happy Hauntings Cartridge and the entire mess is welded to the rounded rectangle from George. The inside mat is from my Halloween stash and set the tone for the color scheme. I'd planned to do something more colorful, but in the end I enjoyed the neutral theme. The rest of the DP is from the DCWV La Crema Stack and the ghosts were cut from old glitter paper from WalMart. The sweet little flocked ghosty brad is by Making Memories.


I've done my usual dimensional layers and am pretty pleased with how it came out. I've been in a bit of a funk lately and I'm hoping to snap out of it soon. Now hop along to Carri's Blog, but don't forget to leave a comment to be entered in my giveaway, a $40 gift certificate sponsored by Custom Crops. Check out their sale going on NOW with Cricut carts starting at $15.00! I'll be drawing the winner using Random Org on Saturday, November 5th. WooHoo! If you ever get lost along the way, hop back to BBTB2 to get yourself back on track and of course, we'd love to see your take on the challenge. Please link up a new creation using any ghost cut by Nov 13th to win our much coveted POW blinkie. Happy hopping, and have a wonderful, safe, Halloween.
I"m also just squeeking in on the ABC "B" is for Boo Challenge and the Simon Says Stamp Anything Goes Challenge.


Don't forget to come back tomorrow for the 2nd Annual Dia De Los Muertos Blog Hop!

Sunday, October 30, 2011

Heinously Haunted Houses


It's the day we've all been waiting for! The Masterful Mistress and the Minions wish you a fabulously safe and spooky Halloween! Our challenge this week at HDH is Heinously Haunted Houses and there is a fabulous prize pack being offered by the Mistress herself so let's see some spooky stuff. I've merged two digi images from Make it Crafty, the Spooky House and Spooky Graveyard. I've colored them with Copics in neutral tones and used my Nesties Grand Creative Book Pages to cut both the image and the scalloped base. The hanging handle was cut with Nesties labels Ten and threaded with a hand cut banner. "Welcome" is spelled out with letters from the QuicKutz Haunted Mini Alphabet that works in your Cuttlebug, Big Shot, or Grand Caliber using the same sandwich you'd use for your Nesties. the entire piece was inked with Distress in Pumice Stone, Brushed Corduroy and Black Soot. The Minions will be taking a little break from our regularly scheduled challenges for the rest of the year, but you never know what might be brewing at HDH, so don't be strangers. In the meantime, go have a look at the fab inspiration HERE, and don't forget Wicked Wednesday when Creepy Glowbugg posts the winners and her amazing creation.
Friday, October 28, 2011

Tiddly Inks Fabulous Inky Friday


I just love the new Fall Queen digi at Tiddly Inks Shop! Little Mavis looks so cute perched atop those pumpkins and I just couldn't resist her. She's colored with Copics and cut with Nesties. The DP is from an old DCWV Fall stack. For embellies I used some burlap ribbon and layered card stock and more DP on top. The leaves and acorn are wooden (so cute) and were found in the button section of J's. Flowers are Prima and that's it. Love that she can be used for any Fall occasion (and there's a new Christmas version of Mavis for all you kitty lovers now too. WooHoo!) Pop by the Tiddly Inks Challenge Blog for more inspiration from our Tiddly fans and DT.

Monday, October 24, 2011

BBTB2 Happy Hauntings Witch Challenge


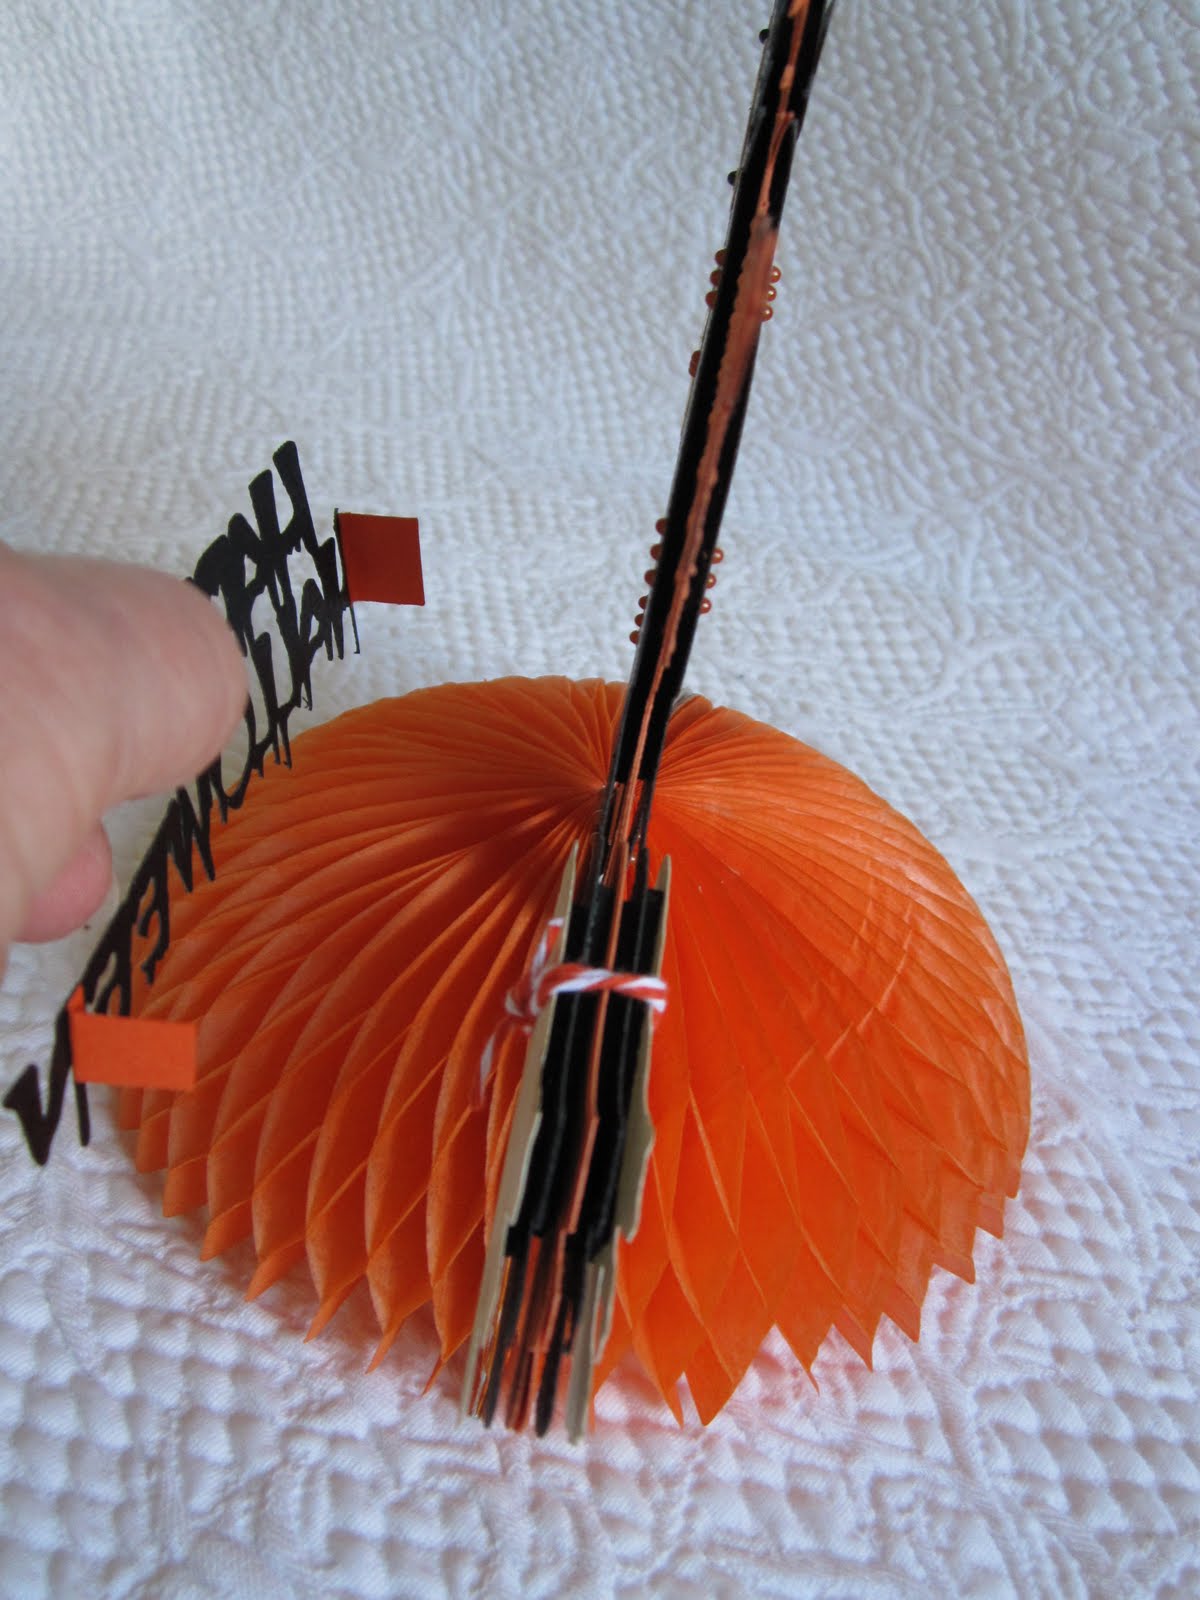
Happy Monday! Just one week to go until the big day and I've LOTS to do still. (Make that EVERYTHING to do still, I'm such a procrastinator and I've been a bit preoccupied! LOL) This week my dear friend and MSU alumni sister Susan has chosen the witch from Happy Hauntings for our BBTB2 challenge. I wasn't quite sure what to do with her until I was shopping in Target and saw some honeycomb tabletop decorations that reminded me of something I had as a child. That, combined with the Whimsical Wednesday challenge of Halloween Home Decor, led to this project.

Nothing fancy here. I just cut the witch and layers at 5 1/2 inches twice (once flipped) so it would be two sided. I kept the colors to a minimum to hopefully capture more of a vintage feel and embossed the cape and broom. The black layer is popped on both sides, as is the broom. Athough the orange base is also 2 layers, I should have cut it in chipboard for strength as she is adhered to the honeycomb by her foot and just the bottom of her dress. I wanted to be able to close the honeycomb for storage so I glued one side together (with the witch in place) and used some removeable tape and a paper clip underneath for the other. "Happy Halloween" is also from Happy Hauntings and I added tabs to it so it would just fit in the slots of the honeycomb for display instead of gluing it permanently.


I dug out the original hanging decoration to show you. (Couldn't get a pic so it's hanging from the cat pole but won't be staying there. LOL) This is truly vintage from the 50's and is a little worse for wear. Wish I'd been a bit more creative with my cut and I will probably try again as I'm not so pleased with it. I was trying to follow the challenge exactly, but I think I could have found a more vintage looking witch. My FAVE decor item I've made using a witch is HERE. I have trouble doing a second project when I've made one I love and I'm in a bit of a creative slump as I'm trying to get back on track with healthy eating and exercise (and no WINE!) to make up for the year and a half (or more) of crafting 24/7 and I'm sort of a crabby BI---, I mean WITCH! Sorry! My DT siters have done a much better job than I, so be sure to check out the rest of the DT at BBTB2 and we'd love it if you'd play along. Yo uhave 2 weeks to complete the challenge, please make it a new project and link back to BBTB2 and you may use any witch from any cart. I'm also entering it in the Getting Cricky Orange and Black (and only one other color) challenge.

Sunday, October 23, 2011

Macabre Monday Movie Madness:Pumpkinhead


This week at HDH the challenge is to create a project inspired in some way by the B Horror fick Pumpkinhead. Okay, I'll admit it. This one slipped by me. I Googled it and the dude looked nothing like a pumpkin to me, but I had this fab digi stamp of the same name by Rick St.Dennis so of course I HAD to use him. He's pretty darn creepy himself, no? Looks like he's about to stomp the crap out of that smiling jack-o-lantern. I've added a "lucky" 7 , cut with my Cricut from the Happy Hauntings cartridge in order to play along with the SBS 12 Days of Halloween (7 pumpkins glowing) and embossed it with a Sizzix folder. The sentiment was done with my Dymo Label Maker. (I'd be feeling luckier if I never ran into this guy on a dark street. LOL)

I've colored this "gourd-geous" guy with Copics and fussy cut him out. Love the detail of this image. The Minions have a fabulous assortment of projects this week, some even featuring the DUDE himself, so be sure to have a look and don't forget our Wretched Wednesday when Creepy Glo posts her fab stuff and announces the winners from the previous week.