Showing posts with label Fall. Show all posts

Monday, November 7, 2016

My Favorite Quote for Aurora Wings


A new challenge begins today at the Aurora Wings Challenge Blog with the theme of "My Favorite Quote".  I've made a gift bag using the gorgeous Mask of Leaves.  Autumn is my favorite season and I tried to capture the beauty of the season using the colors and textures that Autumn brings to mind.  There are many beautiful quotes about Autumn, but I was especially touched by one from John Donne.  I'll speak a more about my choice a little later, if you don't mind. I think it deserves a paragraph of it's own.

I've cut the image and matted using my Spellbinders Grand Labels Four.  The gorgeous paper is another oldie from Kay&Co.  I've added texture with paper leaves from Recollections as well as real copper toned skeleton leaves.  I've distressed the May Arts mesh ribbon.  (Actually I was looking for my cheesecloth and couldn't find it in my stash.  Big surprise!)  the lovely deep rust crinkle ribbon that holds the tag sentiment is from DL.Art.


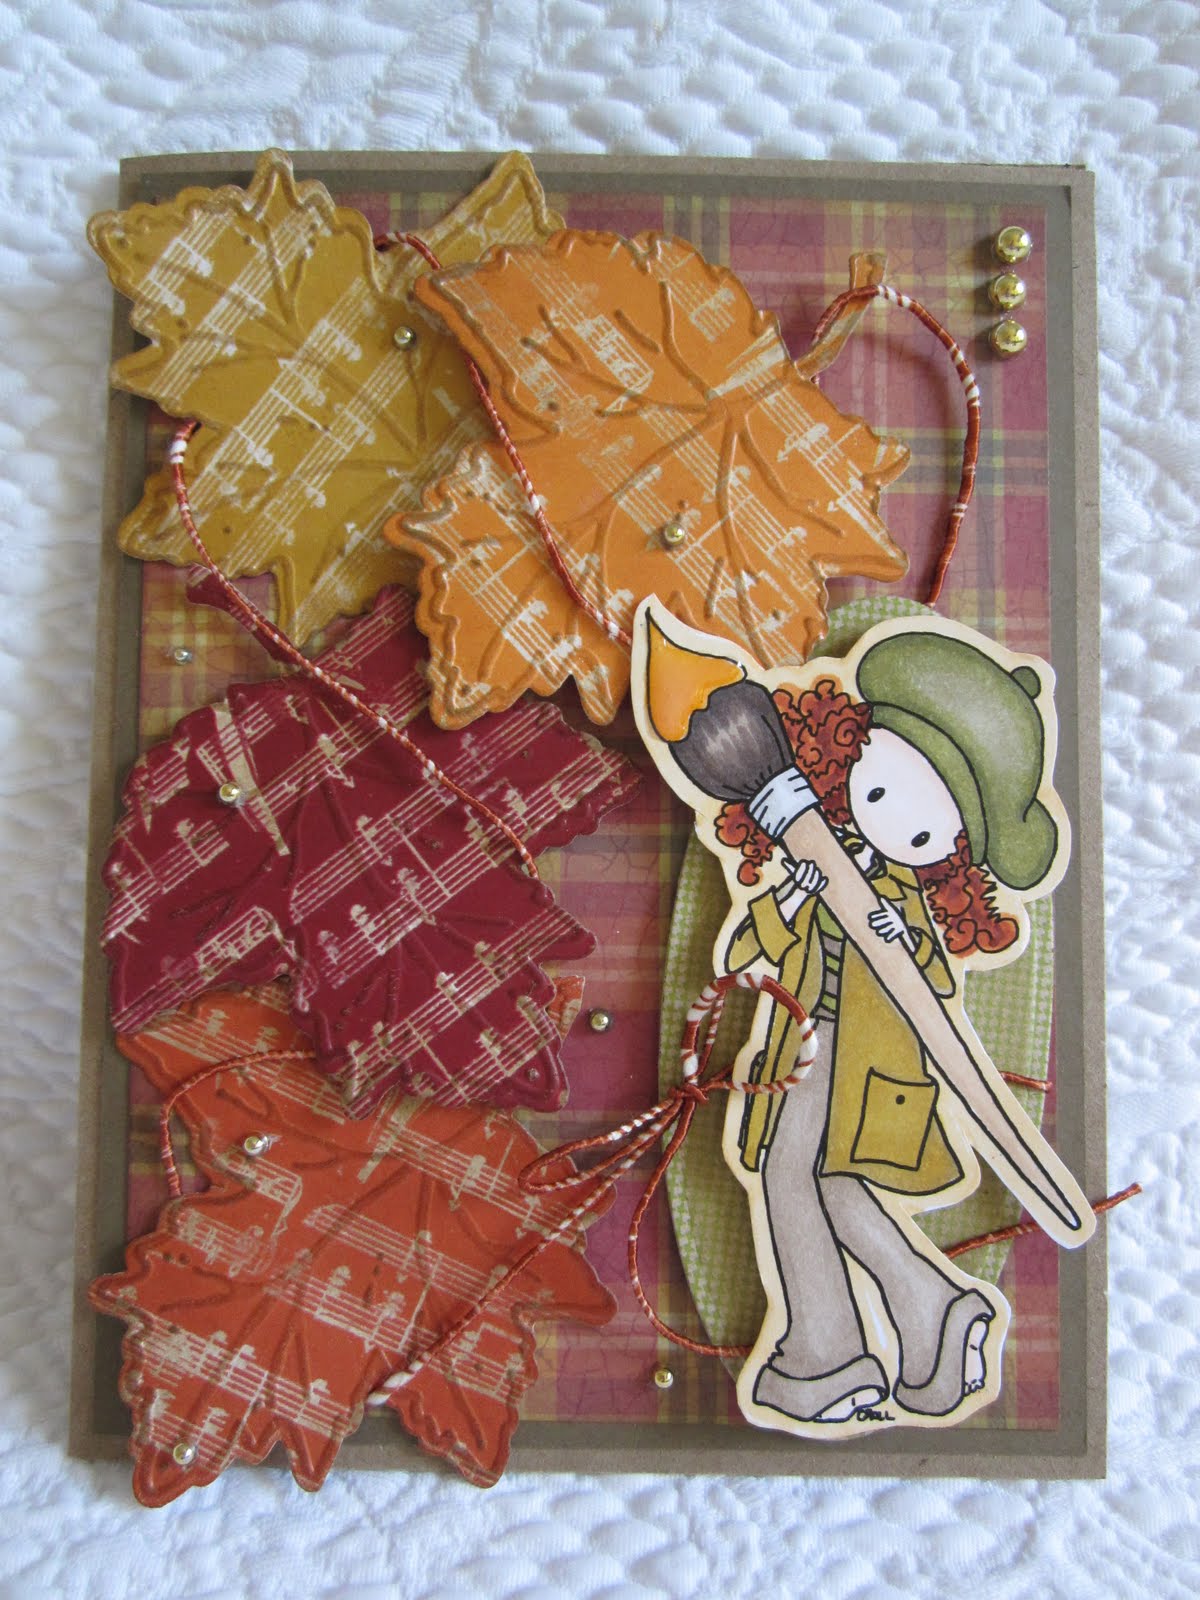
Here's a closeup of the gorgeous Mask of Leaves.  She's colored with Copics with just a touch of shading with Prismacolor pencils.  I've used Autumn hues, but you can see the versatility of this image on the Aurora Wings Showcase Blog HERE.  I see a Christmas card in her future for sure.


I've added the quote as a tag cut with Spellbinders Labels Eleven.  The back was cut from corrugated cardstock packaging with leaves between the layers and a copper heart charm.  The beautiful quote is by John Donne.
  
"No spring nor summer beauty has such grace
as I have seen in one autumnal face."

I love it because it not only speaks of the beauty of Autumn, my favorite season, but also of the beauty and grace he sees in his love's face as she ages. It kind of brings tears to my eyes.  Love goggles?  Maybe, but one can only hope for such everlasting love and devotion.

Please visit the Challenge Blog to be inspired by the Stella team's choice of quotes and beautiful projects. the new November FB Contest, Nature's Bounty, is also in full swing in the Stamps by Aurora Wings FB Group.  We hope you come join the fun.  


Here's how to keep up with all that's happening at Aurora Wings.


Wednesday, September 21, 2016

"Leaf Me Alone" for The East Wind


It's time for a new FB contest at The East Wind, and our fitting theme this month is "Leaf Me Alone", so we want to see leaves, either in the image, the DP, or embellishments.  Since tomorrow is the first day of Autumn in the northern hemisphere, I chose the gorgeous Aurora 'Maple' for my project.  I can't wait until the leaves start to turn.  It's truly my favorite time of year.  I pulled a number of seasonal colored papers from my stash and added a Prima flower, silk leaf and die cut twig wreath.  The sentiment is a sticker from???


Here's a closeup of the beautiful Aurora 'Maple'. She's colored with Copics with just a touch of shading from Prismacolor Pencils and I've used a Spellbinders Grand Oval to cut her out.  Be sure to visit The East Wind FB Group to view my teamies' inspirations and please come play along.  This contest runs through October 17th and don't forget, a new digi is released every Tuesday and Friday in the Group as well.  Our current Blog challenge, I Like to Move it, Move it!  is so fun and creative so be sure to stop by there as well.  


Here are of all the important links you need.

Monday, September 15, 2014

Feel the Fall with The East Wind


Our new Challenge starts today at The East Wind Challenge Blog and the theme is Feel the Fall.  Since it's been in the 90's all week here, I sure wish that were the case.  Gotta say I really love Fall fashions though, so I just had to choose Lucy Loo Tartan Longstocking for my project.


I loved using totally Fall colors for Lucy Loo's fab outfit.  She's colored with Copics, fussy cut and popped.   The Cuttlebug embossing folder, sanded to show off the detail, looks like swirling wind to me so I used the tiny off cuts from the Maple Leaf MS punch, colored them with Copics in the shades of her clothes and scattered them over the card.  There's a tartan DP behind her as well.


Here's the dimensional shot.  The double mat, cut with Spellbinders Classic Ovals is popped from the base, as well as a number of the swirling leaves. Can't you just feel the chill in the air?  Please visit The East Wind to see the fabulous Fall projects created by my DT sisters and come play along.  We can't wait to see what you create.

I'm entering this in the Bearly Mine September Autumnal Colors challenge, Mema's Crafts September Fall Colors, Seemacrafts Autumn is Coming, Whoopsie Daisy Colors of Autumn, Come and Get It Use a Digi With An Autumn Theme, Robyn's Fetish Use an Embossing Folder, the Corrosive Challenge Autumn or Fall, Di's Digi Designs Add Stripes or Checks, ACN September Textures/and or Patterns, the Fitztown Fall Colors Challenge and Simply Create Too Fall/Autumn.

Monday, October 8, 2012

BBTB2 Happy Fall/Pumpkin Challenge

This week at BBTB2 our lovely and talented Glenda has asked us to celebrate Fall by using a pumpkin in our project.  The catch?  NO HALLOWEEN PUMPKINSI'm always avoiding the Disney carts because of the tiny detailed cuts, but the fablous pumpkin and vines on Happily Ever After called to me so I decided to give it a go.  I welded the shadow to the shadow of "Give Thanks" from Phrases and went from there.  Because my Cricut blades are terribly dull and I haven't been able to find replacements for awhile, I cut this pretty large.  (I'm thinkin' 4" for each, but I almost never pay attention to that.)  Oops!  Too large for a card, in fact so this project hasn't found it's final resting place.  I was going to attach a ribbon for a door hanger, but I'm leaning towards matting and framing it.  As usual, I was late in finishing it so for now, it is what it is.
Here's the dimension shot.  I intended one more layer so I could pop the "T", "a", and "s" in "Thanks" (which were trimmed from the entire phrase by hand) but my crap blade and non sticky mat screwed up the last pumpkin shadow I would have needed to do that, so I glued the plaid letters flat.  I shadowed the pumpkin and leaves a bit with Copics and did a little doodling and called it done enough to submit.  LOL  I'm telling you, I really am struggling with the crafting these days.  Hope I can snap out of it.  My teamies are on the ball with fabulous projects, so be sure and stop by BBTB2 and have a look see.  Can't wait to see what you have in mind, too, but remember to follow the rules and make your Cricut cut pumpkin NON HALLOWEEN or it will vanish without a trace from the Linky.

Friday, September 28, 2012

Dilly Beans Fall Challenge


This week at Dilly Beans, we're still celebrating the Fall season.  I love the changing leaves and the way the crisp breeze makes them dance through the air.  I've used an older image, #154 Hanging Heart Girl and removed her heart.  I love the way it looks like her hair is blowing in the wind.


She's colored with Copics and Spica Pens and I added a shaped computer generated sentiment.  The background is embossed with the Tim Holtz Swirls folder and the dancing leaves are metallic brads.  A leaf border was punched in copper foil card stock with an EK Success punch.

Be sure to check out the fabulous work from my teamies at the Challenge Blog and just wait 'til you see the fab new stamps Megan has added to the STORE.  Besides a whole slew of new Halloween stamps, Megan has some adorable new turtles.


Aren't they the cutest EVER?  I apologize in advance for a lean week this week.  I'm currently in Chicago area for my 40th high school reunion and didn't get much crafting time in before and won't be around much this weekend.  See you next week.


Friday, October 28, 2011

Tiddly Inks Fabulous Inky Friday


I just love the new Fall Queen digi at Tiddly Inks Shop! Little Mavis looks so cute perched atop those pumpkins and I just couldn't resist her. She's colored with Copics and cut with Nesties. The DP is from an old DCWV Fall stack. For embellies I used some burlap ribbon and layered card stock and more DP on top. The leaves and acorn are wooden (so cute) and were found in the button section of J's. Flowers are Prima and that's it. Love that she can be used for any Fall occasion (and there's a new Christmas version of Mavis for all you kitty lovers now too. WooHoo!) Pop by the Tiddly Inks Challenge Blog for more inspiration from our Tiddly fans and DT.

Friday, September 9, 2011

Tiddly Inks End of Summer Card


div>It's Fabulous Inky Friday which means at The Tiddly Inks Challenge Blog we highlight cards we see using Tiddly Inks images throughout blogland as well as those from the Tiddly Inkers. We also announce the winner from the previous challenge so of course you wanna go see, don't you? Although it wasn't my team's turn to do the Goodbye Summer Challenge for Tiddly Tuesday, I couldn't help but do a Fall card. It's my favorite season.


I immediately thought of the sweet Colorful World, an older image that resides in the Tiddly Inks Basement. Remember, that's your spot for things you may not find in the new Tiddly Inks Shop. Many of the images in the basement are discounted as well. WooHoo! You can snag her for a mere $2.00! She's colored with Copics, and glossy Accents added to her brush, fussy cut, then popped on a Nesties Mega Oval.


The leaves were cut and embossed with a Cuttlebug die and folder. I used the trees from the huge Harmony at Home Mega Pack for the patterned paper by resizing and printing each in a different color, using my Printmaster Platinum Program, then cutting the leaves out of the tree tops. Brushed Corduroy Distress was used to bring out the embossing.


To add a little interest, I wound a fiber through the popped leaves. I kind of thought it gave a feeling of movement and allows me to enter it in The Ribbon Carousel Anything Goes Challenge this week. Some gold adhesive beads were added for a little shine. There's still plenty of time to enter our Goodbye Summer-Hello Fall challenge so I hope to see you there and wait until you see the fabulous inspiration from our Wow Ya Wednesday Guest Kate from The Kathryn Wheel. Seriously, art journaling at it's FINEST! And pop over to Christy's Blog and see the adorable new Little Miss Sunshine image, just released Tuesday. There is always something fun going on at Tiddly Inks.


I'm also entering this in the Craft Us Crazy Autumn Colors and/or Favorite Embellishments Challenge (adhesive beads, here).

Monday, October 25, 2010

The Cuttlebug Spot Welcomes Fall


Hi, if you're looking for the BBTB2 Blog hop, please scroll down, but take a look here too, okay?
This week at The Cuttlebug Spot we're welcoming Fall. As in all of my cards for The Cuttlebug Spot I try to keep it as much Cuttlebug as possible so I was happy to have received my Pumpkin Patch folder by Tim Holtz. I embossed using Core'dinations card stock, then used a craft knife to carefully cut around the pumpkins and slid a Labels Thirteen Nestie through the opening to cut the window. I embossed the top of the mat with one of the Cuttlebug border folders from the Organic Flourish set and sanded the embossing to reveal the core color. To enhance it further I inked it a bit with Spiced Marmalade Distress Ink. The interior cut out mat was the reverse side of the Core'dination card stock. The first mat was an experiment I rejected from another project. I'd swiped a numer of different Distress inks on my craft mat, spritzed them with water, and wiped my paper through the mess. I dried it with my heat gun and crumpled it up and ran another ink pad over the wrinkles. I thought that was a bit harsh so I spritzed it again. When it dried I decided to run it through the Cuttlebug using D'Vine Swirls and thought it coordinated nicely with what I had going on here so I saved it from the bin.

The third pumpkin is the Cuttlebug 3x3 embossing duo Pumpkin Spice. The mat layers were popped for dimension and the pumpkin was nestled in between. "Thanks" is from the Cuttlebug Card Making Combo, With Gratitude, cut twice and adhered slightly offset to add a bit of a shadow. To add a little bling I added peelie corners and a single gold adhesive bead. WooHoo! All Cuttlebug! Now pop on over to The Cuttlebug Spot to see the amazing creations by the rest of the DT and be sure to play along. A $50.00 gift certificat to Simon Says Stamp will be up for grabs.

Monday, September 13, 2010

BBTB2 Crayon Box Challenge


This week Regina, our dear BBTB2 DT sister, founder of the original BBTB and owner of the fabulous Cutting Cafe chose the Crayon Box from the TBBM cartridge. I love this cut and often use it for envies for my fat Cricut cards. Actually I use it so often that I had a bit of a brain freeze. In a way I feel like I've cheated a bit because the box is the only Cricut on this project. As I've said before, I'm trying to actually USE some of my new crafty purchases (as well as old stash) so that's how this came about. The box was cut at 9" which is the largest you can cut it on a 12" mat.
At the Santa Clara Scrap Expo I purchased a number of the Heartfelt Creations stamp sets that coordinate with Spellbinder's Nesties. This was a first attempt and I must say they take a bit of practice to line up, even using the template method as recommended. I'm not gonna tell you how many got tossed in the bin. I used both the Aztec Gold Sunflowers sets 1 and 2 which coordinate with the Nesties Blossom 2. They were embossed with Tim Holtz Vintage Photo Distress embossing powder and inked with Scattered Straw, Wild Honey, Spiced Marmalade, and Brushed Corduroy (does that scream "Fall" or what?) The gorgeous corners are from the Heartfelt Creations Perfect Petals Die Cut by Spellbinders. The seeds are hand cut and the sentiment was cut with Nesties Labels Four (both on the Sunflowers 1 set).
The DP is K&Co Wild Saffron and so are the layered sticker leaves, tiny lady bug and dragonfly. The gorgeous Offray ribbon from my LSS inspired me to attach it to the box but leave it loose near the flap for a tie closure. My DT sisters knocked this one out of the park with tons of creative inspiration so be sure to check out BBTB2 if you haven't already. I hope you're inspired enough to try your own.

Tuesday, August 31, 2010

Tiddly Inks Goodbye to Summer


Where has the time gone? I think I missed August completly and here it is the very last day. At Tiddly Inks we're saying Goodbye to Summer with Autumn inspired projects. I'm not sad, it's my FAVORITE time of year, when the vineyards turn golden and a there's bit of a chill in the air. I've chosen Fairy Fae Dreams. As she sits atop her Fairy House with the autumn leaves swirling about her, what is she dreaming? She and her house are colored with Copics, fussy cut and popped upon yummy paper from K&Co Alleghany Plum. For some sparkle I've added some copper leaf peelies from Stampendous and a copper border. The sentiment is a Melissa Francis rub on.
The falling leaves were a bit of a challenge. They are punched, and originally I tried colored card stock but they just didn't blend with the rest of the card. Finally I punched them in white, outlined them with a Sigma Micron pen and colored them with Copics. Much better. The twine bow added a bit of a rustic touch. Are you ready for Fall? Pop on over to Tiddly Inks Challenge Blog for the fabulous designs by the rest of the Tiddly Inkers and check out the Tiddly Inks Store for all of the new designs. And don't forget there are FREEBIES every Tues when you join the Tiddly Inks PCP group. This week it's the colored version of the Cheshire Cat (good for 48 hours, so hurry)! But BOTH versions are for sale for only a buck! WooHoo! I'm so honored that my little altered version of "What's Up" inspired Christy to add him to the store!
And hey, if you haven't already, please scroll down for the BBTB2 Blog Hop and leave a comment for a chance to win my prize.

Friday, October 23, 2009

Open Window Gatefold Card.


Oops! Thursday came and went with no post! Sorry about that. My craft rooom had become SUCH a mess that I'd actually moved into the exercise room as well and when I ceased to be able to walk in EITHER room I decided I MUST stop and get organized. Besides, I need to start packing for our slumber Party SWARM over the weekend. Can't wait! Here's a card I did for Custom Crops using my Nesties and Cuttlebug. The article explaining the open gatefold technique is HERE. I used my nested maple leaves and the Cuttlebug maple leaf combo and a number of embossing folders to give them texture. I soooo love Fall!

Friday, October 16, 2009

Beautiful Fall Days from The Cutting Cafe


WooHoo! After a couple of unseasonable days of rain it's going to be a gorgeous day! DH informed me we were going to "do something" today (translation: I won't be crafting and he won't be practicing the piano) so we're off to the city! October weather is BEAUTIFUL in San Francisco (much better than June or July) so I'm happy as a clam. Oh Oh! No blog post yesterday and I've been working on DT stuff all week so what's a girl to do? Hit my Cutting Cafe files of course, for a quick easy card that looks like it took far longer than it did to make. I printed the Autumn Days printable stamp set on kraft paper in brown (I'm SOOOO lovin' that I can do that now), cut the background collage out, matted it in plaid, cut and embossed a Cuttlebug maple leaf, used my petite scalloped circle Nesties to cut out the sentiment, tied a big bow, added some mini skittles and I WAS DONE! Now it's off to the shower. You've got to stop by The Cutting Cafe to see what Regina's been up to. Just wait 'til you see the new All About Christmas set. What fun stuff! TTYL xxD

Tuesday, October 13, 2009

A Monochromatic Fall, TCS, Paper Blooms and Caardvarks


This week at The Cuttlebug Spot we have a monochromatic color challenge. It's really beginning to feel like Fall here so I got out the orange box of paper and started to play. Honestly, they ARE all oranges, but didn't exactly photograph as such). I decided to try the weaving technique for the background and chose 3 shades and cut paper in a variety of widths to make it a bit more interesting. Then I taped the edges and ran it through the Cuttlebug using D'Vine Swirls which this season makes me think of swirling leaves. I really love the effect. The mat is done with one of the new 5 x 7 Cuttlebug folders exclusive to Oh My Crafts. The opening and frame is with my Labels One Nesties.

I love the Cuttlebug pumpkin cut and emboss set and added a number of leaves, some punched, some Nesties, cuttled with Swiss Dots, Herringbone, and the small dotted folder from the butterfly set. The corners are Sizzix. The metallic leaf brads and pearls are from M's.

I still managed to get a bit of dimension, and isn't that ribbon YUMMY!? It came on one of those teeny spools so I've GOT to go look for some more of it, although I'm not sure if it was from J's, or M's. I'll certainly be on the hunt. For this reason I decided to enter it in the Caardvark's Take a Bow challenge which is to use ribbon in a wonderful way. Their sponsor is May Arts which has THE MOST GORGEOUS RIBBON IMAGINABLE!!!!! I CRAVE their stuff BIG TIME!!!! One of my other favorite challenge sites, Paper Blooms, is also having a monochromatic color challenge this week. I really hoped to do another monochromatic card for them featuring Leah's GORGEOUS hand crocheted flowers, but just in case I don't have a chance to I'll be entering this there as well.
This may have been my favorite Cuttlebug Spot Challenge yet and it sure looks like my Design Team Sisters agree. Their projects are FABULOUS! So hop on over to The Cuttlebug Spot, take a look, and play along. I'll see you there.

Tuesday, September 29, 2009

We're Falling at The Cuttlebug Spot


This week at The Cuttlebug Spot we're featuring a Fall theme. WooHoo, now we even have some cooler weather here in CA for some inspiration! I was also inspired by SusieB on the Cricut message board and decided to do a little treat bag like those she did for Halloween. Click HERE for her post and instructions. I decided to use my new Nesties Maple leaf for the flap and the autumn Cuttlebug folder which I inked a bit and shimmered up with Perfect Pearls. The other leaf is the Cuttlebug cut and emboss die. I used a piece of packaging from one of my Cricut cartridges and ran it back and forth until it pretty much cut through (about 4 or 5 times and it still needed a little punching but not too bad) and then used alcohol inks to color (on the back side). Then used my cropadile to punch two holes through all of the layers and tied it up with raffia.

I know the first pic doesn't really show it's a treat bag, but it did show the glimmer a bit better. Hmmm... this pic doesn't really show it much either but you get the idea. I always make spiced pecans at Thanksgiving and thought these would be nice for favors. So fun and easy! Thanks SusieB! Now drop on by The Cuttlebug Spot to be inspired to join us with your own Fall themed project.