Showing posts with label Spring. Show all posts
Showing posts with label Spring. Show all posts
Saturday, April 21, 2018
Hello Spring
My eyes have gotten a little buggy from coloring so I took the day off and played with dies, instead. I've got so many new ones I haven't used yet and more coming. Eiyiyi! The Outlawz Twisted Thursday calls for handmade flowers which I rarely take the time to do. Got plenty of dies to choose from, though. The daffodil here is from Spellbinders. I think I'd never used it because there were really no instructions and they weren't immediately apparent on the site, either. Thanks heaven for Youtube. I did a little shading with my Copics.
The flower is so dimensional that I decided to put it on a Spring tag using layered stitched tags by Gina Marie. I wanted to add some sparkle and shine for the Simon Says Wednesday challenge so I cut the sentiment out of green glitter paper. "Hello" is from Elizabeth Craft and Spring is from Echo Park. Added a jeweled butterfly from Little B, some Doodlebug sequins and two shades of crinkle ribbon from DL.Art.
I'm also adding this to the DL.Art Thankful Thursday #226 Spring Challenge, Lil Patch of Crafty Friends #80 AG, Simply Create Too April #137 Use Die Cuts, Simply Papercraft April #76 AG, Crafting with an Attitude #38 AG...
Monday, March 5, 2018
Bingo Continues at Aurora Wings
We're still having loads of fun with the Bingo Challenge at Aurora Wings as we continue with a mid-challenge inspiration from the Stella Team. Here's the board with tons of possibilities as you can choose colors, elements or both from any row.
To be honest, I had a hard time deciding on colors (in fact lately, I've had a hard time deciding on ANYTHING) so I asked my Aurora Team buddy Susan what she thought, since she was familiar with what I'd done previously for this challenge. She suggested the purple, pink and white diagonal and there ya go. I thought the gorgeous Wings and Petals, available HERE on AW.com and HERE on Etsy would be perfect for that Springy palette. Now I did plan on using the elements for that row as well, but in the end, I managed a full BLACKOUT using ALL of them as the design progressed. WOOHOO!
Here's a closeup of the divine Wings and Petals. This is the first time I've colored her, with my Copics, of course but it certainly won't be the last. I had to print her quite small to fit in the beautiful die cut from the Garden Classics Collection by Janine's Art. She's slightly cropped to a 3 1/2" circle so I wasn't able to manage as much detail in the coloring as I would have liked but I did add some Stickles to the wings of the butterflies and clear glitter Nuvo Drops to what looked like dew drops scattered about to me.
Wings and Petals is one in a series of gorgeous women in profile representing the 4 Seasons. Wings and Petals represents Spring, Fins and Pearls is Summer and the new Vines and Berries represents Autumn. Stay tuned for Winter. I, for one, can't wait! However, I'm sure there are plenty of you out there who've had enough of Winter already this year.
Continuing with the elements needed for the BLACKOUT, here we have cheesecloth fabric dyed with Copic reinker, layered with two white flowers, a crinkle ribbon bow from DL.Art and a stickpin I layered with beads. I purchased the gorgeous pink lace at LAST year's Scrapbook Expo and have been hoarding it ever since. Do ya blame me? Yumbo!
Here are more die cuts, from the Butterfly Exhibit die by Memory Box. I cut the die twice and cut it apart and layered several for dimension. There's more Stickles along the edges of their wings and I used Nuvo drops on their bodies. You can also see the layers of card stock. The patterned DP is from K&Co, my favorite to use with Mitzi's magical images.
The final element was a sentiment and I was thrilled to find one that I thought was fitting in the Tim Holtz Small Talk Sticker pack. I layered it twice with scraps on my desk and there ya go! The final outcome came as a complete surprise but I sure had a ball. Hope you have fun with our Bingo Board, as well!
Be sure to check out the lovely inspiration from my Stella Teamies and please come play along.
Here's how to keep up with all that's happening at Aurora Wings.
Aurora Wings Challenge Blog (current challenge runs through March 17th)
I'll be entering this in the DL.Art March Linky Challenge, the DL.Art Thankful Thursday Challenge #223 AG, Lil Patch of Crafty Friends #77 AG, TTRCD Week of Feb 27 AG, Simon Says Wednesday AG, the Outlawz Monday Greetings Spring, the Corrosive Challenge March AG, Allsorts Week 457 Ladies Only, Crafty Friends Springtime, Di's Digis Die Cuts, the Fairy and the Unicorn March AG/All About Moms, the Classic Design Team Open March, Do Al(l) Kreatives March Spring/Easter, Eclectic Ellapu Spring is Coming, Fabrika Fantasy #18 Spring, Jo's Scrap Shack FFC #223 AG, the Colour Crazy Challenge #9 AG, Dies R US Use Pastel Colors, Artistic Inspirations #195 AG, 613 Avenue Create March AG and Creatalicious AG/optional Girly...
Saturday, April 9, 2016
Spring Has Sprung!
A rainy day is a good time to craft and they've been sort of few and far between in CA, so I'm not complaining...much. Sandra Caldwell is having a Progressive Challenge on her Fan FB Page and I came up with this. The cute image is Birdie Salon and I've made a little scene using DP's from the old DCWV Flower Shower Spring Stack. The glitter bird houses were part of the DP ad I added a couple of layers of grass and a picket fence with MS punches. Flowers are Prima with some pearl centers. I thought the old Spring saying was cute and appropriate, don't you?
Here's a closeup of Birdie Salon. She's colored with Copics and fussy cut. Love the expression on her face. Sooo many cute images in Sandra's Etsy Shop (babycakesdnd).
I'm also entering this in the DL.Art April Linky challenge, Outlawz Twisted Thursday Anything with Wings Challenge, Imagine That!Creative Playground Spring is in the Air, Scrapper's Delights ATG, Creative Moments ATG, Let's Color Linky Party 7, Chocolate Coffee & Cards Spring is in the Air, Crafting with Friends ATG, Inspiration Destination ATG, QKR Stampede Spring has Sprung, and Creative Fingers ATG.
Wednesday, March 18, 2015
Dream in Flowers
Here's one of my March inspiration pieces for Gecko Galz. All stamps used were from the Gecko Galz In My the Garden digital stamp set. Looks like Spring, doesn't it?
In my printing program, I layered IMG10 with IMG3. I also printed IMG15 twice and cropped the sentiment from from IMG19. The main images were colored lightly with Copics and fussy cut. I carefully tore around the the music part of the stamp and inked that area with Frayed Burlap Distress. I fussy cut the two butterflies from IMG15 and attached them at the bodies only on top.
Here's the dimensional shot. I layered a 6x6" square card with very old DP from my stash, tucking lace tape from Decollections under the DP edges before gluing it down. The images were raised with adhesive foam at an angle and I added some ribbon snippets and a floral cameo from WeR Memory Keepers in the top corner. I distressed the sentiment with the edge of my scissors and inked it with Frayed Burlap before popping it top left. I balanced it out with 3 adhesive pearls in the bottom right corner.
I'm entering this in the Crafty Boots Spring Challenge, the Deep Ocean Vintage Challenge, Fan-tastic Tuesday ATG/Make it Square, Going Grey With Scrap Creations Pastels, TTRCD March 17-23 ATG, Card Mania Spring, the Cheerful Stamp Pad In the Garden, Through the Purple Haze for Your Mum or Special Woman, Robin's Fetish Purple and Green, Pile it On Use 3 of Something (3 pearls) and OSAAT ATG with Women.
Friday, April 5, 2013
Spring has Sprung!
Don't faint, I have TWO posts today, so please scroll down to see my Simply Steampunk card and find out about the new monthly challenge.
Looking out the window here it's evident Spring has sprung, so we're celebrating the season at Dilly Beans with Spring inspired cards this week. Here we have #351 Amalia and Butterflies Framed gazing up at #529 Grandpa's Flower. For a little play on words, I made a spring for the stem by winding green wire around a skewer, then fussy cut and attached the leaves behind. The bloom is layered and popped on an action wobble. You tired of my Alpha Beads yet? Me neither. LOL Be sure and pop by Dilly Beans to see more Spring inspired cards from my DT sisters and how about joining us this week? We'd love to have you.
I'm also adding this to the DLArt Thankful Thursday Spring Challenge, Simon Says Stamps and Show Anything Goes, Craft and Me Spring Flowers, Flutter by Wednesday Flowers Challenge, Stampotique Flowers Challenge #94 and Can You Digi It Pick a Season Challenge.
Friday, April 20, 2012
Spring is in the Air
This week at the Dilly Beans Designers and Challenge Blog our challenge was to create a Spring card. Well I must say it's warmed up considerably here and the flowers are coming out in full force. My garden background is #345 Daisy Border, stretched a bit in my Printmaster program, colored with Copics and added some faux stitching. The Spring border punch is MS. The added butterflies are also MS.
I'm also entering this in the following challenges:
Crafter's Cafe Spring with Pastel Colors Challenge
iCopic Spring Colors Challenge #78
Lollipop Crafts Spring Fling Challenge
Papertake Weekly A Stitch in Time Challenge
Thursday, April 28, 2011
Tiddly Inks April Showers Bring May Flowers

This week our Tiddly Inks challenge is April Showers Bring May Flowers. Not my team's turn, but I loved the challenge so much I followed it too and I'm really excited about how it turned out. I used the sweet Donna image (notice the resemblance, LOL? Actually she was not named after me but...). Anyway, I flipped the image, colored her with Copics, cut and backed her with Nesties Classic Ovals, and her boots and slicker are shined up with Glossy Accents. The sparkly rain drops are stickers by Recollections and the sentiment is computer generated.


The cool thing is that it's an acetate front card so you can see a part of the inside from the font when it's closed. The colored image, sentiment and rain drops are on the front of the card, and the red and yellow mats are attached from the inside so the adhesive doesn't show. Conveniently, the stickers have a holographic sparkle on the inside as well.

Inside I've used Flower Garden, again colored with Copics. This adorable stamp (with colored digi papers too) comes from a drawing done by Christy's daughter. Obviously the apple didn't fall far from the tree. Isn't it sweet? So come on and play along with the current challenge HERE and don't forget the Treasure Hunt Blog Hop Saturday with loads of fun, inspiration, new images and a hunt for "booty". HHHmmm... got WAY too much of that already. LOL Check the deets HERE. See you Sat!
Tuesday, March 1, 2011
The Cuttlebug Spot Hat Pins Challenge

This month The Cuttlebug Spot is all about embellishments and our first week features hat or corsage pins. Some of us (like me) used manufactured pins (my little hearts are from Maya Road) while others made gorgeous ones using beads and pearls. Our own Theresa has a wonderful video on making your own right on The Cuttlebug Spot this week. My card is a sort of "Welcome Spring" card using the pyramage technique. I originally saw this technique on Sherry Cheever's Blog and she has a video HERE. The image was a freebie from ? and I used my Nesties Lables Nine for the layers. The embossed frame is from the Heritage Cuttlebug Companion set . The pretty velvet leaves are from 7 Gypsies.
I inked the frame to bring out the embossing a bit and popped it. Usually when I cut a frame in a mat I use a larger Nestie so the underlying mat shows around the image, but I'd used all 5 of the Nesties in the set for my image so I had nothing larger. I still like the fact that it is slighty recessed, though. The rest of the team has done a fabulous job with the challenge so stop by the Cuttlebug Spot and we invite you to play along for a chance to win a $ 20.00 gift certificate from Custom Crops. But remember, although the challenge is about embellishments, we still expect you to use your Cuttlebug or similar machine somewhere on your card.
Monday, February 7, 2011
BBTB2 Bloom Cartridge-Fence Challenge

This week's BBTB2 challenge was chosen by our Scrapper Extraordinaire, Theresa who chose the fence/gate cut from the Cricut Lite Bloom cartridge. Believe it or not, I don't own the Bloom cart (imagine that!) but there are loads of other fences/gates on other carts so I finally decided on one from Picturesque. Since I wasn't quite with the crafting program after our little getaway, I thought maybe a tag would be simpler, however I got pretty involved with making it really 3D so... I loved the look of the tag feature of the cut but there was no fence attached so I added some by using the coordinating corner feature and welded them in Design Studio. I also welded the shadow of the "Spring" cut from Stretch Your Imagination to the top and hid the contour of the hole at the top to make the fence. I cut the individual fence pieces many times and cut them apart, in some cases by hand. to make the fence 3D. The pieces were embossed with the Cuttlebug Distressed Stripes folder for texture and inked bit with Pumice Stone Distress Ink. I cut "spring" and the flowers in white card stock and colored them with my Copics because it was easier, then used some Stardust Stickles on them to match the glitter on the background DP which is from the DCWV Flower Shower Spring Stack.
I did a bit of resizing of the blank tags to fit how I imagined the fence would attach. My first attempt left the fence too far out and sort of flimsy, so I added the outer posts directly to a middle tag piece (welded in DS) behind the DP background layer so they would have something to attach to and I could then also attached the first fence slat to the tag front for more stability. (Okay, I just read what I wrote and I'm pretty sure I've lost 99% of you, but I'm leaving it in, just in case it makes sense to somebody. LOL) I orginally planned to use my Cricut for flowers, but this DP had cute glittery flowers and grass mounds at the bottom so I fussy cut them out and glued them to better match the background. The flower centers are Rain Dots and the butterfly is an MS punch attached to fine wire for flight. Finally, I attached a larger tag pieceto the back with strips of adhesive foam to frame it better and give the entire tag more stuctural strength. So much for a simplified project. LOL My DT sisters found fabulous fence cuts on all sorts of cartridges so pop over to BBTB2 and be inspired. with so many possibilites there's no reason not to play along.
Monday, April 19, 2010
BBTTB2 From My Kitchen Flower Card Challenge

This week at BBTB2 we were challenged to use the flower card located on the shift tab feature for the ice cream cut (page 59, go figure!). I flipped it in DS, changed the proportions as bit, welded a layer of grass from WIMG to the bottom of the opening and used it as a mat for my little scene. My Give a Hoot cartridge was laying out and I thought the little deer was cute so that's what I went with. The background is another of the tabs (with the half round tab) with a sun from Create a Critter (also laying out, I desperately nee to clean up my craft room!)welded to it. I just so happened to have a stamped sentiment left over from our Technique Tuesday challenge so I used it for the center of the sun. Looking at it now the whole project is reminiscent of the Technique Tuesday challenge but I was a bit creatively impaired this week. (The creepy baby faces took it all out of me. LOL) The papers are from DCWV Nana's Nursery Stacks, both boy and girl, regular and mat stack. The buttons are from Stampin' Up.

Here's the dimensional view. Although I intended this to be a card, the welded sun stuck up so high that it was impractical, so I added a ribbon hanger instead. The rest of the team, including the new designers (WooHoo) came up with much more creative projects than I this week so pop by BBTB2 and have a look.
Wednesday, April 7, 2010
Very Merry Tags for Spring -.cut file available

The DT at Custom Crops was given a challenge this week to use Very Merry Tags for a Spring/Easter project. I really love the bird tag and thought it would be perfect for a Springy card. The color scheme is inspired by the pretty colors in ths Basic Grey paper from the Kioshi line. (I'm really partial to plaids and checks). I used Calligraphy Collection for the word "Spring" and welded the letters in DS. The shadow for the tag is done with Plantin Schoolbook wince there are no shadows on the cart. It's really quite simple but I do love the way it turned out. I think I may make 3 more for the other Seasons and perhaps frame them as wall art. There are many more pix and a free .cut file available HERE. Sorry for the short post but we're planning a road trip to go look for garden urns and I've got to get moving. Looks like it's going to be a gorgeous day!
Monday, March 8, 2010
BBTB2 ACY Garden2 Girl (or Boy) Challenge

Happy Monday! This week at BBTB2 our fabulously talented DT sister Shelly is hosting the challenge and chose either the girl or boy Garden2 cut from A Child's Year. I fully intended to do a card and even designed one, but I kept wanting to add and add and add until I figured I need to go BIGGER so out came this door hanger instead. I used the watering can from WIMG mainly because it had a shadow and layers and cut it at 7 1/2" with cut outs in the top 2 layers (done in DS) to frame the little girl. I used a combination of Springy prints from K&Co. Portobello Road, DCWV Nana's Nursery Mat Stack and Making Memories Chloe's Closet.


Here's a close up which shows the script embossing on the top layer of the watering can as well as the MS Spring border punch I used along the edge. the rim and portion of the spout are embossed with Swiss Dots but it still doesn't show up. I cut the girl twice so I could add color to the tulips and also added a tiny butterfly from an MS punch. Yes Leah, of course there are adhesive pearls. LOL
I sort of thought I was done, but it looked like it was missing something so I cut the gardening tools from Walk in my Garden to hang from the side. "Spring Wishes" are peel offs from Stampendous and I think look kind of cool being shiny against the mat silver metallic of the tools. Forgot to mention that at the top of the hanger is a Prima flower with a K&Co covered button brad.
Here you can see the dimension. I used large enough pieces of foam to pop the pieces and enough layers that I didn't even have to use a chipboard backing. It was sturdy enough as is. Now if you're in the mood for Spring be sure to visit BBTB2 so see the gorgeous projects from the rest of the Design Team. They're sure to put a smile on your face even if you're still covered in snow. Gosh is anybody STILL covered in snow? Hope not!
Sunday, March 7, 2010
Spring has Sprung!

Happy Sunday everyone! I looked out the window this morning and the trees were all an explosion of blooms. It inspired me to make this fresh clean Springtime card using digi stamps from The Cutting Cafe. Trees seem to be all the rage on the cardmaking front so I chose this especially stylish one from the Trees in a Row Printable Stamp set. This set comes with 6 different rows of trees and 12 different sentiments so it's extremely versatile and oh so afforable. I used my Printmaster program to clip out the trees and the sentiment (also included in the set) and resized and colored them individually to fit an A2 size card. Regina has instructions on how to do this on the Cafe site. Then I printed the dotty background using the Colored Mini Polka Dot Background set which comes with 12 different colors already done for you. WooHoo! Aren't you ALWAYS looking for something dotty? Anyway, this card came together so quickly and easily. That's what I LOVE about Regina's stamps. To finish I embossed the front of an A2 card with my Swiss Dots Cuttlebug folder, added a green mat, gingham ribbon, and mini buttons and Voila! So if you'd love to do a quick and easy but oh so beautiful card in MINUTES, check out all of the goodies available for download at The Cutting Cafe.
Tuesday, March 24, 2009
The Cuttlebug Spot Spring Challenge
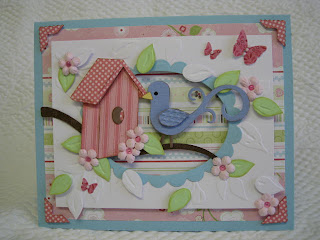

Spring is definitely in the air and this week at The Cuttlebug Spot it is no exception. My Spring themed card starts with my Cuttlebug Leafy Branches folder. I cut an oval in the center with my Nesties to allow the pretty Spring paper to show through and rimmed it with a scalloped frame also cut with my Nesties. The birdhouse, branch, leaves, and bird were all cut using my new Cottage Cutz die from The Scrapping Cottage. These fabulous dies are designed by and made exclusively for The Scrapping Cottage by Go Kreate. I used Tim Holtz distress embossing power on the branch and cut many leaves in both white and green and cuttled them individually with the Leafy Branches folder for texture. Some of the leaves were popped directly over the base embossing and some were just thrown in for interest. I also used a leaf shape for the bird's wing and cuttled it with one of the textures from the Cuttlebug Snow Fun emboss/die combo set. the butterfllies are a Martha Stewart punch, the corners are a punch from EK Success and the flowers are by Prima. Be sure to stop by The Cuttlebug Spot to see all of the fabulous creations the other Design Team members have done and we invite you to play along.
Monday, March 23, 2009
Spring has Sprung BBTB Challenge


Happy Monday! Is everybody out there feeling Springy? This week at Bitten by the Bug Regina chose the "Spring" cut from the Stretch Your Imagination cartridge. I made a shaped card by welding my sentiment in Design Studio using my choice of the required cut and letters from All Mixed Up to some tulips and daffodils from Walk in my Garden and grass from Zooballoo. This shaped front was then welded to a rounded rectangle from George. I highlighted the letters with my fave adhesive pearls and cuttled the grass for texture with the forest branches folder. Of course there were several layers to pop for dimension and the darling Queen & Co. garden brads finished it off. the little butterfly and bee are on springs I made by winding 26 guage wire around a wooden skewer. Be sure to stop by Bitten by the Bug to see how my Design Team sisters rocked this challenge and I hope you'll be inspired to play along.
Hey, and don't forget my BLOG CANDY. Click HERE if you haven't already entered. the drawin will be held on April 1st.
Subscribe to:
Posts (Atom)


