skip to main |
skip to sidebar
 The Cricut message board is great for enabling. I see more stuff on there that I never knew I needed and my pocketbook has suffered greatly since becoming a member. I purchased a set of the Prisma colored pencils after marvelling over All of SusieB's gorgeous creations (check out her Heartprints gallery if you really want to be inspired). I didn't try them though until I joined the Aprile's MCPT challenge on the board. (For those of you unfamiliar with MCPT it stands for Magic Colored Pencil Technique and uses gamsol or mineral spirits to blend the colored pencils. Susie has a great tutorial for this technique which I watched many times before taking the plunge.) Here's my first try and I was pretty pleased with the results. I used the spring card fold again and framed the image with some scalloped circles cut from Accent Essentials. The cute flowers on the base are Favorite Findings buttons that I clipped the back loop off of.

 this card was inspired by my good friend JulieH from the Cricut message board. She made some beautiful cards with this Cuttlebug Birthday Wishes emboss/die combo and those lucky ladies in the UK got theirs way before we did in the States. In fact, seeing her cards prompted me to order it and I'm sure glad I did. This card went together really quickly. I used light yellow pearlescent paper that doesn't really show up very well and the the stripes are from the DCWV Nana's Nursery glitter matstack. I added some skittles and a bow, did a little doodling and there you go.

 I was sooo excited to to find BeeCherryLady on the Cricut message board because she lives only a few blocks away. She's a terrific lady and we try to get together as much as we can to talk and scrap together. This card was for her little boy Scotti. I welded a big two big #4's from Plantin Schoolbook together with a shadow of the Scotty dog from Paper Pups on the front. The front 4 was cuttled with some of the boarder folders, the happy birthday folder, and scored with Scor-pal for texture. I welded some scallops to a single #4 in blue that I glued to the inside front for color and because I needed a place to attach my little flying bugs. The doggie's hat is from Celebrations and his collar has a ring with "Scotti" in alpha beads hanging from it. The inside sentiments are from the Cuttlebug Birthday Wishes emboss/die combo.
This is the first card I did with the Storybook cartridge. I especially love the delicate corners and borders and the font options are gorgeous. The thank you accent and frame is pop dotted so the ribbon that keeps it closed can thread through, and I matted the card twice. Once just a red square to hold the ribbon in place around the back, and again with a scalloped square from Accent Essentials. This made the card too big to cut a square envie with my Expression so I made a template by hand to cut the one. It's not very obvious in the picture but the border and flower are cut twice, in both the light blue and red to match the card colors. My mind is drawing a blank as to what this cool card fold is called but I'm pretty sure I got it on SplitcoastStampers. 

I have to laugh at that blog counter. As far as I know nobody besides my friends Lillie and Julie know about this blog so most of those counts on there are from me. I guess I've got enough on here now to let a few other people know but if you happened to end up here accidentally and like what you see please leave me a comment. I'd love to hear from you. My goal is to post all of my creations from the first to the present and I managed to finish up July this morning. Yahoo! Only 3 months to go. Honestly, I didn't realize I'd been so prolific.
 I'm trying to do all of these posts chronologically from the earliest cards I made to the present and I almost forgot this one. I don't know why I was thinking about Christmas in July (probably because it was over 100 degrees outside) but here it is. It was my first attempt using the Cricut markers for outlining before cutting and I love the way it turned out. I used a pretty shimmer ice blue cardstock and cuttled it with Swiss dots. The snowflakes were cut from Accent Essentials and stickled for a little bling. I added a darker blue strip I had run through my crimper, a sheer bow, and a wine charm with alpha beads for a sentiment. Cooled me right off.

 Here's a birthday card I made for a little girl who loves princesses and monkeys. Since I don't have any of the Disney Cricut cartridges I decided to make a monkey princess. She is cut and outlined with the Cricut markers from Zooballoo and I thought she'd be cute hanging from a big #5 that I cuttled with the Happy birthday folder. I added google eyes, a mini pompon nose, a crown brad, a little skirt made from a deconstructed silk flower. Happy Birthday is also cut from Zooballoo and the #5 and Princess is from Plantin Schoolbook. The dotted crown is from Celebrations and the paper is the DCWV Glitter stack. Love the little pink metallic hearts from J's too.
 Here's a design that just wasn't that successful. (We all have one every once in awhile don't ya think?) Anyway, it was inspired by a sentiment I saw on the Cricut message board about birthday rules. The last one was "Never let anyone count your candles." Since I'm in that age bracket I thought it was funny so I designed this card using the birthday candles from Celebrations which I welded in 4 rows with Cricut design studio. This means I had to cut them 4 separate times using glitter stock to get the 4 different colors, and 4 more times to get all of the flames (which I stickled as if there wasn't enough glitter). What a colossal pain! I backed them with some striped glitter stock and the effect sort of gave me a headache. Worse yet I went on to do the inside which I'm not even gonna post. My DH couldn't even read it there was so much going on. Needless to say I did NOT post this on the Cricut message board so this is it's debut. (Right before it goes in the circular file.) LOL

 This is the first (and only) card I made using a sketch. I don't know why I don't use them more often. It seems like a great way to jumpstart your creativity but my brain doesn't seem to work that way. Somehow this one called to me though, and allowed me to use some of that darling paper I got at JoAnn's. Aren't the little flowers, bees and ladybugs adorable? The words were welded using Cricut design studio using the All Mixed Up cartridge. The flower and bee are from A Walk in my Garden which I cuttled using Swiss dots, tiny mosaic, and divine swirls for texture. I used fun flock on the daisy center. The adorable bee and ladybug brads are from Queen and CO and a few heart rain dots are thrown in for good measure.

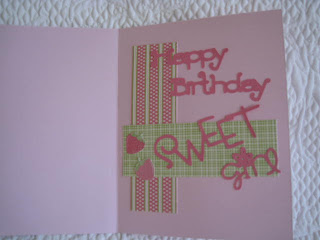 Here's another birthday card for a little girl turning 1. (Do you sense a recurring theme here?) Again, that Doodlecharms cupcake! This time I added a big #1 cut from Plantin Schoolbook and used my Cuttlebug to emboss it with the Happy Birthday folder. I think it's exciting for kids to get a card with their new age on it and it gives some reference to when it was received in case it is saved as a keepsake. I also got a chance to use another of my #1 paper clips. (Yea!) The adorable paper is DCWV Nana's Nursery Baby girl glitter matstack. The lacy band is a Martha Stewart punch and I used a wine charm ring strung with alpha beads and pink gingham ribbon for accents. Happy Birthday is from Tear Drop and Sweet girl from All Mixed Up. The little strawberries were hand cut from the paper. YUM!




 Posts