Sunday, February 28, 2010
BBTB2 Cupcake Challenge and Blog Hop!
WooHoo! Time for another BBTB2 challenge and this week's the Blog Hop! If you've come from the fabulous Jeri's Blog you're on the right track, but if not, you may wish to start at BBTB2 so you don't miss a thing. The sweet and wonderfully talented Carole chose the cupcake from Celebrations, although if you wish to play along this week, any cupcake will do. I've been in sort of a mood lately and wanted to do something a little different so I dragged out my (creepy as my DH calls it, but I think it's cute) baby face stamp. The inspiration for the card came from my new Once Upon a Princess cartridge with the words "Baby Cakes" on it. I made a shaped card in DS using the border feature from the Celebrations cupcake. The pretty paper is Baby Boy from Heidi Grace. I crimped the cupcake bottoms and cuttled the frosting with D'Vine Swirls then inked just a bit.
Of course I popped the layers, then had a ball finding the fun embellies. I'm especially fond of the Alpha Beads spelling "YUM", 'cause aren't babies (and cupcakes) just too yummy for words? Anyway, be sure to stop by BBTB2 to see all of the delicious cards by my DT sisters and if you haven't been following the hop, be sure to start at the beginning, because there are prizes to be had. There's even a special one from Everyday Cricut (formerly Holidays with the Cricut, thanks, girls) if you sign up to follow BBTB2 and leave a comment there as well. My Blog Hop candy is a $30.00 gift certificate to Custom Crops and all you have to do is leave me a (preferably sweet LOL) comment. I'll be drawing the winner on Saturday, March 6. Now you're off to visit the uber talented Krista's blog. You can always count on her to bring a smile to your face. Enjoy!
Dreaming of Paris
I'm really enjoying my altered projects these days because it stretches my creativity. I so loved GCD Studios at CHA and was so thrilled to find a pack of their Paris Nights paper at my local M's. My BFF is a mom and rarely finds moments to herself. She is well traveled but by far her favorite destination is Paris so I thought a door hanger she could could use to "get away" would be appreciated. I used a papier mache heart I'd found at my LSS and covered it with the collage paper from the Paris Nights pack. This pack also comes with fabulous frames and a set of alphabet glitter stickers that I used, along with a tag cut with my Cricut with computer generation to complete the sentiment. The Eiffel Tower is from the Cricut Destinations cartridge with more yummy paper from GCD and I embossed with my Cuttlebug Swiss Dots on the shadow and Textile Texture on the regular cut for interest.
Embelllishing was really fun! I inked a bit and I used tulle, Primas, adhesive gems and pretty pleated organdy ribbon for trim. What do you think? Tres chic?
Friday, February 26, 2010
Oh, Alice! New Challenge Blog
Are you counting the days until "Alice in Wonderland" hits the theaters? (On Imax, in 3D, next FRIDAY, YEA!!) Well, you don't have to wait for all things Alice because there's a new challenge blog out there, called appropriately Oh, Alice! I just happened to come across it yesterday and it really gave my mojo a shot in the arm. I dropped everything because the challenges come out every Saturday and combed the net for Alice images. Unfortunately, in my haste, I neglected to note where it came from. The inspiration for this challenge was this cool Urban Decay makeup collection so I sort of went the the colors and added my glam with the Prima Say it With Crystals swirl.
Then I used the reverse of the layered Spellbinder's technique I did HERE so that it looked like you were peeking down the rabbit hole. I found it quite a bit more difficult to do it this way but I LOVE the way it turned out.
However, this made it quite thick so I decided I'd go with a shadow box effect. I intended to make it a card but the reverse side of this K&Co DP was so cool and framed everything so well that I added a large piece to the back so it now measures a whopping 6 1/2 x 8. I may just frame it.
Thursday, February 25, 2010
A Better Day and More Cuttlebug Double Embossing
Well today was a better day and I did actually finish a project (none of the ones I NEED to get done, but hey!) Still need to take pix so that post will be another day. Instead here's another example of that fun double embossing technique we did for The Cuttlebug Spot this week. If you missed Nilda's fabulous video on this technique, click HERE. This time I actually used 2 different folders before I did the embossing with the Nestie. The first was the Happy Birthday folder from the Crafts-Too company, available HERE at Custom Crops. That folder embossed the bottom half of the mat and the center sentiment. Then I took Swiss Dots and placed it on the blank top half and used my cut out chipboard (see the VIDEO) to emboss that portion only so as not to flatten the previous embossing. I then used the negative cut out piece and my scalloped square Nestie to complete the double embossing. The popped cupcake is from the set that came with my Cuttlebug and I embossed in white, pink, and plaid and cut the pieces out by hand and glued them together. The border punch is MS and I cut a second border so I could cut out some pink cupcake tops for added color.
I'm trying to finish my cards inside and out these days, so I added a computer generated sentiment and cut it out with my Nesties Labels Four. Gotta love that one! (Might have been nice to take a straight pic, though. LOL) Don't forget we have a new sponsor at The Cuttlebug Spot so pop on over and leave a comment for a chance to win a $50 gift certificate from Simon Says Stamp! You gotta try this technique, too! I LOVE it!
Wednesday, February 24, 2010
Ever Have One of Those Days?
My mood is horrendous today! I'm starving, but nothing satisfies me. I want to craft but the mojo isn't there. I can't focus on ANYTHING. I'm irritable and somewhat depressed. So I went to my collection of images for inspiration and this one jumped out at me. I copied it when I was searching for images to do the Moxie Fab Taintor-tude Challenge but ended up using another one instead. Since I'm counting THE SECONDS 'til Happy Hour I thought I'd slip this in.
The funniest thing is where the image came from. I got it from Pyzam.com and it actually was an ad copyright 1957 that read: "They're young... They're in love... They eat LARD" Seriously! Better yet, it is from the British Lard Marketing Board in conjunction with (are you ready?) The Department of HEALTH. I can't even say it out loud without ROTFLMAO! CHEERS!
Tuesday, February 23, 2010
The Cuttlebug Spot Double Embossing with Nesties and Happy Birthday Lillie!
Today is my dear friend and DT sister Lillie's Birthday so before I say anything else I want to wish her a super fabulous Happy Day! Love ya, girlfriend! Pop by HERE to do the same! Oh, and don't forget to comment for a chance to win her fabulous Cricut and Cuttlebug covers. She's drawing tomorrow! Click HERE!
This week at The Cuttlebug Spot we have a technique challenge. I have to say this has been one of my favorite challenges to date. Nilda has done a super video HERE to show how it works and I've been playing ever since. You create a chipboard cut out to help you emboss only partially with your folder, and then use that cut out to help you emboss ONLY in the blank space with your Nestie. Cool huh? This is actually the second card I created because I was so excited I actually STAMPED on it TWICE without messing up. Yea for me! Honestly it usually takes me 4 or 5 times to get a decent image when I stamp, and yes, I know all the tricks but I stink at it so I was thrilled that I didn't screw up (of course the stamps were pretty tiny, but hey, it's a start!) I used the Allegro Cuttlebug folder and a Labels Four Nestie. The kitties dancing are an ancient Boynton image stamp that I've had since dinosaurs roamed the earth and "dance" is from a set of words stamps in different fonts that you are supposed to make up poems with and for the life of me I can't find the darn box. (I just had it! Grrrrr!) The musical notes are also Cuttlebug with the bottom parts embossed with the tiny dots from the butterfly cut and emboss combo and the border punch is EK Success.
Be sure to pop on over to The Cuttlebug Spot to see all of the cool cards done by my DT sisters and be sure to leave a comment. We have a new sponsor, Simon Says Stamp, and you can win a $50.00 gift certificate to their store just by saying something nice. ;-D WooHoo!
Sunday, February 21, 2010
BBTB2 EDPD Elephant Challenge
Didya get all of that? The initials, I mean. This week our challenge at BBTB2 is the darling elephant cut from Everyday Paper Dolls chosen by my dear friend and super talented DT sister, Sandi. Isn't he the cutest? Well, I did have my troubles because you know I prefer my cuts to have shadows and of course the Paper Dolls cuts don't but I managed to do a shaped card anyway. I have to admit this is design #2 but I'm okay with it. I found the best way for me to preserve the cute facial details was to use my Cricut markers. I welded the the cuts with a rectangle from PS and did some trimming on the trunk to do the base. The top is the outlined elephant with a Cuttlebug birthday present from the cut and emboss folder tied to his tummy. He's holding some Prima flowers in his trunk.
I got a bit of popping with his ear and two legs and added some detail by Stickling the toenails and adding one of those sweet lidded google eyes.
I thought this would make a cute belated birthday card so this is the inside sentiment. Be sure to check out the adorable take by my DT sisters at BBTB2. Wow, what inspiration. Hope you can play along.
Saturday, February 20, 2010
Kiss Me Puzzle- Free .Cut File Available
Here's a little project I did for Custom Crops. This fun puzzle could be used as a card, party favor, or even a learning tool (with a different illustration, perhaps). The puzzle pieces are from My Community with an illustration from the Sweethearts cartridge and Plantin Schoolbook drawn with my Cricut markers. In order to draw on the puzzle with the Cricut I needed to move the pieces together using Design Studio. Then I fit a picture to the pieces which I drew first, then cut the puzzle pieces in both card stock and chip board and assembled. For the complete instructions and free .cut file click HERE. Once the puzzle is assembled, you have the option of coloring it yourself as I did, or giving the puzzle with a set of markers. I even added a bit of bling and googly eyes for interest. Once you've downloaded the puzzle file it is easy to create additional puzzles with any picture you choose. This project was a little different for me, but it was a fun one to do. Be sure to stop by Custom Crops to check out the videos we did from CHA as well as the fabulous projects created by Natalie and Miranda. The Tim Holtz video is especially cool with very interesting questions and answers. Don't miss it!
Thursday, February 18, 2010
Yummy is for Cottage Cutz and The Cutting Cafe!
Here's a quick little card that I did with my favorite dies to use with my Cuttlebug...Cottage Cutz, available at The Scrapping Cottage. Ever since Christmas I just can't get enough of CHOCOLATE so I just had to use my Stacked Candies 4 x 4 die and make this yummy little card. The pretty glittery paper is from the DCWV Sweet stack (8 x 8 size) and I just punched along the side and threaded some narrow ribbon before adhering it to a premade A2 card. the sweet little sentiment is from the A-Z is For Set of downloadable printable stamps from The Cutting Cafe, recolored in chocolate brown using my Printmaster Pro program and cut with my circle and petitie scalloped circle Nesties. There are 26 little sentiments included with this fun set; one for every letter of the alphabet! Now if you'd like to see more cute cards done with the Cottage Cutz dies pop over to The Cuttlebug Spot and check out what my DT sisters did with these wonderful dies.
Wednesday, February 17, 2010
Bah! Humbug! Meets Peggy Loves Vintage
WooHoo! Time for another challenge at Bah! Humbug! and this time it's snowmen, or ladies, or BOTH in my case. LOL I decided to take a little peek at the Peggy Loves Vintage Snowmen CD and came across this cute couple. What was neat about it was each image was individual so you could use one, or the other, or both like I did to make a gatefold card. (There was even an option with the two together. How fun!) Anyway, I cut them each separately and mounted them on a gatefold (which I cut long enough to have each image completely backed by the green and trimmed again).
Then I printed the snow lady a second time so I could do some fussy cutting and pop a few parts. These images are so sweet and nostalgic that they really don't need alot of embellishment. They practically make themselves and always turn out soooo cute! It does kind of crack me up that things so familiar from my childhood are now considered vintage. Does that mean I be old? Nah! LOL
Inside I found a vintagely looking candy cane stripe and then used a K&Co rub on and cut it with my Nesties Labels One. The little holly sprig was cut from the ladies hat and added and that was it! Now if you love Chistmas you MUST check out the Bah! Humbug! weekly challenges. So far I haven't missed one yet. WooHoo! And if your'e not familiar with Peggy Loves Vintage be sure and check out her BLOG to find out all the happenings and of course her Etsy Shop or her Web Store.
Tuesday, February 16, 2010
The Cuttlebug Spot Altered Frame
This week at The Cuttlebug Spot we were asked to alter frames. I am totally loving these altered projects for a change. My frame is $1.00 a 8x8 plain wooden one from M's. I first applied a coat of gesso to give it some "tooth" to adhere my paper. It's irridescent CS from the Recollections Precious Metals pack and I used one of the 5x7" Cuttlebug "Romance" folders to emboss. So how did I do it with minimal seams and the pattern going all the right way? First I cut the CS into 2 "L" shapes. The top "L" went into the folder and embossed the entire long vertical way, and to about an inch from the shorter horizontal end at the top. When I went to emboss the other "L", however, the pattern would have been upside down so (now don't faint or anything) I CUT THE FOLDER along the top. Yup, I cut that baby right in half along the fold to allow me to emboss from the top edge. No biggie, I'd done it before with my Swiss Dots, and the pattern sort of just clicks into place. You just have to make sure you don't lose half of it though, or you're screwed. LOL Anyway, this leaves about an inch of unembossed area at the end of both horizontal sections. I found one of the wider floral Cuttlebug borders that sort of coordinated with the pattern I'd already embossed to fill in the gap. Voila! All embossed with only 2 seam(conveniently covered with embellies)!
I really couldn't find an appropriate picture to put in the frame so I went to The Cutting Cafe and downloaded words from the truly elegant Valentine's Big Stuff. (In case you didn't notice from the previous post I LOVE these printable stamps because they work for so many occasions; wedding, anniversaries, home decor and of course, Valentine's Day). I chose the words I wanted, resized them to fit and printed them is a matching cocoa color using my Printmaster program. Then I punched out a small butterfly (gotta love Martha) to finish it off. Even if you planned to give the frame as a gift to be used with a picture, having something elegant in the center makes it so much more professional and it could be kept "as is" (like I intend to) to use as a home decor piece. Be sure to stop by The Cutting Cafe to see what's new. Regina is adding things almost DAILY, WooHoo!
I used one of my rapidly growing collection of MS punch around the page sets to do the 5" frame around the opening and cut the center out with my Nesties Labels One and popped it with dimensionals. Then I cut an ivory frame and adhered adhesive pearls. The small flowers are "wedding confetti" from M's some with punched centers, some with just pearls. The large butterfly is the Cuttlebug cut and emboss set. I colored one of the flowers, one of the centers and the butterfly shadow with my Copics. Finally, to finish it further, I used pearls around the entire perimeter and May Arts velvet rick rack along the edge. Be sure to stop by The Cuttlebug Spot to see the amazing creations by my DT sisters and be sure to leave a comment there to win a $20.00 gift certificate from Custom Crops.
Monday, February 15, 2010
BBTB2 Double Hearts from the Wedding Cartridge
This week at BBTB2 our double heart challenge from the Wedding solutions cartridge was chosen by our dear DT sister Renee. It is also being sponsored by Regina's Cutting Cafe so the DT was able to use one of her fabulous printable downloadable stamps on our projects. I had a bit of a tough time coming up with something new since I love this cut and have used it alot, but mostly for door hangers. This time I made a shaped card, but the opening was on the solid heart only. I welded the banner, also from the Wedding cart, across the open heart and then welded solid hearts to form the card. The couple on the top mat is from Love Struck. the "Love" on the banner is from The Cutting Cafe's Valentine Big Stuff. Isn't that font gorgeous? I used the Cuttlebug Swiss Dots and D'vine Swirls for embossing and the little flowers (wedding confetti) were colored with my Copics to match the irridescent blue of the cardstock.
Of course I did a bit of popping the layers and added my signature adhesive pearls.
Here's the card open. The inside sentiment is also from Valentine Big Stuff from The Cutting Cafe. Although I intended to make a bit more racy card for my husband, this turned out to be his Valentine because the kittie's cards ended up being so demanding. LOL Be sure to stop by BBTB2 to see the fabulous creations by my DT sister and remember, we love it when you play along.
Sunday, February 14, 2010
Caardvarks Wedding Card Challenge
Happy Valentine's Day! Hope your day has been full of love. I thought I'd sneak this quick wedding card in for the Caardvarks challenge. I love the sophisticated color combo of ivory and taupe and I think the clean and simple design is quite elegant. Now off to Valentine's dinner. WooHoo!
Card recipe:
Card size: 5 x 6 1/4
Card Stock: Recollections and Prima Marketing
Embossing folders: Cuttlebug Flourish Frame Provo Craft, Wedding Set #2 Sizzix
Flowers: Bride's magazine table confetti embossed ivory shimmer
Adhesive pearls: Recollections
Saturday, February 13, 2010
Goliath's Valentine to Daddy
Goliath is our great hunter. Before we let him outside he used to walk around with his toys in his mouth meowing as if he'd caught something and acting all proud when he laid it at our feet. Well, he's graduated to the real thing, often leaving "goodies" by the back door, sometimes with only a few body parts left so we know he's been on the prowl. When he saw Jezzie's card to Daddy he was quite insistant he have one of his own. On our weekend Swarm I found these Post it Notes that looked just like Goliath and bought a few pads. They were supposed to be stocking gifts but of course I misplaced them. Then I thought they'd be a great birthday gift (New Year's Eve) from his boy, but of course they were STILL nowhere to be found. WooHoo! They fnally surfaced so I peeled of a few, mounted them on card stock and cut around the kitties and the word bubble. Don't they look just like him? The sentiments is computer generated as is the geat back ground papers from The Cutting Cafe. The dot is fromthe Colored Mini Polka Dots printable stamp set and the neat thing about this set is you get 12 different colors already done for you so no messing around with another program. WooHoo! The xoxox is from the Valentine's Day Red Mini Backgrounds which I also used inside. There are 4 different backgrounds included in this set and I can see using the Love, hearts and xoxo for lots of different occasions.
I finally got a chance to use my Sweet Treat heart cups and punch from my dear friend and Stampin' Up demonstrator Lillie. BTW if you're in need of some Stampin' Up stuff I know she plans to be placing an order at 6:00 pm Monday night, the 15th, so you can contact her HERE. I also used my Nesties heart to frame the cups and filled them with mice from a MS punch and $1 mini heart punch from M's.
Inside I used more of the Valentine's Day Red Mini Backgrounds and also one of the tags from the Holiday Tags Printable Stamp Set from The Cutting Cafe. There are 23 images with this set and they work with the Stampin' Up large tag punch, or if you have a Pazzles or SCAL there is a WPC file included so you can cut them on your machine. Finally, I used the MS mouse border punch along the bottom and an "undipped" mouse in Goliath's mouth. Now he's happy, although he'll probably be eating Daddy's gift himself.
Friday, February 12, 2010
Moxie Fab's "Taintor-tude"
I'm sure you've seen them on cards, coasters, purses, you name it, those 50's chicks with attitude by Anne Taintor. You know, the ones that make you laugh out LOUD when you pick them up and read them? Well Cath at Moxie Fab World is as big a fan as I am and issued a challenge to come up with a card that mimics Anne's style. WooHoo! The hunt for the right image proved daunting, but I had copied a pic that my dear friend DeeDee had used quite awhile ago (I searched your blog though, DeeDee, but couldn't find the card to give credit) and although it's in black and white, the look (and attitude) was there. She's holding a ticket, but I'd come up with a sassy sentiment so I search my mags to find credit card logos small enough to use on my project. I used a craft knife so she could actually hold them in her fingers and for an additional pop of color added some red to the roses with my Copics. Finally, to add my signature style, out came the adhesive pearls and rhinestones. Now tell me, who do you think she's talking to? You... or her man? ;-D
Thursday, February 11, 2010
Jezzie's Valentine to Daddy
I can't believe it's been 3 1/2 years since we picked up Jezebel as a companion for Goliath. She ADORES her big brother but Goliath treats her like the pesky little sister she is, and made it clear from the start that Mommy and Daddy are HIS, not to be approached unless HE says it's okay. To this day she's on the lookout when she wants to come near, worrying that any minute Goliath will appear and voice his disapproval. She wants so badly to be affectionate, purring and rubbing around your legs UNTIL you try to pick her up and her wild instincts take over and off she scoots. Miraculously in the last few months she's becoming a lap cat (but only on Daddy's lap, and only on her terms when Goliath is outside). Mommy is only approached when I'm eating tuna and she figures there might be a taste. Obviously Jezzie is a Daddy's Girl so she wanted a special Valentine of her own to give the second (Goliath is still #1) most important man in her life.
As soon as I saw the Cottage Cutz Kitty w/ Heart die from The Scrapping Cottage I KNEW it would make the perfect Valentine. I cut her in both grey and white and colored and detailed her with my Copics. Dimensionals made her pop. "Daddy's Girl" was cut on my Cricut Expression using the Hannah Montana cartridge and the heart background paper was printed on my computer using the Small Hearts Solid background stamp from The Cutting Cafe which I recolored in light pink using my Printmaster program.
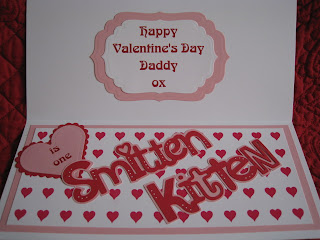
Inside I recolored the Small Hearts in a hot pink. I so love to be able to have the prints available any time I need them and they come in 3 different sizes in both outline and solid! "Smitten Kitten" is also cut with my Cricut from the Sweethearts cart and the rest of the sentiments are computer generated and cut with my Nesties scalloped and regular hearts and Labels 4. I really enjoyed combining a number of techniques on this card and Jezzie was very pleased. (Hope Daddy will be.)
Wednesday, February 10, 2010
Bah! Humbug! Challenge 5-Holly
If you're a regular visitor to my blog you know I've become a Loyalty Member at Bah! Humbug! I so love Christmas, and to have a great excuse to make a Christmas card EVERY WEEK is just my cup of tea! It also gives me the opportunity to explore different techniques and styles and I'm having a ball. I can't believe it's week 5 already and the Challenge is Holly. Here I checked out my stash and found this holly paper from a K&Co matstack and embossed it with the Holly Cuttlebug folder. To further enhance the embossing I inked it slightly with Tim Holtz Distress Ink in Brushed Corduroy and tried my hand at a bit of distressing around the edges using my trusty scissors. I used my MS holly border punch on both sides of a strip of paper and inked it with Tim Holtz Old Paper and mounted it on some paper by BasicGrey, slapped it on a pre made cream colored card and added a K&Co chip board oval.
And looky, I finished the inside! The polka dot was from the same K&Co matstack to which I added holly rub-ons by daisyd's and a rub-on sentiment, again by K&Co. I supposed I'll write in "to you" before signing it since the sentiment just sort of hangs there, but hey, I was improvising. LOL Aren't you proud of me?
Monday, February 8, 2010
You've Got Mail from The Cuttlebug Spot
This week at The Cuttlebug Spot we are altering mailboxes, either the $1.oo ones from Target, or your own paper creations. After several unsuccessful attempts with a white one, I finally settled on a red mailbox. It seemed to go well with the sweet stamp I colored from Auntie Amy's.
I backed the stamp with the beautiful Cottage Cutz doily die from The Scrapping Cottage. Now I have to admit, this die is very intricate and although I was told it cuts very will with a Big Shot or QuicKutz machine, the old Cuttlebug has some problems with it when you use cardstock, even with a shim. It cut fine with regular copy paper though and then I was able to do sort of a blackout cut using cardstock so it was all good!
It was a bite photographing the front and side together because you couldn't see any of the embossing. I used the Heart blocks Cuttlebug folder on BoBunny Poppy Dot DP and then inked it a bit with Fired Brick to bring out the detail. The hearts at the bottom are a big MS border punch. (Yea!, first time I used it!)
I covered the box with 2 pieces because I wanted the hearts to go in the right direction on each side. They matched up so well I really didn't need to add anything at the top but I was dying to use my new Stampin' Up border punch I got from my dear friend (and Stampin' Up demonstrator) Lillie. Sale*a*bration is still going on, so if you order $50 worth you get a choice of free stuff and I chose the corner punch that went with this border. WooHoo! Also, Lillie has a cool program called the DeSignin' Divas where you can get even MORE free stuff without having to order all at once. Click HERE for more info.
On the back I cut the hearts with my Nesties and the adorable heart stamp with my set that came with my Cuttlebug. I cut and embossed it twice and then just cut the red heart out and glued it in place. The rest of the embellies are just adhesive beads, gingham ribbon and some glitter foam hearts I got at M's last year. the DT outdid themselves with this challenge so be sure to check out their fabulous creations HERE. Now don't you want to play along?
BBTB2 Wildcard Heart and Envie Challenge and Freebies and a Contest from The Cutting Cafe
Happy Monday everyone! It's time for another BBTB2 challenge which is hosted by our lovely and talented Design Team sister Penny Shuberg. Penny has chosen the heart card and envelope from the Wild Card cartridge. I'm afraid mine may be a bit disguised because I couldn't help adding a top mat from the new Love Struck cartridge and then embellishing the heck out of it. LOL I thought I was gonna be able to stay away from pink this time by cutting the card base and envie in blue and the top layer in green but OOPS!, guess not. My first intention was to cut the floral mat several times in order to individually cut the flowers to add color and dimension but after fussy cutting a few (I sure wish there were more layers on those seasonal carts) I decided that was gonna take WAY too long so I pulled out my trusty Primas and adhesive pearls. I like the way it turned out, but I'm feeling a bit guilty here.
I stretched the envie a bit in DS to accomodate the larger card and added a few more Primas. It is lined in a polka dot to match the flowers that I printed from the Colored Mini Polka Dot background set from The Cutting Cafe which is being offered FREE until midnight tonight along with the Colored Flowers background set. Yes, you heard it, ABSOLUTELY FREE and there are 12 colors in each set, already colored so all you have to do is PRINT! Sweet Regina is offering them as a thank you to all of her customers, and also a contest using these fun stamps where you have a chance to win 4 more sets of your choice! So hurry, click HERE for the freebies and contest details, and get your mojo working. And if you want to be impressed by some major mojo, hop on over to BBTB2 to see some seriously great stuff by the rest of my DT Sisters and be sure to come and play along.
Saturday, February 6, 2010
Blog Hop Winner, a Freebie and a Contest from The Cutting Cafe
WooHoo! Has Regina got a contest for YOU! In appreciation for all of her fabulous customers, Regina is offering her two NEW background sets, Colored Mini Polka Dots and Colored Flowers ABSOLUTELY FREE until 11:59 pm PST Monday, February 8th. Yes, you heard right, absolutely free AND these backgrounds come in 12 different colors, READY TO PRINT so if you have a colored printer but don't have the software, or don't know how to change the color of a printable stamp IT'S ALREADY DONE FOR YOU!!!!!!! WooHoo! AND that's not ALL. Once you've downloaded your FREE background stamps, use them to enter The Cutting Cafe Contest and you may WIN 4 downloadable printable stamp sets of YOUR CHOICE! Details HERE. I have used a number of colors from both sets to give you an idea of the range of colors included, and also used the Rain, Rain Go Away Set which is particularly apropo in CA right now. LOL Hurry, now's your chance to get some FABULOUS freebies AND have the chance to WIN!
And speaking of WiNNERS< now what you've been waiting for. The WINNER of the $30 gift certificate from Custom Crops (chosen by Random DH) is......... #8
KIM who said "So cute Donna! I love shaped cards and the combo you used is perfect. One thing I learned is that there are lidded googly eyes? I have never seen them! I must look closer next time!"
CONGRATS KIM! Please email me at dlmundinger(at)yahoo(dot)com to arrange for your prize. Thanks for all who participated in the hop! xxD
Friday, February 5, 2010
A Contest and Some Exciting News!
I hope you all have heard that there's a CONTEST going on at Peggy Loves Vintage Blog and a FREE image to use for your entry. Just look at this beautiful heart and imagine the possiblitlies. The winner will receive 2 of the Cut Out sheets of their choice so what are you waiting for? Find the details HERE. The EXCITING news for me is that I've been asked to join Peggy's Design Team which is a dream come true since I'm SUCH a fan of Peggy's gorgeous vintage images. WooHoo! I had already started my contest card before I got the news but the gloriously talented DT has been offering up examples for the contest to get your mojo working so here's mine. I decided to cut out my image (including the center) and then pop it atop a second image. I went over the sort of gold border of the heart with my gold leafing pen in order to match my vintage embossed foil frame I had recently found when going through some things from my Grandma. What a FIND! I had specific paper in mind but do you THINK I could FIND it? NOOOOO!!!! It's gotta be around here somewhere, but I looked through bins and bins of paper that I thought was sorted by theme or color (guess not) and it was nowhere to be found. I settled on dots which coordinated well with the beautiful satin stripe ribbon from May Arts. All of my charms were silver so I pulled out my gold leafing pen again and Voila! I left off a sentiment thinking that it could be used for other occasions as well.
Of course I had to include a dimensional shot. And I forgot to mention the I embossed the bottom heart image with my Cuttlebug Textile textures folder (backwards because I was in such a hurry so it's actually debossed but still turned out okay.) This was an afterthought and I had carefully unpeeled the bottom heart from the dimensionals and removed the charm to do it. Risky, I know, but it just wasn't right without it in my eyes. The beauty here is that with printable images if you REALLY mess up, you can ALWAYS reprint them. YEA!!!!! So what are you waiting for? Go grab that IMAGE and let's see what you've got! You might consider following the Peggy Loves Vintage Blog because you never know what Peggy has up her sleeve and there are easy direct links to all of her glorious vintage images.
Wednesday, February 3, 2010
Bah! Humbug! Baubles Challenge
Well, here I am again at the last minute submitting to Bah! Humbug! Wouldn't it be nice to make it in advance so that you could all participate in the challenge? By the time this is posted, they may have next week's challenge on the blog so be sure to check it out and get a heads up. Well, this week the challenge was baubles. (Christmas ornaments in U.S. speak) I made a shaped card with my Cricut Design Studio and the Christmas Solutions Cartridge in what from the pic looks like an atrocious red and mirror silver. The base was covered in German glass glitter and the top was embellished with red adhesive gems. Honestly, it is prettier IRL.
I did a bit of popping and would have loved the chance to try another color way, but DH wanted to go see a flick and out to dinner and who was I to deny him the pleasure? (Whoa! The Mel Gibson The Edge of Darkness is quite the movie.) If you're a Christmas lover, be sure to check out the fun and fab challenges at Bah!Humbug!
Subscribe to:
Posts (Atom)