Friday, September 30, 2011

Fabulous Inky Friday at Tiddly Inks


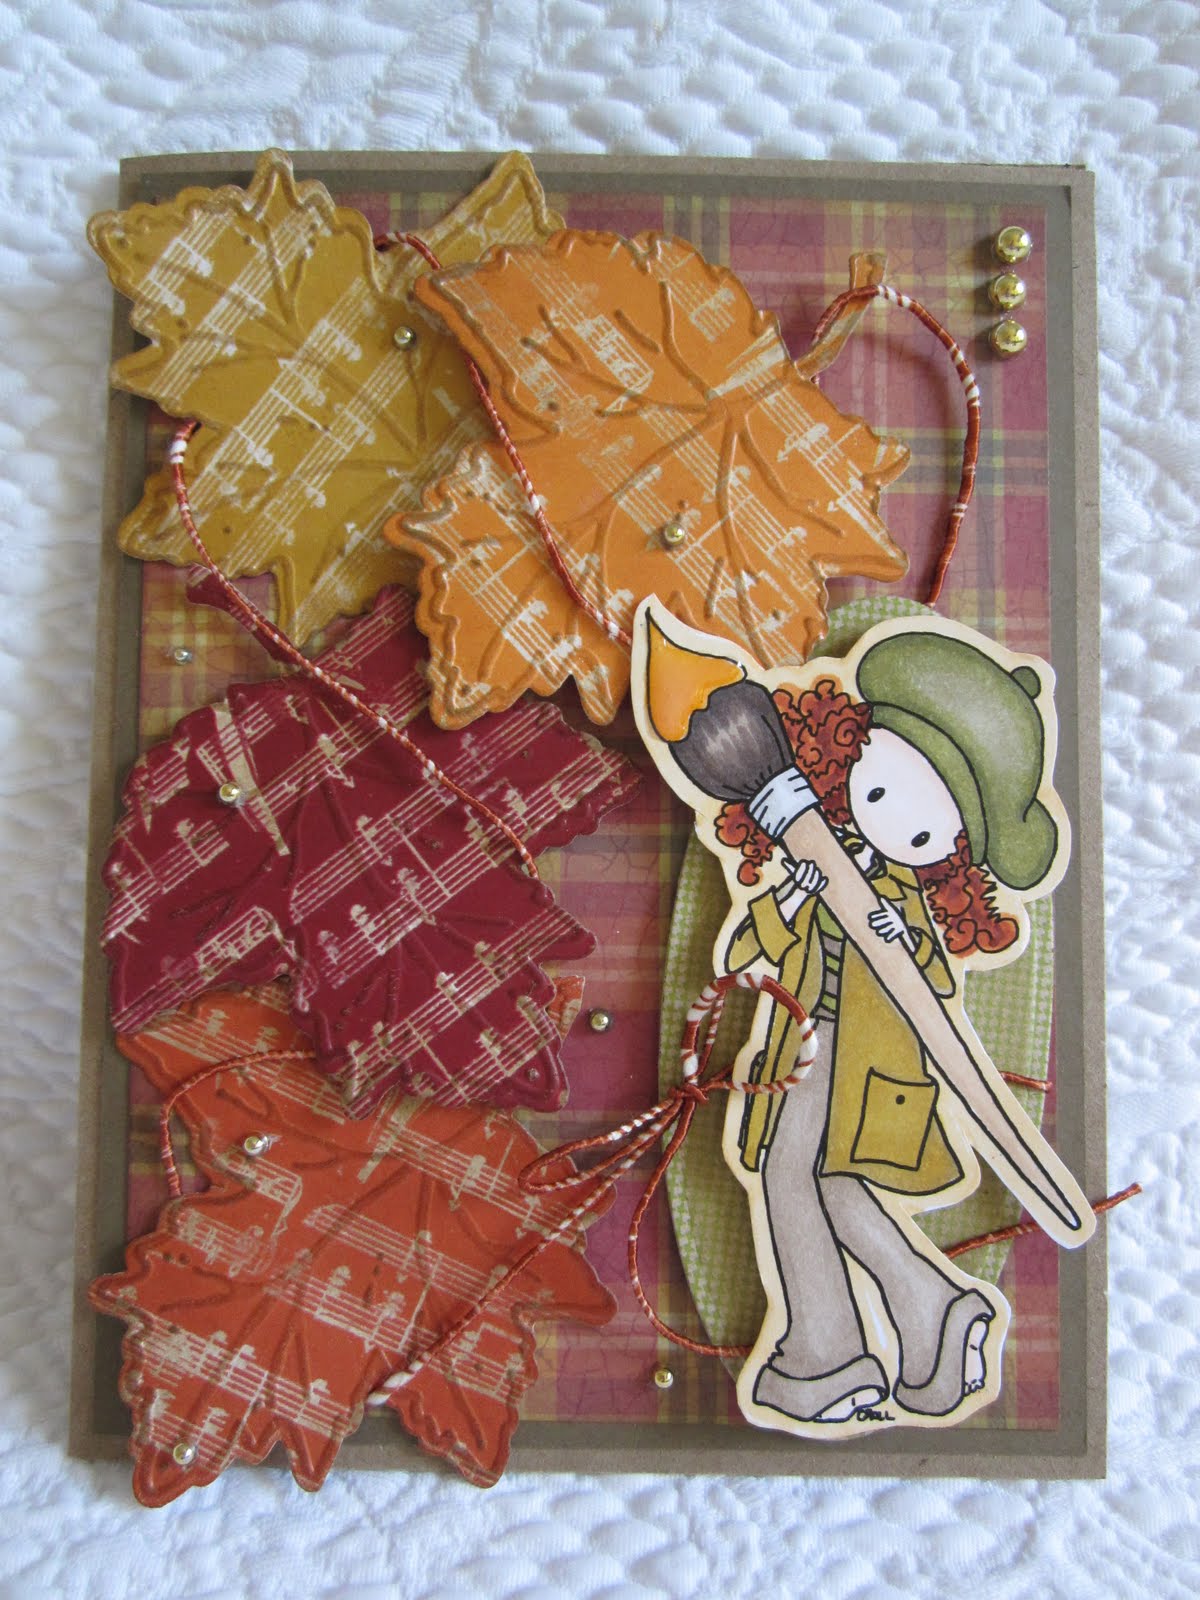
TGIF! Really! Not that the weekend is gonna be all that great either but... Obviously I'm still in a bit of a funk. Sorry, guys. I did manage a card though, for my Sweetie who does so much for me, even when I'm a crab cake. LOL The lovely image is Will You? from Tiddly Inks Victorian Gothic/Steampunk Release. Sooo romantic, no? I've colored them up with Copics in shades of brown for a vintage feel (except for the red hair, but I just HAD to make her red).


My original plan was to use one of the ADORABLE NEW SUGAR AND SPICE GIRLS but this sentiment was very timely this week so those cuties will be for another day. OOhh, I'm getting sort of misty here. Lotsa love goin' around.


The gorgeous papers are from DCWV Tattered Time stack and Tim Holtz Lost and Found. The mats are cut with Nesties Labels Seventeen and popped for dimension. The pearls are Recollections. Now pop on over to the Tiddly Inks Challenge Blog to see Some fab inspiration by our Tiddly fans and more of the Tiddly Inkers. If you're featured, you may grab bragging rights and a fab badge for your blog. Also, our current Acrylic Challenge is still going on and the projects there are AMAZING. And if you'd like to see a whle bunch of inspiration for the fab Sugar 'n Spice gals take a look at Christy's blog HERE. I'm also adding this to the Whimsical Wednesdays Anything Goes Challenge, the Delightful Pearls and Swirls Challenge and the For Fun Warmth Challenge. That's all for now.

Thursday, September 29, 2011

New Sugar 'n Spice for Tiddly Inks Sale!

I'm feeling really bad that I don't have a sample of the new Sugar 'n Spice Girls from Tiddly Inks but you MUST have a look HERE at the GORGEOUS samples from my teamies. Then take a read HERE. You can get them at 40% 0ff if you HURRY! They wil be available at 40% off for all orders over $7.oo with the code SUGARNSPICE at checkout until 7:00am Central Time tomorrow morning. I'll have a love Tiddly card to show tomorrow morning, but I didn't want you to miss this SALE! xxD

Wednesday, September 28, 2011

Bah! Humbug! Rudolph/Reindeer Challenge


This week at Bah!Humbug! it's all about reindeer, Rudolph or otherwise. I was poking around in my printed but not colored digi images and a came across Deer Mae from SOG. Oh, I just ADORE her and she was printed on kraft so I decided to give her a go. She's colored with Copics with some white pencil accents. After that, the card practically made itself. The mat was cut from the DCWV Homespun Christmas stack with the lovely space for the computer generated sentiment right there. WooHoo! (It was about all I could handle 'cause I'm having a rough week.) I added a few tiny buttons that I threaded with jute (the hardest part of the whole card. LOL) punched a few corners out of kraft and colored them with Copics to match Mae and added a few small adhesive beads. Done! I'm also entering it in the Christmas Stampin' All Year Long Clean and Simple challenge, The Paper Shelter For the Girls challenge and the Simon Says Stamp Anything Goes challenge.

Monday, September 26, 2011

BBTB2 WIMG Wheelbarrow Challenge and Blog Hop


Welcome to the BBTB2 Blog Hop! If you have arrived from Lori's Blog, you're on the right track. If not, you might want to start at BBTB2 so you don't miss a thing. I'm hosting the challenge this week and chose the wheelbarrow from Walk In My Garden. Although it's an oldie, it's still one of my faves. I've welded the shadow of the wheelbarrow to a big full moon from George and pumpkins from Holiday Cakes. The sentiment is from Holiday Cakes as well.


Yes, it's a shaped front card. You know that's my favorite kind to make. I've re sized the rounded rectangle from George for the back. The background DP is from Memory Box. I've embossed the wheelbarrow with the Cuttlebug Distressed Stripes folder and the full moon with Polka Dots.


In some cases, I've cut the image more than once and done some trimming to add more layers, like the middle pumpkin and the green vines. The wheelbarrow was also cut in several colors and hand trimmed to add more detail to the cut.


Isn't this jack-o-lantern a hoot? I stickled the yellow layers of the pumpkins so they looked like they were lit from within, and embossed several with Swiss Dots.


Here's the dimension shot. I couldn't resist adding some non-Cricut embellies, like the leaves and Rain Dot bats. I sprinkled in a few adhesive beads, as well. Now hop on over to sweet Krista's Blog but before you do, please leave a comment for a chance to win a $40.00 gift certificate to Custom Crops. They have a Spooktacular BooTique, chock full of Halloween goodies, as well as new Holiday items and plenty of Tim Holtz, so be sure to start a wish list in case you're the winner! I'll be drawing the name (with any luck, LOL) on Saturday, so be sure to check back because I won't be hunting you down. Now remember, you have two weeks to complete each challenge and we'd like to see a "new" project and please link back to BBTB2 so others can join in the fun. If you don't have the cartridge, you may use a similar cut. In this case, I'm not sure there are any other wheelbarrows, so a wagon would be a fine substitute.

Sunday, September 25, 2011

A Haunting We Will Go (Making a Scene for Macabre Monday)


This week at Haunted Design House we're "making a scene" with the help of some fabulous images from this week's sponsor, Make it Crafty. Here's an opportunity to do some serious coloring! Mine was with Copics, of course. I had a ball making a shadow box card using the Haunted Halloween House as the back drop. The window frames were cut with my Nesties Grand Labels One.


Looking on is the adorable Mini Frankenstein. He's available on his own, or part of the MonztaBoyz collection. Trust me, you'll want them ALL! He was a bit of a challenge to fussy cut, but I managed with my trusty Exacto knife.


The little diva is Mini Morticia. And yup, she's got some gal pals too in the MonztaGalz collection. Don't they make a cute couple?


I've completed the scene by using a variety of MS punches including Spooky Fence, Spider Web, Graveyard and Drippy Goo, and popped them from the window frames for added depth. I've used Alpha Beads to spell out my title and some music note brads so you can all be singing this little song all day. HeeHee! If you'd love to sin some Make It Crafty images of your own, bop by Haunted Design House and grab some additional mojo from the Minions and come on and play along. I'm also entering this in the Corrosive Challenge Blog Punches and Dies challengeand the Paper Sundaes Anything Goes challenge

Thursday, September 22, 2011

Tiddly Inks Fabulous Inky Friday and Special NEWS about a Contest at BBTB2!


TGIF!!!!! That means it's time for another Fabulous Inky Friday at the Tiddly Inks Challenge Blog where we highlight fabby creations by our fans found all over the net, as well as creations by the DT that may or may not feature the current challenge, and announce the previous challenge winners. BTW, that current challenge is Art Journaling, and because it is perhaps a bit unfamiliar, we've extended our challenge to two weeks so have a gander HERE and get inspired. I honestly did try to do another journal page, but I never got further than a half done background, so I decided to pull out an old favorite, Poppy, as well as Poppy Accents, for my card this week. I realize the popular sentiment is "Take time to smell the flowers", but my dream has always been a garden that would provide cut flowers for at least 3/4 of the year, but now that I have it, I've been so busy, the majority of them have just died on the vine. Bummer!


Poppy provides an excellent opportunity for practicing your Copic coloring skills. This time I opted to attempt a sort of wavy look and I'm pretty pleased with how it came out. The DP is K&Co and the sentiment is computer generated.


I've also chosen to print the images twice to decoupage. The centers of the flowers are highlighted with Glossy Accents. Each word of the sentiment is cut and glued separately and partially outlined with Copics as well.


Now don't faint. I actually finished the inside as well. I used the flowers from Poppy Accents, colored them with Copics and doodled a similar frame around the space to write a personal message. WooHoo! I might actually send this one. Now why not pop by Tiddly Inks and check out the beautiful featured cards, and it one of them is yours, feel free to grab the badge for your blog. There will also be some adorable new images this coming Tuesday. There's a bit of a sneak peek on Christy's BLOG I'm sure you won't want to miss.


On another note, I hope everyone has heard about the FABULOUS CONTEST going on at BBTB2. Our sponsor is My Creative Classroom. THIS IS HUGE! My Creative Classroom offers classes in just about anything you'd want to explore. Die Cutting (Cricut and others) of course, but also Stamping, Mixed Media, YOU NAME IT! Click HERE to see the list. You have through Monday to enter so HURRY! CLICK HERE to read all about the contest, (wish I could enter!), and good luck!


Wednesday, September 21, 2011

Happy Belated Birthday, Teri!


When we Minions party, we party HEARTY! Although it's no excuse, a few of use were still reeling from Creepy Glo's birthday and we totally missed our fabulously talented sister Minion Teri's big day on Monday. So sorry hon, but I'm sure you didn't miss the Birthday song. LOL Anyway, here's your card, as late as it may be.


I've used Teri's fab image, Skeletal Candle Holder from Teri's Delicious Doodles Store (BTW, they aren't ALL creepy for you of faint heart) and printed it out 3 times and decoupaged it. No need to color, the fab shading is all there, however I did use some Copics and stickles on the flame. The gorgeous DP is from Our own Susan's Crafty Chaos Designs. The collection is Jezebel's Remains Paper Set (How could I resist? LOL)


Here's the dimension shot. I actually cut the frame out of adhesive fun foam using my new Nesties Fleur De Lis Squares. The flowers and gems are Recollections. Hope your day was just FAB, hon, and please, please, forgive. xx

Tuesday, September 20, 2011

Bah! Humbug! Flourishes/Swirls Challenge


This week the Bah! Humbug! challenge is Flourishes and Swirls and because I skipped out on BBTB2 this week, I thought I'd better do a Cricut card. Happier now? My very first thought was the Trim a Tree cartridge with the intricate swirling images. I chose the ice skate this time because I was a figure skater as a kid and also because it was a natural to add a flourish to. Ever go to MyCutSearch.com and type in flourish? HA! There are so many carts with flourishes these days that I got an error message. Left to my own devices I decided to use another of those carts I just "had to have" and have hardly used, Picturesque. (Phonetic spelling pik-che-'resk, according to Merriam-Webster, except the "e" in che is upside down in their phonetic spelling and I can't figure out how to do that. LOL But honestly, I've heard this cart called some very hilarious things, even in a VIDEO!)


Fortunately, I didn't have to look very far to find a suitable flourish, so I welded the skate and shadow of the flourish to a rounded rectangle from George to make a shaped front card. I'm hoping this counts as a shaped card for the ABC Christmas Challenge this week which also requires Swirls, Spots or Stripes. I chose the gray glitter DP from M&MBI to join in on the CHNC Glitter Challenge and added glitter snowflakes from JoLee's as well.


The swirly top skate is done in matte metallic with the regular flourish in mirri which is why the pix are so bad, sorry. It really is prettier IRL. There's a bit of dimension and a few silver adhesive beads and a peelie sentiment and there ya go. The Shopping Our Stash challenge this week is No Coloring Allowed so I'm popping it in there as well. For once I'm a bit ahead for all of these challenges so go have a look. There's still time to play long and the DT examples are lovely.

Monday, September 19, 2011

Macabre Monday Apalling Apothecary


What's in YOUR medicine cabinet? Okay, Margie, you don't have to answer that. LOL but you ladies who take the challenge at Haunted Design House must...do you dare? My nifty little bottle of poison started as a bottle of premium scotch that hubby had to have. LOVE the shape of the bottle and just KNEW it would come in handy.WooHoo! I finally got to use my Tim Holtz Poison Label embossing folder which I tore around and inked with Distress.


The "cobwebs" are a ripped up dryer sheet. That seems to be one of my favorite recyclable items. A few plastic spiders and some interesting looking fibers and I was good to go.


And how about my cool skeleton fingers gripping that bottle? I used a mold meant for making chocolate covered pretzels and filled it with Paperclay (no baking required). After filling each finger, I carefully removed them and molded them around the bottle. Once dry, I painted them with Distress. The bottle is filled with some bile colored liquid and some dish soap so it bubbles. Couldn't really get a pic of that. And I've used some Distress Embossing Powder around the wood cork stopper which looks like some lovely corrosion. The top said Est. 1897 and I thought that was just too cool to cover up. I really enjoyed doing an "altered project" for a change and I hope you enjoy it too. I'm afraid there won't be a BBTB2 post this week. Sorry about that, but not only did I not have the cart, I had a fleeting (I hope) lack of mojo in that arena. Be sure to check out the rest of the Minions take on this challenge HERE (and again on Wednesday for Creepy Glo's submission) and in a few hours stop by BBTB2 and give my sisters there some love. I'm also entering this in the Allsorts Recycle/Alter something challenge, the Shopping Our Stash Vintage, Distressed or Shabby Chic Challenge, and the Quirky Crafts Anything but a Card Challenge.

Saturday, September 17, 2011

Saturated Canary for Whimsical Wednesday


WooHoo, I was so excited when The Saturated Canary came out with digis. I bought a bunch but couldn't decide which to color until I saw the Whimsical Wednesday "Just Because" challenge. I colored up Hellokitty (oops, don't see her on there at the moment, but check back) but then couldn't figure out what to do with her. I've also been eyeing the Deconstructed Sketches from my TI DT sis Jenn and decided to play along. She's colored with Copics, and cut with Nesties, the DP is K&Co. The sentiment is Cuttlebug and the Card Candy is from my dear friend Chloe and Scrappy Go Lucky USA . I'm also entering this in the Cardmadfairie's Digi Days Lots of Layers Challenge and the Squiggles Stamps Autumnal Colors Challenge.

Friday, September 16, 2011

Happy Birthday, Creepy Glo!


It's our Minion Sister Creepy Glowbugg's b-day and we all are wishing her a fabulously creepy day! My little card features the Dilly Beans Framed Zombie Girl with Bow 1. Isn't she sweet? She's about to make a wish and blow out the (real) candle on her brain cupcake (made by merging an Octopode Factory cupcake from Alice elements with a cartoon brain I found on the net. ) Yummy! Hey Birthday Girl! Here's hoping all of your birthday dreams come true! xxD And if you all want to come to the PARTY, check out the festivities at Haunted Design House. And speaking of parties, I'm also entering this in the Daring Cardmakers How many Candles challenge sponsored by Funky Hand in celebration of their new Happy Happy Birthday CD Rom.

Thursday, September 15, 2011

TOFF Quotes and Forever Night


Just managed a quickie today for the TOFF Quotes challenge. I had planned to do something entirely different, but when I saw that Forever Night was Mysterious Findings (from Wonderland), I decded to use the Hatter's riddle as my quote. It's a quickie, because I'm running out of time and hubby wants to see a movie. Crafting as an excuse gets overused in this house so I'm rushing. I merged The Octopode Factory Raven, Ink and Quill from the Poe Set and Dada Steampunk Hands images (which for my purposes became the Hatter's) on the computer and added the quote. (I'm pretty sure the answer to this is still a mystery.) I colored with Copics, matted with a stripey border, a few beads and DONE! Sorry so short, but I'm outta here!

Wednesday, September 14, 2011

Bah! Humbug! Paper Weaving Challenge


Those gals at Humbug Hall almost scared the bejeezes out of me with that giant spider they had introducing this week's challenge. Boy, I sure couldn't wait 'til it was off my sidebar. LOL Thank heavens it's gone! Thought I'd stumbled into Haunted Design House for a minute. And I dare say I wouldn't be using any spider catcher no matter HOW long the handle. How are ya hanging in Humbug Hall this month, Barb? HeeHee However, the challenge this week was not the easiest either, especially since I took a few days off from crafting the beginning of the week and thought I could sort of skate by. Paper weaving? Eiyiyi! Yes, I've done it, but it's not something that is easily slapped together. I'm proud that I did manage, however. The mats were cut on my Cricut with a cut out from Storybook which I stretched to fit the sweet silhouette from A Child's Year.


After weaving my background, I ran it through my Cuttlebug using the Sizzix Tim Holtz Swirls folder so I could enter it in the CHNC Swirls challenge and also because it made me think of swirling snow. The top mat and silhouette are embossed with the Cuttlebug Limited Edition Snowflake Folder.


Both mats and top image are popped on a prefolded 5 x 6 1/2" card base. The gorgeous snowflake is cut and embossed with the Spellbinders Create A Flake 1 and topped with an adhesive pearl. Be sure to stop by B!H! and CHNC to see the lovely examples. No much timeleft for B!H!, but you still can sneak in a card at CHNC.

Tuesday, September 13, 2011

Tiddly Inks 2 Week Art Journaling Challenge.


Better grap a cuppa, this is gonna be a long post.
Our challenge this week at Tiddly Inks is inspired by our Wow Ya Wednesday artist Kate of The Kathryn Wheel and what a challenge it is! (for me, at least) Create an art journal page (or project) inspired by the multi media style so popular now. I'll be honest. I don't have a lot of paints and sprays and that kind of stuff because I really don't like to get my hands (and everything around me) dirty. And I'm a chicken, and a perfectionist, and if I don't like something I throw it away and start over, COMPLETELY over. The philosophy here is "There are no mistakes in Art". Tell that to my waste basket. LOL So actually experimenting in a bound journal is actually quite terrifying to me. I joined the Smeared and Smudged Art Journaling Group and I lasted 3 days and NEVER posted what I did on my blog. The group was very supportive, but what was supposed to be a fun and freeing experience caused me EXTREME anxiety so I dropped out. However, armed with the fab inspiration from Kate and the various links Christy provided for us HERE, I was ready to take the plunge again.


Okay, so maybe it looks like a little dip, because my page is really not as jam packed with doodling and whatnot as I would have liked... I started by slapping gesso on the page which covered up the lines and provided a base. Then I used Distress Inks in colors I immediately didn't like (was going for a sky and grass thing because I had no idea what the page was gonna be about, or what images to use.) Note to self: have a plan first.I hated it so on went another layer of gesso which muted it all (thank GOD!) Next some Acrylic Paint Dabber in Cloudy Blue and while the gesso AND the paint were still wet, I pounced it all with bubble wrap trying to get some texture. Then I had to let it dry. Hmmm... not very patient, so I blasted it with my heat gun.


Then I pretty much just messed around. Used more bubble wrap and Distress Inks with pretty much all of the blues. Stamped a Heartfelt Creations text background stamp with Perfect Medium and dusted with Perfect Pearls in the upper right corner. So it started to look like sky, or water. Took a look at my Tiddlies and came across Whaz'Up...or Down (currently residing in the Tiddly Inks Basement for a mere $1.00! Now you know I'm more of a cat woman, but these little guys captured what I've been feeling lately. (Read the computer generated journaling. No, I was just too chicken to try and write it by hand and possibly mess up after all of this!) I colored the little guys with Distress Ink and cut them out. I also added a compass mask and some stamping also with Distress.


Then I decided I wanted clouds so I got REALLY BRAVE and slapped on some Dreamweavers Embossing paste. What I didn't read was that it was translucent. CRAP! (thought it was white) so I looked in my drawer and grabbed some Sparklyfluff, sprinkled it on, and hoped it would stick. Yea, it did, but the pic doesn't show the sparkle...bummer. My only dilemma now was the balloon strings because I was pretty sure I couldn't draw over the Sparklyfluff. Couldn't find black floss either, so I opted for wire which was not a great choice, but what's a gal to do? So anyway, here's my page and I have to admit I had FUN! No, it's far from perfect, but it's okay. Now, if you want to see perfection, check out what my teamies have done HERE. And don't forget this is a 2 week challenge so you have plenty of time to muster some courage if you're a newbie like me. You may just find your voice. There are no mistakes in art.


P.S. Christy has previewed 2 new adorable images and a FREEBIE on her blog, so have a look HERE.

Monday, September 12, 2011

BBTB2 TBBM Box Challenge


Isn't that title hilarious? I'm sure non Cricuteers are scratching their heads. Translation: This week our challenge at Bitten By The Bug2 was chosen by our fabulously talented sis, Jeri. Her pick was ony of the 3D boxes or containers from Tags, Bags, Boxes and More. Well, my fave box on that cart is the cake box. However, I had a hard time figuring out what to do with it because I had already done a vintage inspired Halloween one HERE, and also a birthday cake shoe HERE. What I didn't realize, was that I could cut it quite a bit bigger than the "fit to page" size on a 12"x12" mat, which is 9". By turning it around using DS, I could just cut it a a whopping 11". WooHoo! That is SOME slice of cake!

I used just two colors because I decided to use the trick or treaters silhouettes from A Child's Year and create a little scene around the sides of the box. They look quite vintage to me, and the paper decorations I have left from my childhood have few colors other than orange and black. I finally got to use the larger MS fence punch too.

The figures were cut at 2 1/4 " (the witch, clown and princess) and 2 1/8" (fairy, fireman, and cowboy) Some were flipped so they would all face the front of the box. To continue the scene, I punch a smaller MS Spooky Fence punch to add around the top.

"Trick or Treat"was cut from Pumpkin Carving. I added a large moon and shadow cut with my Grand Caliber and Grand Circles Nesties. The haunted house is a Tim Holtz Sizzix Bigz Die. I happen to have a Big Shot, but these can be cut in the Cuttlebug too, using the die between 2 B plates.


The box opens from the back so of course I needed to decorate that too. "Happy Haunting" is also from the Pumpkin Carving cart and the ghosts are another MS punch. I'm telling you, LOTS of treats will fit in here! Now don't fret if you don't have TBBM, because any box or treat container from any of the carts will do, as long as it is a "new" project and you mention and link to BBTB2 in your post. Now go have a look at the amazing inspiration from my DT sisters and we hope to visit you to see your take on the challenge too. BTW, although we have a new challenge every week, you have 2 weeks to complete them so our winged, drippy heart challenge HERE is still open as well.

Sunday, September 11, 2011

Macabre Monday 7 Deadly Sins Challenge


This week at Haunted Design House, our challenge is to create a project inspired by one of the 7 Deadly Sins. That would be Lust, Greed, Envy, Pride(Vanity), Sloth, Gluttony and Wrath. I was all set to do a dude having a Big Mac Attack when I realized the project I was doing for the TOFF Challenge (that I was late for) would work just famously for this challenge so I saved it. Anyway, it is my FAVE Deady Sin so...(don't laugh, just because there's snow on the roof doesn't mean there's no fire in the chimney ;D) Anyway, I used The Octopode Factory Whimsical Devil Girl and colored her with Copics and popped her with dimensionals. The background paper was done with Distress Inks and the flames behind her were stamped using the cool Distressed Stripes clear stamps from Papertrey Ink (thanks, Leah) which I squiggled up on the clear block and also stamped with Distress. I did a little journaling (a la Art Journal style, sort of) up the flames and doodled a striped border as well (because the TOFF challenge was stripes). The die cut letters are the QuicKutz Haunted Mini Alphabet cut on my Cuttlebug. The Minions are out in full force so check out the inspiration HERE, and don't forget Wretched Wednesday when Creepy Glo posts her contribution. Hope to see yours, too.

Friday, September 9, 2011

Tiddly Inks End of Summer Card


div>It's Fabulous Inky Friday which means at The Tiddly Inks Challenge Blog we highlight cards we see using Tiddly Inks images throughout blogland as well as those from the Tiddly Inkers. We also announce the winner from the previous challenge so of course you wanna go see, don't you? Although it wasn't my team's turn to do the Goodbye Summer Challenge for Tiddly Tuesday, I couldn't help but do a Fall card. It's my favorite season.


I immediately thought of the sweet Colorful World, an older image that resides in the Tiddly Inks Basement. Remember, that's your spot for things you may not find in the new Tiddly Inks Shop. Many of the images in the basement are discounted as well. WooHoo! You can snag her for a mere $2.00! She's colored with Copics, and glossy Accents added to her brush, fussy cut, then popped on a Nesties Mega Oval.


The leaves were cut and embossed with a Cuttlebug die and folder. I used the trees from the huge Harmony at Home Mega Pack for the patterned paper by resizing and printing each in a different color, using my Printmaster Platinum Program, then cutting the leaves out of the tree tops. Brushed Corduroy Distress was used to bring out the embossing.


To add a little interest, I wound a fiber through the popped leaves. I kind of thought it gave a feeling of movement and allows me to enter it in The Ribbon Carousel Anything Goes Challenge this week. Some gold adhesive beads were added for a little shine. There's still plenty of time to enter our Goodbye Summer-Hello Fall challenge so I hope to see you there and wait until you see the fabulous inspiration from our Wow Ya Wednesday Guest Kate from The Kathryn Wheel. Seriously, art journaling at it's FINEST! And pop over to Christy's Blog and see the adorable new Little Miss Sunshine image, just released Tuesday. There is always something fun going on at Tiddly Inks.


I'm also entering this in the Craft Us Crazy Autumn Colors and/or Favorite Embellishments Challenge (adhesive beads, here).

Thursday, September 8, 2011

A Super Quickie for Bah! Humbug!


Yikes! My little anniversary trip threw me all out of whack for my fave weekly challenges so here I'm am scrambling to sneak this week's Bah!Humbug! Xmas Sentiments/Text Challenge. I actually had a much more elaborate card in mind, but at this late hour, there is no way I'd be able to finish it so I pulled out my trusty Cuttlebug, embossed with the Joy and Cheer folder (that I've had FOREVER, but never used), stamped a Hero Arts sentiment with Blazing Red StazOn, cut a scalloped rectangle in the mat with my Nesties, popped them both and there ya go! Don't even know if I'm technically under the wire, VERY CAS, but it's done! I apologize for the pic. Hard to photograph when it's still dark out. LOL

Tuesday, September 6, 2011

A Special Baby Card


Well, I'm away on our anniversary trip enjoying the lovely accomodations and idyllic setting at Nick's Cove, but I do have something new to show you. I can now reveal a commissioned baby card. I've actually never done a commission before, but out of the blue, I got a phone call from the Mom of one of my followers who wanted to surprise her daughter with a card from ME! I was flattered and shocked that this sweet Mom would track me down and make her request and the date seemed soo far away (at the time) that I just couldn't refuse.

What I didn't realize is how I would feel about the huge resonsibility it is to try to capture someone else's vision and it made me pretty nervous. The nursery is done in navy (yeah, that's navy on the card, not black) and lime green with an alligator motif. I threw out about a bazillion designs before I came up with something I liked. I had pix of the bedding and stuff and I found the PERFECT alligator on Zooballoo. The baby blocks are from New Arrival and the pond and grass is from Create a Critter. It's all welded in DS to a rounded rectangle from George into a shaped front card (big surprise!) The design still bothered me until I added a banner from a Stampin'Up Treat Cone Die (the shadow for that was hand cut) with an Alpha Bead sentiment.

Inside I added another pond, directly under the one on the front, so it didn't show through when the card was closed, for writing a personal note and another teeny alligator. Isn't he cute? He's embossed with the Mesh Texture Cuttlebug folder, rather than the Tiny Mosaic that his big brother is embossed with, which seemed more to scale. The pond paper is Bo Bunny which is already textured and the blocks were embossed with Swiss Dots.

As you can see, it is FAT and required a custom envie. I often use the Crayon Box from TBBM for these which I decorated to match but I was in such a hurry to get this mailed to Louisianna that I forgot to take pix. BUMMER! I sure hope Jennifer liked it and was happy and surprised.